Article Number: 000125197
Dell KM636 Keyboard Usage and Troubleshooting Guide
Summary: This article describes the main solutions that have been identified and guidance for diagnostic on the most reported failures on wireless keyboards of the KM636 model.
Article Content
Symptoms
Affected Products:
- Dell KM636 Keyboard
The solutions provided apply to, but are not limited to, the following failures:
- Fully non-functional keyboard
- Some non-functional keys
- Low battery life
- Delay in typing
- Character repeat failure
Cause
Causes vary. Perform the recommended troubleshooting to determine the cause and solution.
Resolution
Table of Contents:
- Check that the Power Switch key is in the on position
- Check the battery charge level
- Firmware Update
- Pair (only if the firmware update performed in the previous step did not resolve the fault)
- Pairing dell keyboard and universal mouse
- Hardware Testing
- Testing with another keyboard/system
- Wireless Keyboard and Mouse Updates
- How to Clean Your Keyboard
- Related Articles
Check that the Power Switch key is in the on position:
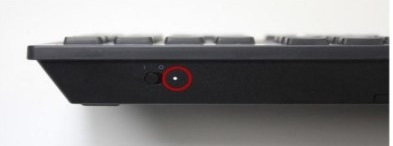
Check the battery charge level:
- If the LED is flashing orange, check the batteries, test with new batteries, or batteries of a working keyboard.
- Low batteries usually cause some keys to stop responding, most often the E, C, and Esc keys as described in article Dell KM636 Keyboard keys not functioning when the battery is low.
Firmware Update:
- Installing the Firmware Update - Follow the steps below to download and install the Wireless Keyboard firmware update:
- Select the Dell Wireless Keyboard and Mouse - KM636 from the Dell Support website > Browse All Products > Electronics and Accessories > PC and Tablet Accessories, then download the latest version of the Dell Universal receiver firmware updater from the list available in Drivers & Downloads.
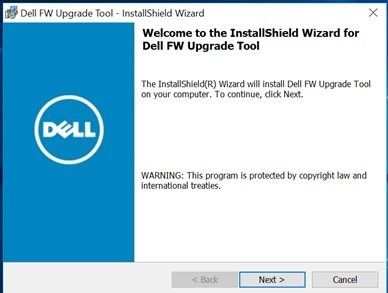
- Ensure that only one Dell Universal dongle is connected to the equipment when you are upgrading the firmware. Insert the dongle for the device that you want to upgrade, then press on the .exe file and begin the installation process.
- Press the Next button on the InstallShield Wizard screen:
- Accept the license agreement and press Next:

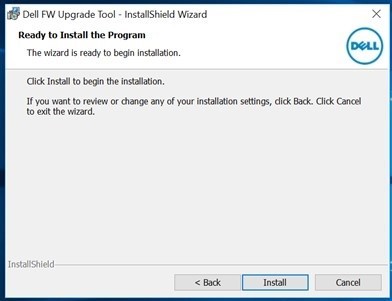
- Press Install to start the installation process, and do not remove the dongle:
- Press Finish when the InstallShield Wizard completes:

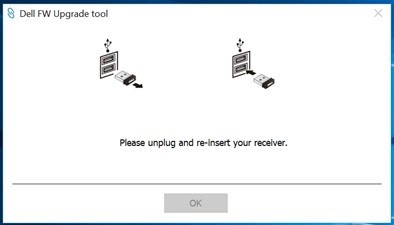
- Disconnect and reconnect the dongle according to the orientation to complete the installation:
After the firmware update, the LEDs should exhibit a new behavior.
The new behavior is:
- Once num lock, caps lock and scroll lock are pressed, the LED turns on.
- After five seconds, the LEDs will turn off to save energy.
- Pressing the keys (Num Lock, Caps Lock and Scroll Lock) disables the function without visual indication.
- Pressing again restarts the process with the LED on for five seconds.
Pair (only if the firmware update performed in the previous step did not resolve the fault):
Note: Before performing the pairing, ensure that the client does not have Dell Peripheral Manager installed and running. If yes, remove the application before Installing Dell Universal Pairing. Dell Universal Pairing does not work when Dell Peripheral Manager is installed. For more information, check the article Dell Peripheral Manager Usage and Troubleshooting.
- Go to the Mice, Keyboards and Wireless Touchpads selection page (wireless mice, keyboards, and touchpads).
- Select the keyboard or mouse model that you have.
Note: To find the model of your keyboard or mouse, look at the bottom of the keyboard or mouse, look for the model on the packaging, or reference the documentation that came with your keyboard or mouse.
- Tap or click the Driver and downloads tab.
- Tap or click Show All.
- Look for the Dell Universal Receiver Control Panel.
- Tap or download the Dell Universal Receiver Control Panel section.
- Tap or click Save or Save File when prompted.
Note: The file should be downloaded to the default downloads folder, which is probably the Downloads folder.
- Go to where the file was saved. Then double-click or tap the file. (The User Account Control window can be displayed; in this case, click Yes.)
- Tap or click Continue.
- Tap or click OK.
- Tap or click Yes and follow the instructions to install the app.
Pairing dell keyboard and universal mouse:
- Start the control panel and plug-in of the Universal USB Dell receiver.
- When paired devices already have a profile, remove the pairing by clicking the "Remove device" button.
- Tap or click Add New Device.
- Follow the instructions.
- Turn off all devices (keyboards and mouse).
- When pairing a mouse, hold down a mouse button and press the power button, hold down the mouse button for three seconds until pairing is complete.
- When pairing a keyboard, hold down a key on the keyboard and press the power button, hold down the keyboard key for three seconds until pairing is complete.
- Pairing is complete.
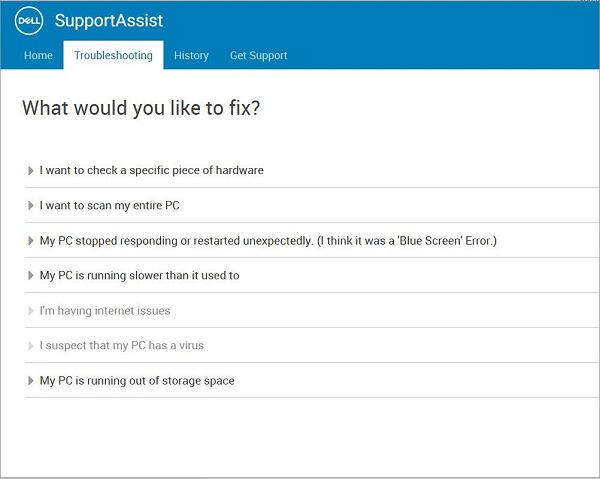
Hardware Testing:
- Run the advanced diagnostic for SupportAssist keyboards:
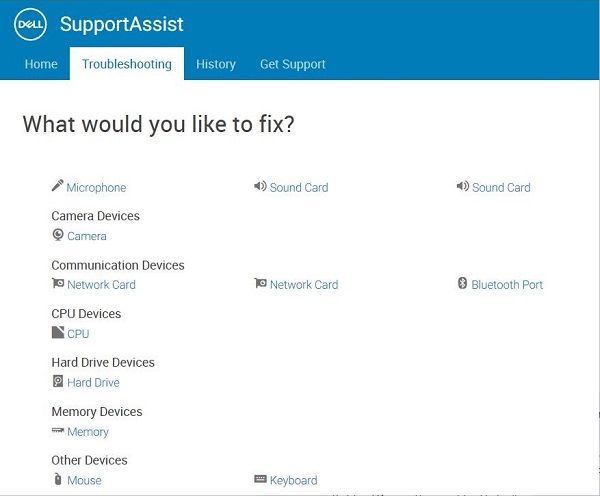
- Click the Troubleshooting tab and later select the option to check a specific hardware:
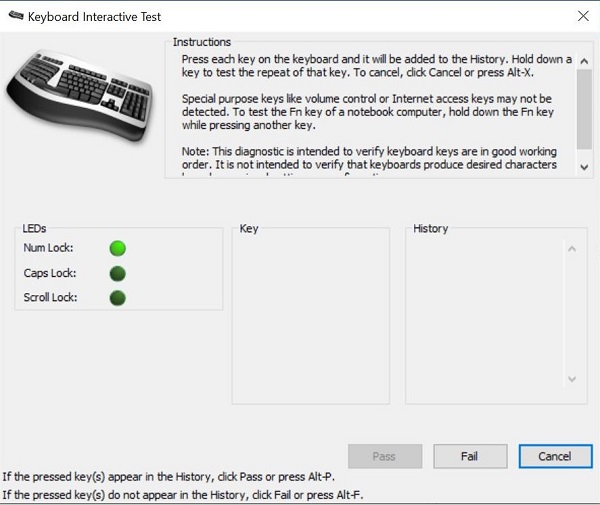
- Select your Keyboard Device:
- Press the keys on the keyboard and see if they respond:
- Click the Troubleshooting tab and later select the option to check a specific hardware:
If the customer is unable to run SupportAssist, perform tests on the BIOS and ePSA environment and checking if there is a response.
Testing with another keyboard/system:
- Ensure that the client has another keyboard and mouse available. If yes, connect the other keyboard and mouse to the device and check the functionality. Also test the keyboard with suspected failure on another computer and check the functionality. Do not forget that the receiver should continue to follow the keyboard/mouse in the tests.
Note: Persisting failure follow with dispatch to exchange the KM636 keyboard/mouse kit.
Wireless Keyboard and Mouse Updates:
Dell Technologies recommends that you update your wireless keyboard and mouse drivers, software, or firmware regularly to avoid conflicts or issues. This ensures that you have the most recent functions and features.
Note: Downloading the latest wireless keyboard and mouse driver, software, or firmware can help improve your devices connectivity, stability, and performance.
Dell Wireless Keyboard and Mouse (KM636)
How to clean your keyboard:
- Ensure that the computer is turned off.
- Disconnect the keyboard from the computer.
- When using a wired, wireless, or Bluetooth keyboard, turn the keyboard upside down and shake it gently to remove any loose material.
- Use a vacuum cleaner designed for computers, when available.
- Use a can of compressed air to remove any additional loose material when available.
Caution: Do not turn the can on its side or upside down. This causes a freezing liquid to spray out and can damage your keyboard and skin.
- Using a Microfiber or terry cloth wipe the keys and frame around the keys.
Note: When there is a build-up, take a cotton swab, microfiber towel, or terry cloth and dip it in isopropyl alcohol. It should be damp but not wet. Wipe away the build-up and let the isopropyl alcohol evaporate away before using the keyboard again.
Additional Information
Related articles:
- Dell KM636 Keyboard keys not functioning when battery is low
- Dell Wireless Keyboard KM717/KM636 no function after upgrade Dell Universal receiver firmware updater Version 1.4.1.0 A00
- Repeating Keys on Dell Wireless Keyboard and Mouse KM636 Dell Wireless Keyboard and Mouse (KM636) - how to differentiate between Logitech's Unifying and Dell's Universal pairing
- How to use the Dell Universal Pairing Dell Peripheral Manager Usage and Troubleshooting
Article Properties
Affected Product
Dell Wireless Keyboard and Mouse- KM636 (black)
Last Published Date
16 Jul 2024
Version
10
Article Type
Solution