Article Number: 000210329
VCF on VxRail: Replace NSX-T Local-Manager Self-Signed Certificate
Summary: Replace NSX-T local-manager self-signed certificate. NOTE: Only follow this KB article for VCF managed NSX-T federation environment.
Article Content
Instructions
NOTE: Only follow this KB article for VCF managed NSX-T federation environment.
Background:
We have different types of NSX-T certificates.
| Certificate Name | Purpose | Replaceable | Default Validity |
| Tomcat | This is an API certificate used for external communication with individual NSX Manager nodes through UI or API. | Yes | 825 days |
| mp-cluster | This is an API certificate used for external communication with the NSX Manager cluster using the cluster VIP, through UI or API. | Yes | 825 days |
| LocalManager | This is a platform Principal Identity certificate for Federation. If you are not using Federation, this certificate is not used. | Yes | 825 days |
For VCF solutions:
The Tomcat and mp-cluster are replaced with CA certificates signed by VMCA from vCenter. The mp-cluster and Tomcat certificates may still be there but are not being used.
NSX-T Manager with VCF:
- Tomcat - Node1 > not being used
- mp-cluster - VIP > not being used
- CA -Node1
- CA - VIP
GET https://<nsx-mgr>/api/v1/trust-management/certificates/<certificate-id>Local-manager certificate is the Principal Identity certificate used to communicate with other sites in Federation.
An NSX-T Federation environment contains an active and a standby Global Manager cluster and one or more Local Manager clusters.

Figure 1: Shows three locations with active and standby Global Manager clusters in Locations 1 and 2 with Local Manager clusters in all three locations.
To check the environment and find out how many Local Manager Clusters there are, follow the below steps and screenshot:
System > Configuration > Location Manager
- At the top of Local Manager, it shows you which cluster you are logged in on. In this example, we are logged in to a Local Manager Cluster.
- In the middle of the page, it shows the Global Manager Clusters, and which cluster is Active, and which is Standby.
- Other Local Manager Clusters are seen at the bottom under Remote Sites.

Figure 2: Local Manager Cluster Environment
Replacing local-manager self-signed certificates procedure:
- Log in to NSX Manager in the Local Manager Cluster.
- Collect NSX-T backup before proceeding. This step is very important.
- System > Lifecycle Management > Backup & Restore > Start Backup

Figure 3: Collect NSX-T Backup
- Check the certificates and expiry date.
- Click System > Settings > Certificates
Example below shows in red the expiring date of local-manager certificates.

Figure 4: Expiring Date of Local-Manager Certificates
There is one certificate per Local Manager cluster regardless of the number of NSX Managers there are within the cluster.
- Step 1: Log in to any NSX Manager on Local Manager cluster 1.
- Step 2: Generate new CSR.
- Click System > Settings > Certificates > CSRs > Generate CSR

Figure 5: Generate New CSR
-
Enter the Common Name as local-manager.
-
Enter the Name as LocalManager.
-
The rest is user business and location details (This can be copied from old expiring certificate.)
-
Click Save.

Figure 6: Enter CSR Names and Locality Information.
- Step 3: Create a Self-Signed Certificate using the Generated CSR.
-
Click the new CSR check box > Generate CSR > Self-Sign Certificate for CSR.
-
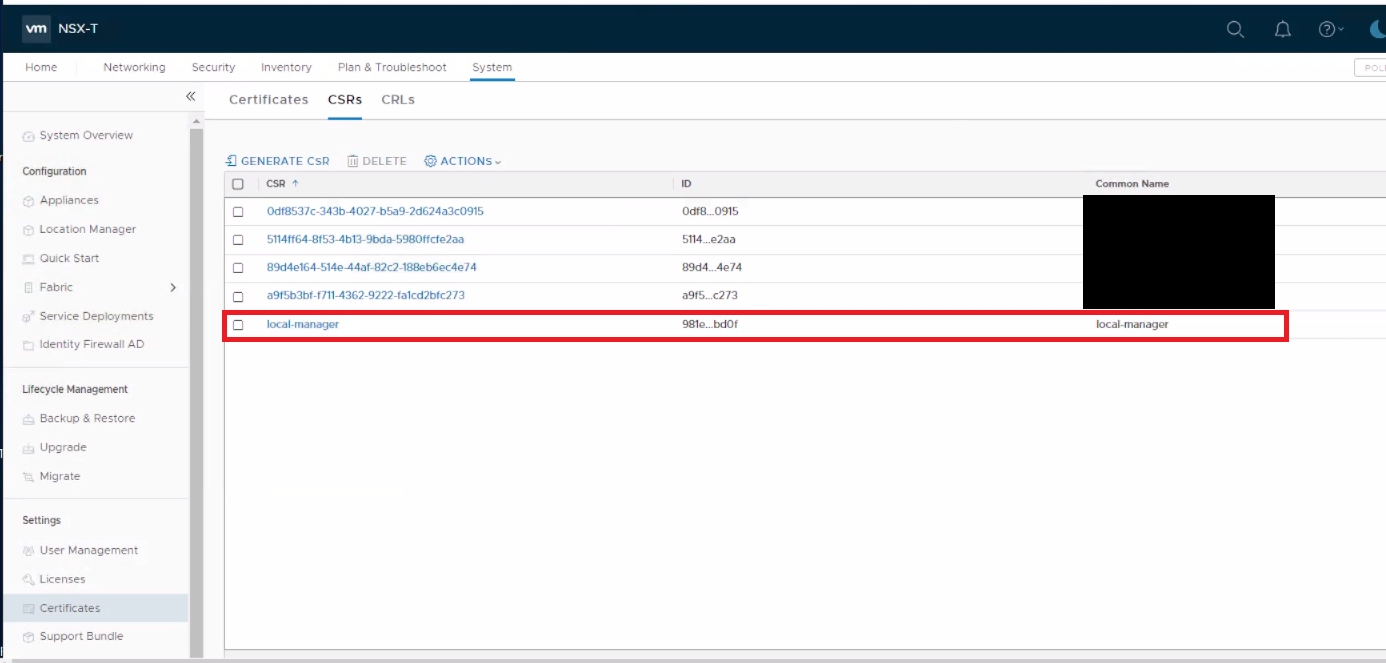
Figure 7: Create Self-Signed Certificate
- Ensure that Service Certificate is set to "No" and click Save.
- Return to Certificates tab, locate the new Certificate and copy Certificate ID.

Figure 8: Copy New Certificate ID
- Step 4: Replace the Principal Identity certificate for the Local Manager.
- User to install Postman platform.
- In the Authorization tab, select Type > Basic Auth.
- Enter NSX-T Manager login details.

Figure 9: Enter NSX-T Manager Login Details
- In the Headers tab, change "application/xml" to "application/json."

Figure 10: In Postman Change "application/xml" to "application/json"
- In the Body tab, select POST API command.
- Select raw and then select JSON.
- In the box beside POST, enter URL https://<nsx-mgr-IP-local-manager-clusterX>/api/v1/trust-management/certificates?action=set_pi_certificate_for_federation
- In the above, the URL is the IP used is for any NSX manager within a specific Local Manager Cluster.
- In the body section, enter the below in two lines as seen in the screenshot:
{ "cert_id": "<certificate id, copied from step 3>",
"service_type": "LOCAL_MANAGER" }

Figure 11: Enter URL for Any NSX Manager Within a Specific Local Manager Cluster.
- Click Send and ensure you see the result 200 OK.
- Step 5: Repeat Steps 1 > 4 on each Local Manager Cluster 2 and 3.
Once these steps are completed, you created one new certificate on each Local Manager Cluster and replaced the Principal Identity Certificate on each Local Manager Cluster.
It is now time to delete the old expiring certificates, from each of the three Local Manager Clusters.
It is now time to delete the old expiring certificates, from each of the three Local Manager Clusters.
-
Check that certificate is no longer in use.
-
Copy Certificate ID
-
Open Postman
-
Select GET API instead of POST.
-
Enter URL https://<nsx-mgr-IP-local-manager-clusterX>/api/v1/trust-management/certificates/<certificate-id>
-
Look for "used_by" and confirm it has empty brackets.
-
    "used_by" : [ ],
    "resource_type" : "certificate_self_signed",
    "id" : "9cd133ca-32fc-48a2-898b-7acd928512a5",
    "display_name" : "local-manager",
    "description" : "",
    "tags" : [ ],
    "_create_user" : "admin",
    "_create_time" : 1677468138846,
    "_last_modified_user" : "admin",
    "_last_modified_time" : 1677468138846,
    "_system_owned" : false,
    "_protection" : "NOT_PROTECTED",
    "_revision" : 0
  }
- Go to System > Settings > Certificates > select the required certificate.
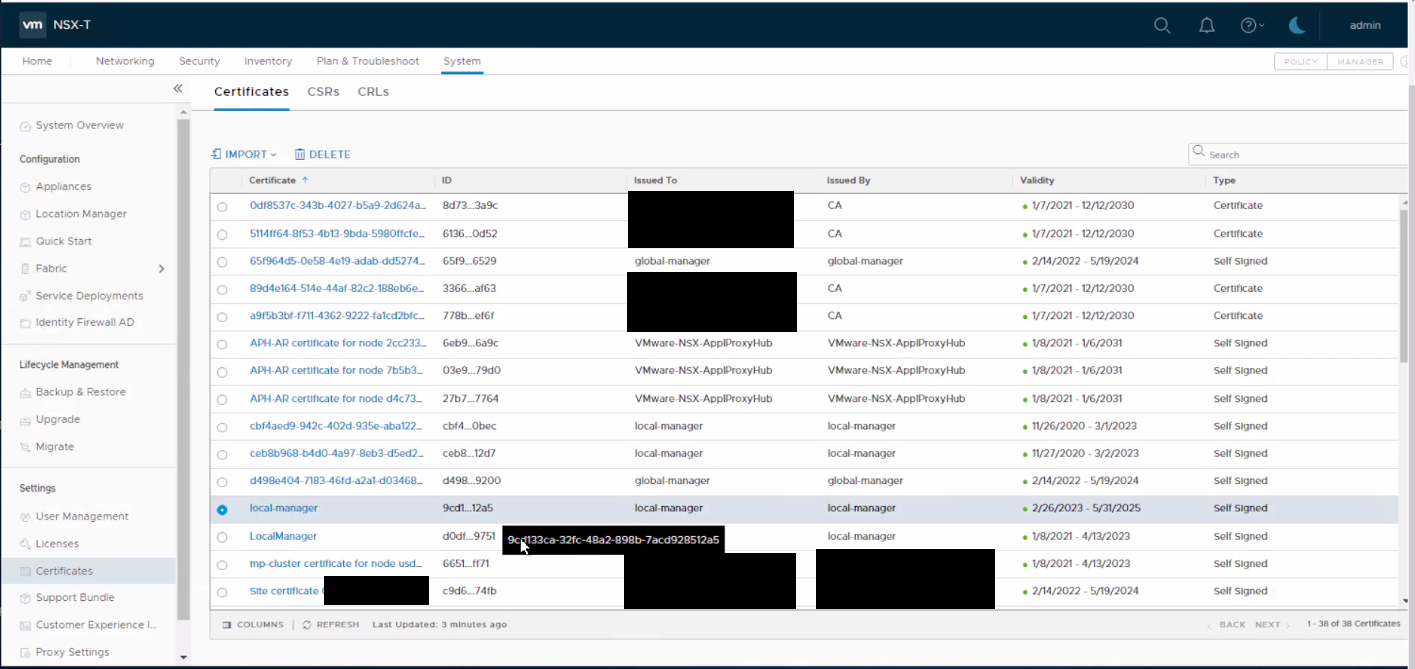
Figure 12: Select the Required Certificate.
- Click Delete > Delete.

Figure 13: Delete Certificate
- To confirm Principal Identity is working and using the new certificates:
-
Open Postman
-
Select GET.
-
Run URL https://<nsx-mgr-IP-local-manager-clusterX>/api/v1/trust-management/principal-identitie.
-
Output should be similar to the below, "certificate_id" should show the newly created certificate ID.
-

Figure 14: Certificate ID Shows the New Certificate ID
Additional Information
To replace Global Manager Certificate, follow the same process but change "LOCAL_MANAGER" to "GLOBAL_MANAGER" and perform the procedure from the Global Manager Cluster.
See VMware documents for more information:
See VMware documents for more information:
Article Properties
Affected Product
VMWare Cloud on Dell EMC VxRail E560F, VMWare Cloud on Dell EMC VxRail E560N, VxRail Appliance Family, VxRail Appliance Series, VxRail D Series Nodes, VxRail D560, VxRail D560F, VxRail E Series Nodes, VxRail E460, VxRail E560
Product
VxRail G410, VxRail G Series Nodes, VxRail E560 VCF, VxRail E560F, VxRail E560F VCF, VxRail E560N, VxRail E560N VCF, VxRail E660, VxRail E660F, VxRail E660N, VxRail E665, VxRail E665F, VxRail E665N, VxRail G560, VxRail G560 VCF, VxRail G560F
, VxRail G560F VCF, VxRail Gen2 Hardware, VxRail P Series Nodes, VxRail P470, VxRail P570, VxRail P570 VCF, VxRail P570F, VxRail P570F VCF, VxRail P580N, VxRail P580N VCF, VXRAIL P670F, VxRail P670N, VxRail P675F, VxRail P675N, VxRail S Series Nodes, VxRail S470, VxRail S570, VxRail S570 VCF, VxRail S670, VxRail Software, VxRail V Series Nodes, VxRail V470, VxRail V570, VxRail V570 VCF, VxRail V570F, VxRail V570F VCF, VXRAIL V670F, VxRail VD-4000R, VxRail VD-4000W, VxRail VD-4000Z, VxRail VD-4510C, VxRail VD-4520C, VxRail VD Series Nodes
...
Last Published Date
27 Apr 2023
Version
2
Article Type
How To