Troubleshooting the Dell S2340T Monitor
Summary: This article offers guidance for troubleshooting issues with the Dell S2340T monitor.
This article applies to
This article does not apply to
Symptoms
Guide for troubleshooting issues with the Dell S2340T monitor.
Cause
Dell S2340T monitor
Resolution
Table of Contents
- Using the Monitor Self-Test
- Using the Built-In Diagnostics
- Touch Screen Performance
- Audio Performance
- Network Connectivity
- Common Monitor Issues
- Product Specific Issues
- USB Connectivity
Using the Monitor Self-Test
The monitor provides a self-test feature that allows you to check whether your monitor is functioning properly. If your monitor and computer are properly connected but the monitor screen remains dark, run the monitor self-test by performing the following steps:
- Turn off both the computer and the monitor.
- Unplug the video cable from the back of the monitor. To ensure proper Self-Test operation, remove all digital (white connector) and analog (blue connector) cables from the back of the computer.
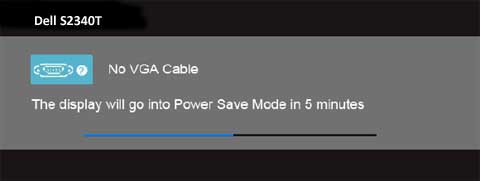
- Turn on the monitor. The floating dialog box would appear on-screen if the monitor cannot sense a video signal but is working properly.
- This box will also appear during normal system operation if the video cable becomes disconnected or damaged.
If the monitor continues to be blank after verifying that the self-test works, the problem must be the video cable, the video adapter in the computer, or the computer itself.
- Turn off your monitor and re-connect the video cable, then turn on both your computer and the monitor.
Using the Built-In Diagnostics
- Make sure the screen is clean of dust and debris.
- Unplug the video cables from the back of the computer or monitor. The monitor should go into self-test mode.
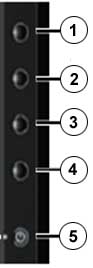
- Press and hold Button 1 and Button 4 simultaneously for 2 seconds (Figure 2). A gray screen should appear.
The test is complete when the text screen appears. To exit, press Button 4 again. If you do not detect any screen abnormalities using the built-in diagnostic tool, the monitor is functioning properly. Check the video display adapter and the computer if problems persist.
- Carefully inspect the screen for abnormalities.
- Press Button 4 on the front panel again. The color of the screen should change to red.
- Inspect the screen for abnormalities.
- Repeat steps 5 and 6 to inspect the display in green, blue, black, white, and text screens.
Touch Screen Performance
Note: To use the monitor's touchscreen capabilities, you must have the Displaylink software installed and have the monitor connected to your computer properly.
You may notice the following with the monitor:
- Touch screen does not respond to touches.
- Cursor does not accurately follow your finger when you touch the screen.
- Cursor moves erratically.
- The USB cable connects the computer to the monitor.
- Your computer should support USB 2.0 or 3.0 technology.
- Turn off the monitor and disconnect the AC adapter from the base, then reconnect the AC adapter and turn the monitor back on. If this does not help, try restarting the computer, as well.
- The Displaylink software has been installed on the computer.
- Make sure nothing is blocking the optics of the touch screen. Notes or other objects overlapping the edges or foreign substances on the screen can interfere with the touch-sensing capability.
- Remove gloves if you are wearing them.
- Dry your hands if they are wet.
- Move metal objects and conductive items away from the screen.
- Clean the screen surface.
- Go to the Windows Control Panel and select Tablet PC Settings.
- On the Display tab click Calibrate.
- Follow the instructions to calibrate the screen.
- You may choose to save the calibration date.
Audio Performance
If you are experiencing problems with audio through the S2340T monitor:
- Make sure all cables are well connected including the USB cables and/or any other video cable you are using.
- Check the configuration of your computer's audio and make sure it is on and the volume is up.
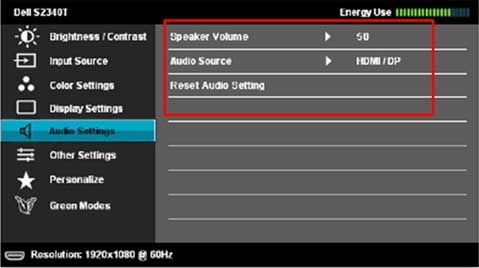
- Check the On-Screen Display (OSD) menu on the monitor and check the Audio Settings (Figure 3) to make sure you have the correct Audio Source (eg. HDMI/DP or USB).
- Make sure the audio output source on the computer and the audio input source on the monitor match.
- Make sure the volume control setting is up high enough to hear computer audio.
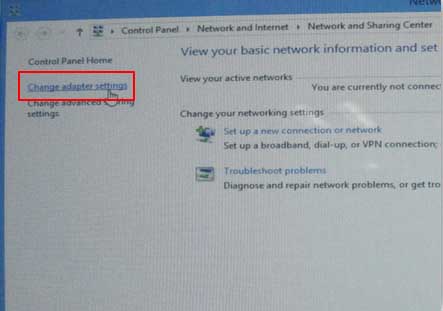
Network Connectivity
If the monitor is unable to connect to the network to support your computer:
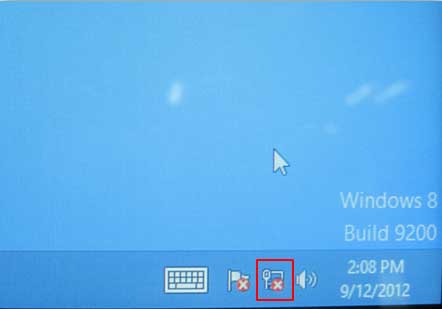
- Right-click on the network status icon in the system tray and choose the second option (Figure 4).
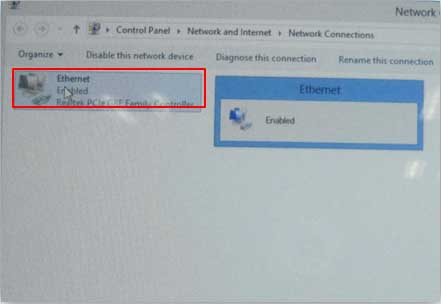
- Click Change adapter settings (Figure 5).
Note: Make sure the Displaylink software is installed correctly in your computer.
- Double-click the Ethernet icon (Figure 6).
Common Monitor Issues
| Common Symptoms | What You Experience | Possible Solutions |
|---|---|---|
| No Video/Power LED Off | No Picture |
|
| No Video/Power LED On | No picture or no brightness |
|
| Poor Focus | Picture is fuzzy, blurry or ghosting |
|
| Shaky/Jittery Video | Wavy picture or fine movement |
|
| Missing Pixels | LCD screen has spots |
|
| Stuck-on Pixels | LCD screen has bright spots |
|
| Brightness Problems | Picture too dim or too bright |
|
| Geometric Distortion | Screen is not centered correctly |
Note: When using DVI-D or HDMI input, the positioning adjustments are not available
|
| Horizontal/Vertical Lines | Screen has one or more lines |
Note: When using the DVI-D or HDMI input, the Pixel Clock and Phase adjustments are not available.
|
| Synchronization Problems | Screen is scrambled or appears torn |
|
| Safety Related Issues | Visible signs of smoke or sparks |
|
| Intermittent Problems | Monitor malfunctions on and off |
|
| Missing Color | The picture is missing a color |
|
| Wrong Color | Picture has incorrect colors |
|
| Image Retention from a Static Image left on the screen | Faint shadow from the static image is visible on the screen |
|
Back to Top
Product Specific Issues
| Specific Symptoms | What You Experience | Possible Solutions |
|---|---|---|
| Screen Image is too small | Image is centered on the screen but does not fill the viewing area. |
|
| Cannot Adjust the Monitor with the Buttons on the Front Panel | OSD menus do not appear on the screen. |
|
| No Input Signal when User Controls are pressed | No picture, the LED is bright blue |
|
| The Picture does not fill the entire screen | The picture does not fill the height or width of the screen |
|
USB Connectivity
| Specific Symptoms | What You Experience | Possible Solutions |
|---|---|---|
| USB Interface is not working | USB peripherals plugged into the monitor do not work. |
|
| High-Speed USB 2.0 interface is slow | High-Speed USB 2.0 peripherals are working slowly or not working at all. |
|
Back to Top
Affected Products
Dell S2340TArticle Properties
Article Number: 000145337
Article Type: Solution
Last Modified: 12 Aug 2024
Version: 7
Find answers to your questions from other Dell users
Support Services
Check if your device is covered by Support Services.