C7520QT Troubleshooting Guide
Summary: Various information for troubleshooting on the C7520QT display.
Symptoms
No symptom information is available.
Cause
No cause information is available.
Resolution
Table of Contents:
- Accessing the Touch OSD Menu
- Wake on Touch (Default OFF) - Standby Power
- Locking the Touch OSD
- Unlocking the Touch OSD
- Sluggish or Erratic Touch Response
- Input Sources and USB Pairing
- No Response from Remote Control
- Locating Service Tag for the Monitor
- Locating Firmware Version for the Monitor
- Built-in Diagnostics
- Sparkle Effect on Screen
- Dell Web Management
- Does this Monitor Ship with DisplayNote Software?
- Handling the Monitor
- Remote Management through RS232
Accessing the Touch OSD Menu
The C7520QT monitor comes with a Touch OSD (On-Screen Display).
To access the OSD Menu, press the OSD Touch key - located just above the Dell logo (Figure 1).

Figure 1
Wake on Touch (Default OFF) - Standby Power
When the monitor is in Sleep mode, touching the monitor screen does not wake the monitor.
The Wake On Touch feature on the monitor is Off by default. To enable this feature (Figure 2):
- On the OSD Menu, go to Personalize.
- Select and Enable Wake On Touch.
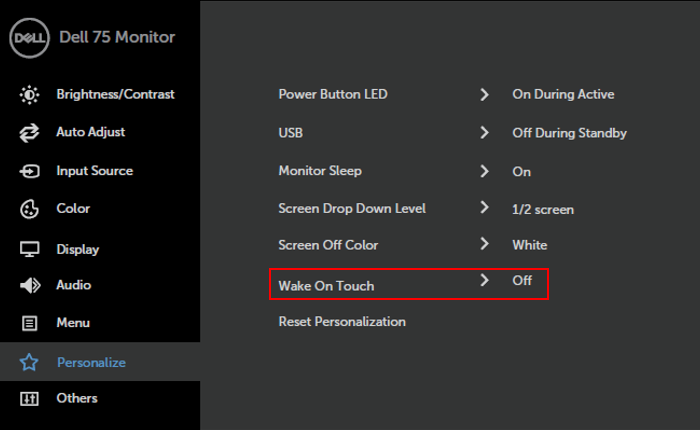
Figure 2
Locking the Touch OSD
The monitor comes with an OSD Lock function that prevents unintentional triggering of the OSD Menu. This OSD lock feature is available on firmware version M2T101 and higher.
To lock the touch OSD.
- Press the OSD launcher touch key. Touch and hold X (Key #7) for 5 seconds (Figure 3).

Figure 3
- You see the following select option. Select the lock accordingly (Figure 4 & 5).
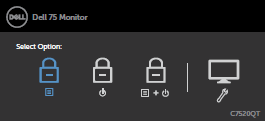
Figure 4
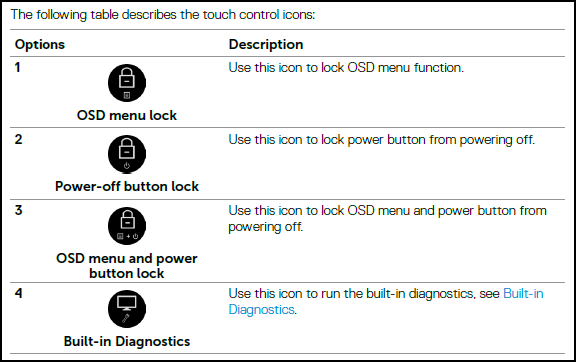
Figure 5
Unlocking the Touch OSD
To unlock the Touch OSD after OSD lock has been set.
To unlock the touch OSD.
- Press the OSD launcher touch key.
- Touch and hold X for 5 seconds, touch the Unlock Icon to unlock (Figure 6).
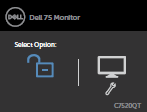
Figure 6
Sluggish or Erratic Touch Response
The cursor does not accurately follow your finger or stylus when you touch the screen.
Perform one or more of the following:
- Proper Cables:
- Ensure that the proper USB Uplink cable is connected from system to monitor.
- Use 60 Hz Resolution:
- If you are using a 30Hz resolution, switch to a 60Hz resolution.
- Enter Windows Control Panel -> Display -> Screen Resolution -> Advanced Settings -> Monitor -> Choose 60 Hz
- 60 Hz resolution may not appear as an option if your system graphics or hardware does not support 60 Hz with your existing video connection. Lower your screen resolution or use a different Video Connection (for example Use DisplayPort).
- Recalibrate the Screen:
- Enter Windows Control Panel to choose Tablet PC Settings.
- Select Calibration.
- Follow the instructions on the screen to Re-Calibrate your screen.
Input Sources and USB Pairing
To ensure that your Input Source is correctly paired to the right USB Upstream port. If the Input-USB pairing is not done properly (for example HDMI 1 with USB Upstream 2), you cannot access your USB port.
See the following Input Source and USB Upstream pairing table for proper pairing (Figure 7).
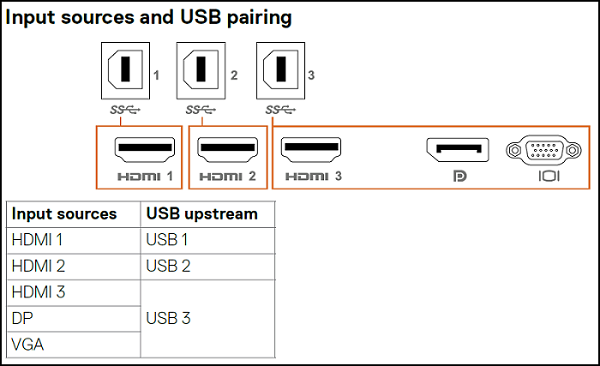
Figure 7
No Response from Remote Control
Remote control does not work.
- Check to ensure that batteries are properly installed.
- The remote control sensor is located on the Lower Right bezel of the display. Point your remote control to the sensor during use (Figure 8).
- Use the remote control within a distance of 8m from the remote control sensor or at a horizontal and vertical angle of within 15 degrees with a distance of 5.6m.
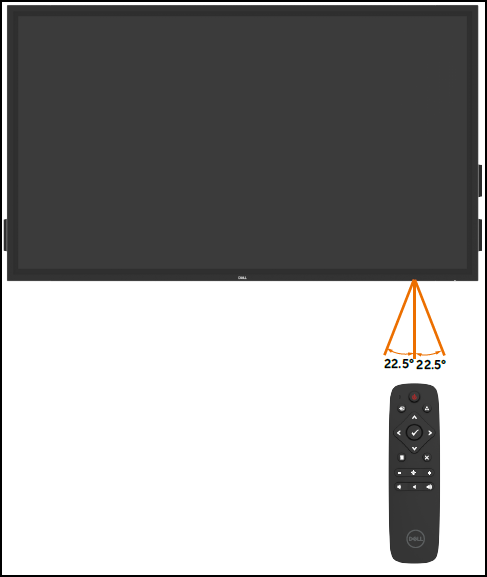
Figure 8
Locating Service Tag for the Monitor
The monitor Service Tag can be found in the following:
- Printed label on the rear (near the power input) and side (under the video interface ports) of the monitor.
- On the OSD Menu, go to Others (Figure 9).
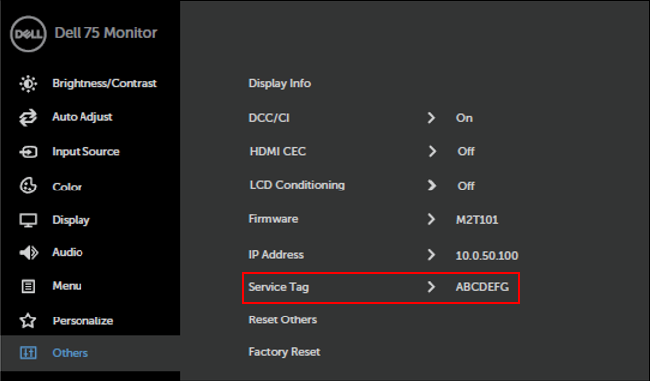
Figure 9
Locating Firmware Version for the Monitor
On the OSD menu, go to Others (Figure 10).
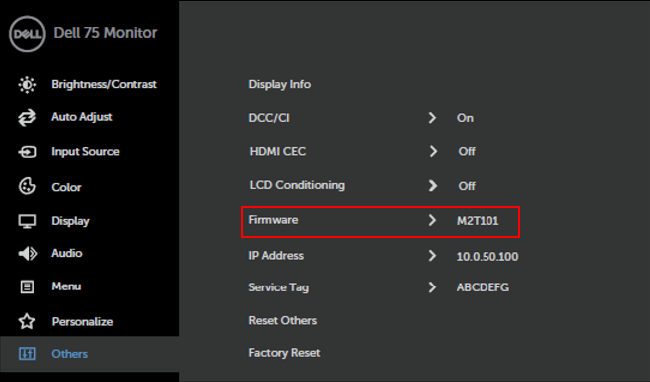
Figure 10
Built-in Diagnostics
The monitor has a built-in diagnostic tool that helps you determine if the screen abnormality you are experiencing is an inherent problem with your display, or with your computer and video card.
To run the built-in diagnostics:
- Unplug the video cables from the back of the computer or display. The display then goes into self-test mode.
- On the OSD Menu, touch and hold X (key #7) for 5 seconds (Figure 11).

Figure 11
- Touch the self-inspection icon. A gray screen appears (Figure 12).
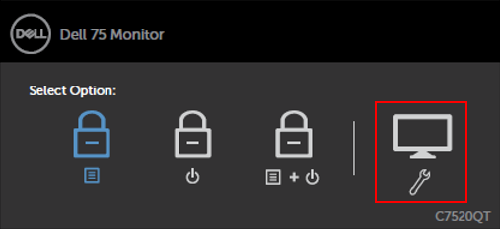
Figure 12
- Inspect the screen for abnormalities.
- Touching the front panel changes the color to red, green, blue, black, white, and text.
If you do not detect any screen abnormalities upon using the build-in diagnostic tool, the display is functioning properly. Check the video card or computer.
Back to TopSparkle Effect on Screen
The monitor screen is coated with anti-glare & anti-finger print to provide the user with the best possible screen performance. Due to this coating, the screen may appear to have some sparkle effect. This is normal behavior.
This is not a defect.
Back to TopDell Web Management
The Dell Web Management function is OFF by default.
To access Dell Web Manager:
- Ensure that the Ethernet is working.
- On the OSD menu, touch and hold key #5 for 4 seconds to enable Web Management on the monitor. A network icon appears on the Top-Left corner for 4 seconds (Figure 13).

Figure 13
- To access the Dell Web Management tool, you must set the IP address for your computer and the display.
- On the OSD menu, go to Others and look for IP Address.
Note: By default, the IP Address is 10.0.50.100 (Figure 14).

Figure 14
Does this Monitor Ship with DisplayNote Software?
No this monitor does not ship with DisplayNote software.
Back to TopHandling the Monitor
The C7520QT is a high precision touch enabled monitor. To following these instructions when handling and using the monitor.
- Always handle and use your monitor in an upright position (Figure 15).
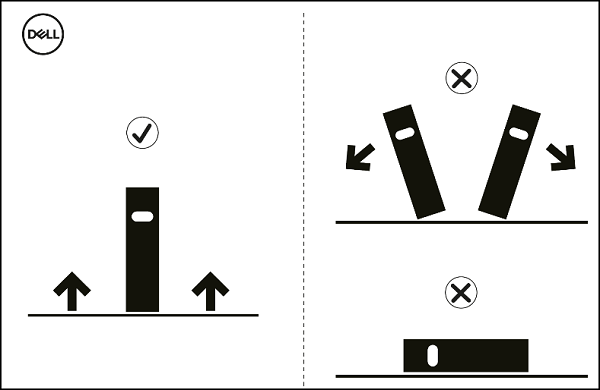
Figure 15
- Always set-up the mounting brackets using the original carton base to hold the monitor upright.
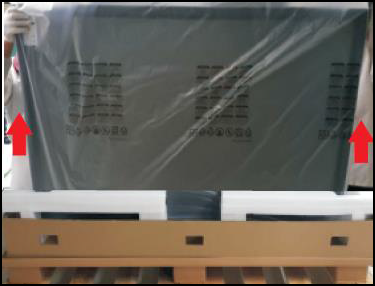
Figure 16
Remote Management through RS232
The C7520QT supports remote management and control through the RS232 connector.
All RS232 commands need to be in accordance to the C7520QT RS232 Protocol guide.
Go to Dell.com/C7520QT to download a copy of the C7520QT RS232 Protocol Document.