Dell C8621QT Monitor Troubleshooting Guide
Summary: This article contains general information about the Dell C8621QT monitor.
This article applies to
This article does not apply to
This article is not tied to any specific product.
Not all product versions are identified in this article.
Symptoms
No symptom information is available.
Cause
No cause information is available.
Resolution
Table of Contents:
- Accessing the Touch OSD Menu
- Wake on Touch (Default OFF) - Standby Power
- Locking the Touch OSD
- Unlocking the Touch OSD
- Sluggish or Erratic Touch Response
- Input Sources and USB Pairing
- No Response from Remote Control
- Locating Service Tag for the Monitor
- Locating Firmware Version for the Monitor
- Built-in Diagnostics
- Sparkle Effect on Screen
- Dell Web Management
- Remote Management through RS232
- Does this Monitor Ship with DisplayNote Software?
- Using Whiteboard on C8621QT
- Replacing the Stylus Pen Nib
- Use the USB-C Cable with Cable Clip
- Display Orientation
- OptiPlex Holder
- Handling the Monitor
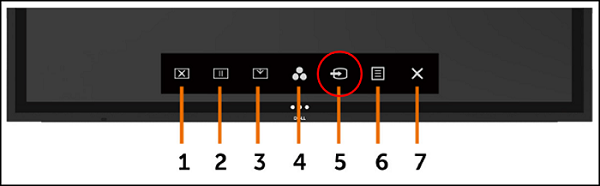
Accessing the Touch OSD Menu
The C8621QT monitor comes with a Touch OnScreen Display (OSD).
To access the OSD Menu, press the OSD Touch key - located above the Dell logo.

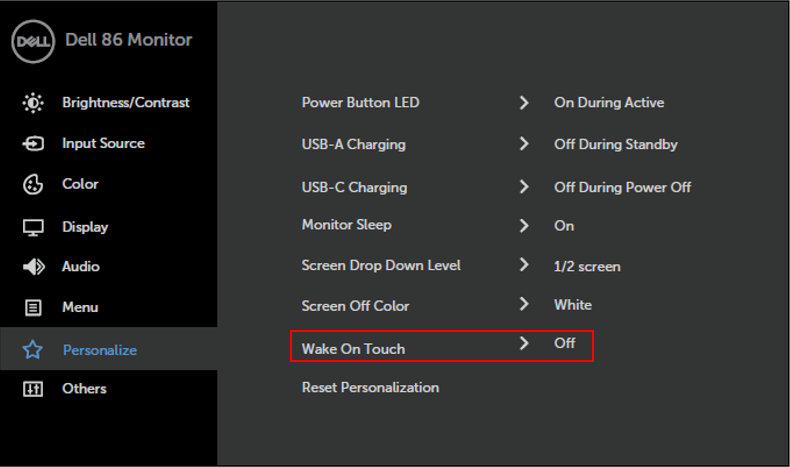
Wake on Touch (Default OFF) - Standby Power
When the monitor is in Sleep mode, touching the monitor screen does not wake the monitor.
The Wake On Touch feature on the monitor is Off by default. To enable this feature:
- Ensure that your PC supports USB Remote Wakeup, and the "Allow this device to wake the computer" option is selected.
- On the monitor, go to monitor OSD Menu > Personalize > Enable Wake on Touch
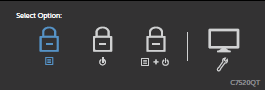
Locking the Touch OSD
The monitor comes with an OSD Lock function that prevents unintentional triggering of the OSD Menu.
To lock the touch OSD.
- Press the OSD launcher touch key.

- Touch and hold X (key #7) for 5 seconds. You get the following select options. Select the lock accordingly.
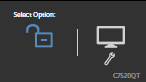
Unlocking the Touch OSD
To unlock the Touch OSD after OSD lock has been set.
To unlock the touch OSD.
- Press the OSD launcher touch key.
- Touch and hold X for 5 seconds, touch the Unlock Icon to unlock.
Sluggish or Erratic Touch Response
The cursor does not accurately follow your finger or stylus when you touch the screen.
Perform one or more of the following:
- Proper Cables:
- Ensure that the proper USB Uplink cable is connected from system to monitor.
- Use 60 Hz Resolution:
- If you are using a 30 Hz resolution, switch to a 60 Hz resolution.
- Enter Windows Control Panel -> Display -> Screen Resolution -> Advanced Settings -> Monitor -> Choose 60 Hz
- 60 Hz resolution may not appear as an option if your system graphics or hardware does not support 60 Hz with your existing video connection. Lower your screen resolution or use a different Video Connection (e.g. Use DisplayPort).
- Recalibrate the Screen:
- Enter Windows Control Panel to choose Tablet PC Settings.
- Select Calibration.
- Follow the instructions on the screen to Re-Calibrate your screen.
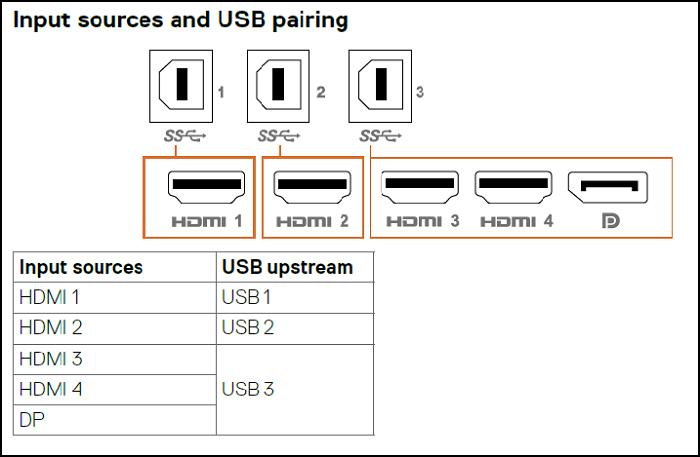
Input Sources and USB Pairing
To ensure that your Input Source is correctly paired to the right USB Upstream port. If the Input-USB pairing is not done properly (e.g. HDMI 1 with USB Upstream 2), you cannot access your USB port.
See the following Input Source and USB Upstream pairing table for proper pairing.
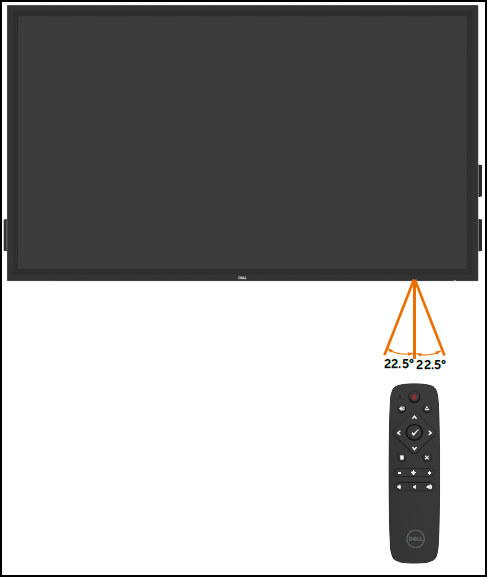
No Response from Remote Control
Remote control does not work.
- Check to ensure that the batteries are properly installed.
- The remote control sensor is on the Lower Right bezel of the display. Point your remote control to the sensor during use.
- Use the remote control within a distance of 7 m from the remote control sensor or at a horizontal and vertical angle of within 22.5' degrees.
Locating Service Tag for the Monitor
The monitor Service Tag can be found in the following:
- Printed label on the rear (near the power input) and side (under the video interface ports) of the monitor.
- Monitor OSD Menu > Others > Service Tag.

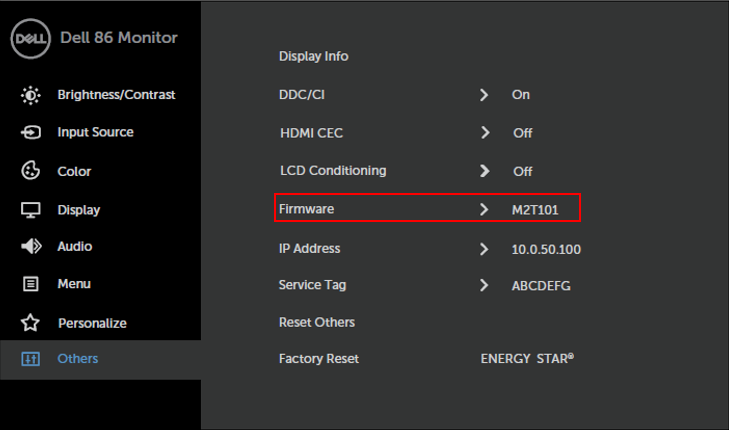
Locating Firmware Version for the Monitor
Monitor OSD Menu > Others > Firmware.
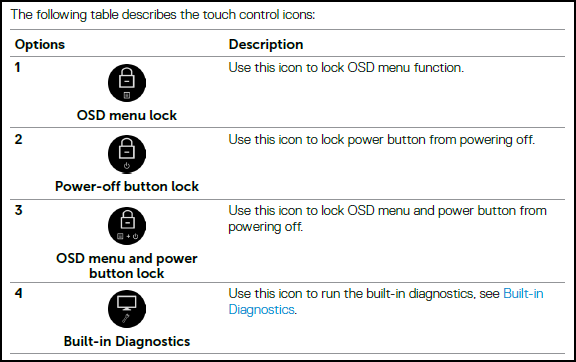
Built-in Diagnostics
The monitor has a built-in diagnostic tool that helps you determine if the screen abnormality you are experiencing is an inherent problem with your display, or with your computer and video card.
To run the built-in diagnostics:
- Unplug the video cables from the back of the computer or display. The display then goes into self-test mode.
- On the OSD Menu, touch and hold X (key #7) for 5 seconds.
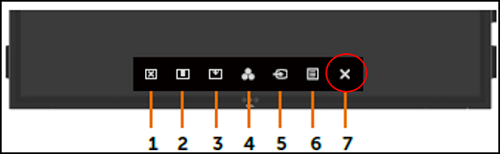
- Touch the self-inspection icon. A gray screen appears.

- Inspect the screen for abnormalities.
- Touching the front panel changes the color to red, green, blue, black, white, and text.
- The test is is completed when the text screen appears. To exit, touch the panel again.
If you do not detect any screen abnormalities upon using the build-in diagnostic tool, the display is functioning properly. Check the video card or computer.
Sparkle Effect on Screen
The monitor screen is coated with anti-glare, and anti-finger print to provide the user with the best possible screen performance. Due to this coating, the screen may appear to have some sparkle effect. This is normal behavior.
This is the normal behavior of the anti-glare and anti-finger print coating.
Dell Web Management
The Dell Web Management function is OFF by default.
To access Dell Web Manager:
- Ensure that the Ethernet is working.
- On the OSD menu, touch and hold key #5 for 4 seconds to enable Web Management on the monitor. A network icon appears on the Top-Left corner for 4 seconds.
- To access the Dell Web Management tool, you must set the IP address for your computer and the display.
- On the OSD menu, go to Others and look for IP Address.
Note: By default, the IP Address is 10.0.50.100. For Dell Web Management setup information, please see the C8621QT User's Guide.

Remote Management through RS232
The C8621QT supports remote management and control through the RS232 connector.
All RS232 commands need to be in accordance to the C8621QT External Control Guide.
External Control Guide. Go to Dell.com/C8621QT to download the External Control Guide document.
For Remote Management using RS232, make sure that the monitor's Ethernet mode is Disabled.
To Disable Ethernet mode:
On the OSD menu, touch and hold key #5 for 4 seconds. If you see a crossed-out network icon, it means that Ethernet mode is Disabled.
Note: If you see a network icon (not crossed out), exit the OSD menu and repeat the above instructions to disable Ethernet mode.

Does this Monitor Ship with DisplayNote Software?
No this monitor does not ship with DisplayNote software.
Using Whiteboard on C8621QT
Install software with whiteboard capability to use the monitor as a whiteboard.
You may install the Flatfrog Board software to use your monitor as a whiteboard.
- Go to Flatfrog.com/Dell
- Follow the instructions on the webpage to download and install.
- To active Board software:
- Connect your PC to the monitor.
- Ensure that both the video and USB upstream cables are connected.
For support, contact Support@Flatfrog.com.
Replacing the Stylus Pen Nib
The C8621QT monitor ships with 2 x Stylus Pens and 2 x Stylus Pen Nibs as spares.
The spare Stylus Pen Nibs can be found in the accessory packing box (together with the Stylus, Remote Control, Cables etc.).
You may replace the Stylus Pen Nib when it shows signs of wear and tear.
To replace, simply unscrew the Stylus Pen Nib and replace with a spare Nib.
Stylus Pen Nib
Unscrew the Styles Pen Nib and replace with a new nib.
Use the USB-C Cable with Cable Clip
If you are connecting a USB-C cable on the monitor, use the USB-C cable securing clip to prevent accidental dislodge of the cable USB-C port.
The USB-C cable clip is located near the USB-C port. When using a USB-C cable, secure the cable with the clip .
Display Orientation
The C8621QT monitor can be used on a landscape orientation and upright at 90 degrees.
See the C8621QT Quick Start Guide.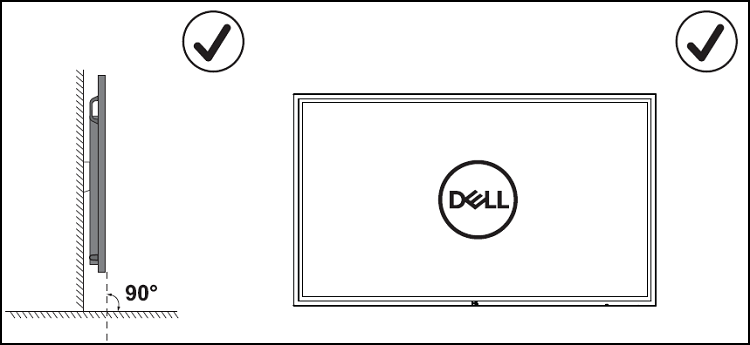
OptiPlex Holder
The OptiPlex Holder is an enclosure for holding the OptiPlex PC at the rear of the monitor.
This holder, which is shipped with every C8621QT monitor, is not preinstalled on the monitor.
Remove the OptiPlex Holder from the carton box.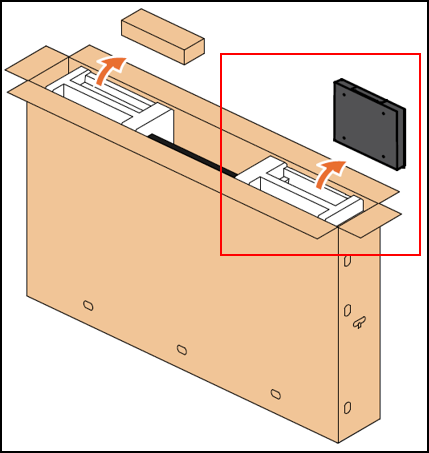
Insert the OptiPlex Holder into the empty slot at the rear of the monitor.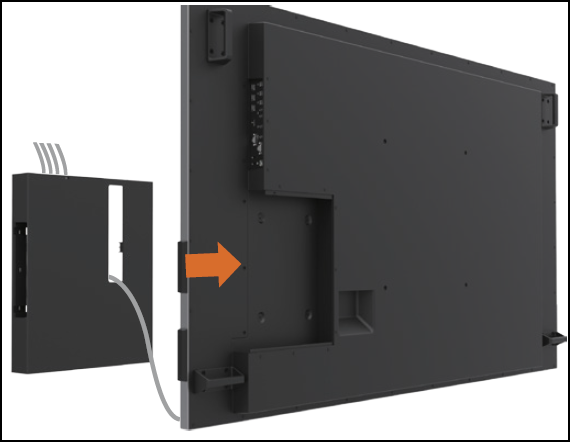
Handling the Monitor
The C8621QT is a high precision touch enabled monitor. Following these instructions when handling and using the monitor are important.
- Always handle and use your monitor in an upright position.
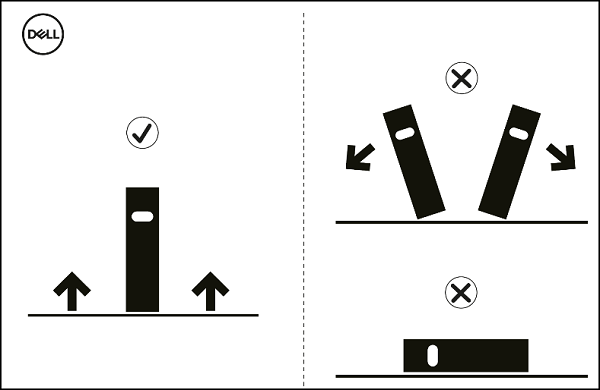
- Always set up the mounting brackets using the original carton base to hold the monitor upright.
Affected Products
Dell C8621QTArticle Properties
Article Number: 000132368
Article Type: Solution
Last Modified: 24 Sep 2024
Version: 4
Find answers to your questions from other Dell users
Support Services
Check if your device is covered by Support Services.