Management and Configuration of RAID Arrays on LSI MegaRAID 9361-8i, 9440, 9460, and 9341 RAID Controllers
摘要: This article provides instructions for the management and configuration of RAID arrays on a LSI MegaRAID 9361-8i, 9440, 9460, and 9341 RAID Controllers
症状
Table of Contents:
- Overview
- Accessing the RAID controller
- Creating a RAID volume
- Verifying Your RAID Configuration
- Delete ALL RAID Arrays
- Delete a Single RAID Array
- RAID Consistency Check
原因
Overview
This article will document the steps required to manage your LSI MegaRAID 9361-8i, 9440, 9460, and 9341 RAID Controllers RAID controller in the Unified Extensible Firmware Interface (UEFI) configuration of your Dell system.
解决方案
Accessing the RAID controller
When you start your system, Slowly tap the F12 key until you see a message: "Entering the one time boot configuration" message in the upper right corner of the screen. Use the arrow keys to select "Device Configuration" option, then press the Enter key.
This will open the system setup UEFI configuration options for your LSI MegaRAID RAID controller. (Figure 1a):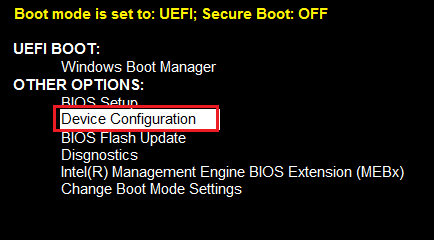
Figure 1a. - Entering the Device Configuration Menu
On some systems, it may be necessary to click the arrow button in the upper right corner of the BIOS screen as shown in the image below to access the configuration menu (Figure 1b):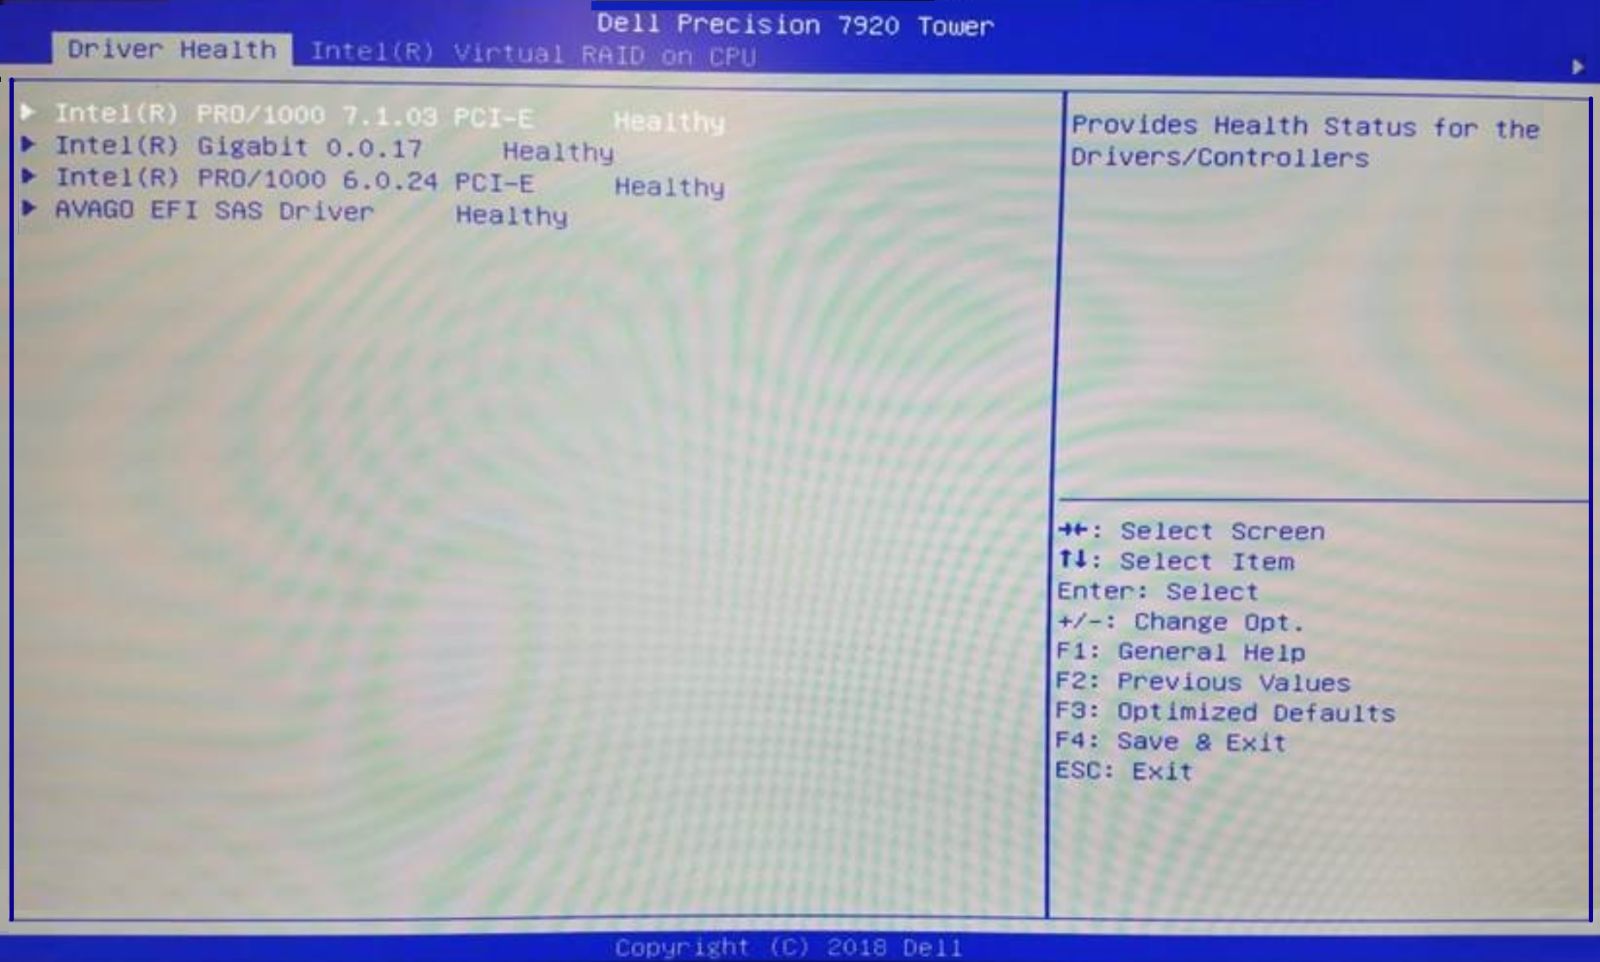
Figure 1b. - Entering the Device Configuration Menu
Top of the Page
Creating a RAID volume
On the LSI MegaRAID RAID controller main configuration screen :
- Select the "Configuration Management" option and press the Enter key. (Figure 2)
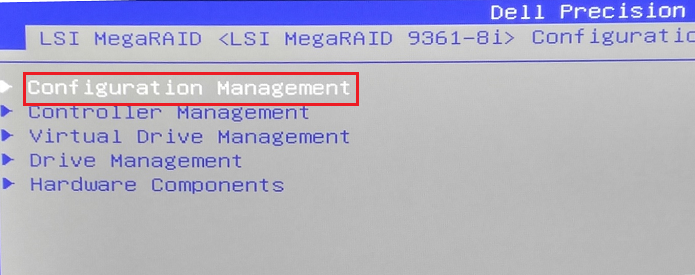
Figure 2. - Selection of Configuration Management Menu
- Select "Create Virtual Drive" and press the Enter key. (Figure 3)

Figure 3. - Selection of Create Virtual Drive Menu
- Use the Up/Down arrows and select the section "Select RAID Level" and press the Enter key. (Figure 4)

Figure 4. - Select RAID Level
- Use the Up/Down arrow and choose Your RAID Configuration and press the Enter key. For the example we will use RAID 1.
Note: When only 2 drives installed you only the options for RAID 0 and RAID 1 are available. Systems configured with 3 or 4 Drives will also display options for RAID 5 and RAID 10
- Use the Up/Down arrow and select "Select Drives" and press the Enter key. (Figure 6)

Figure 6. - Select Drives option
- Use the Up/Down arrow and select a drive that you want in your RAID configuration. (Figure 7)
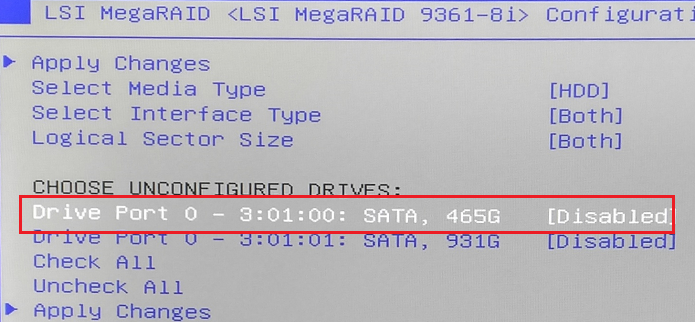
Figure 7. - Selecting a drive
- Press the Enter key and then use the Up/Down arrow to the "Enable" option and then press the Enter key again. (Figure 8)

Figure 8. - Enabling the drive
- Repeat steps 5, 6, & 7 to add and then enable second drive to the array.
- Use the Up/Down arrows to select "Apply Changes" and press the Enter key. (Figure 9)
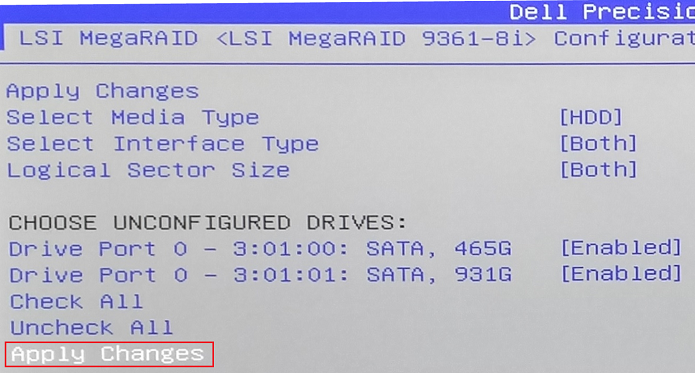
Figure 9. - Applying changes to the array
- The next screen begins a 3-step process to agree to the configuration changes. This is required because applying this change results in 100% data destruction of any data currently on the drives. Select the "Confirm" option, press the Enter key. Then use the Up/Down arrows to select "Enabled" and then press the Enter Key. (Figure 10)
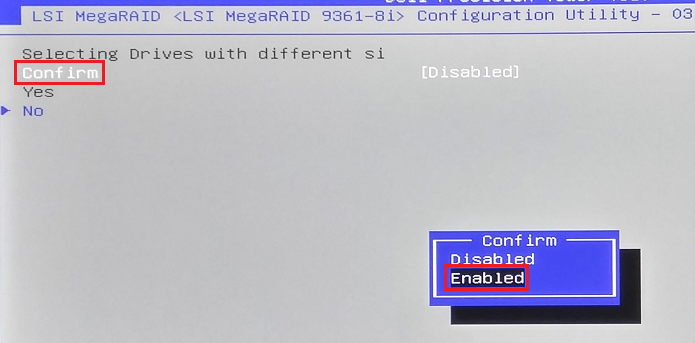
Figure 10. - Applying changes to the array
- Next use the Up/Down arrows and select the section "Yes" and press the Enter key (Figure 11)

Figure 11. - Confirming changes to the array
- Next press the enter key for "Ok" (Figure 12)

Figure 12. - Completing the configuration by clicking OK
- On the next screen use the Up/Down arrows and select the section for "Save Configuration" and press the Enter Key. (Figure 13)
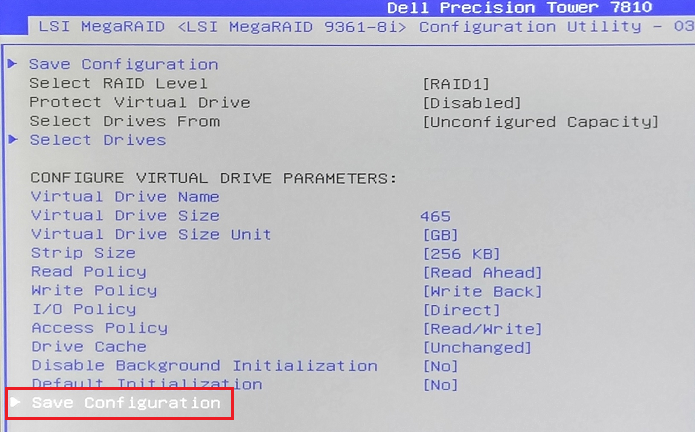
Figure 13. - Saving the Configuration of the array
- You will see a confirmation screen that the task was successful
- To save the configuration. You will need to press the F4 key to save and exit out of the RAID configuration menu. Select "Yes" and press the Enter key to confirm. (Figure 14)
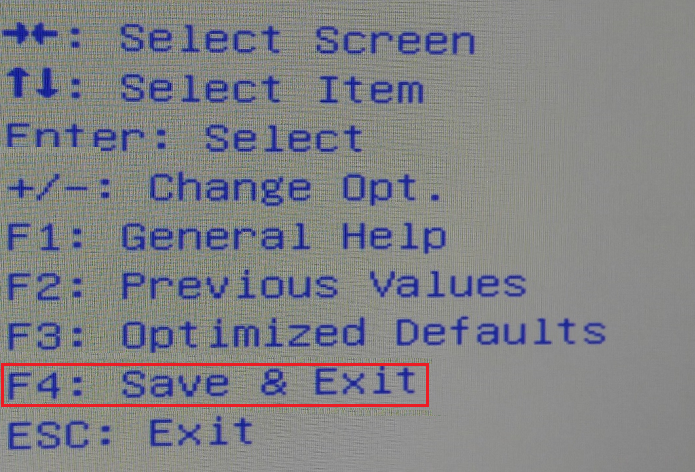
Figure 14. - Saving the Configuration of the array
Verifying Your RAID Configuration
- When you start your system, Slowly tap the F12 key until you see a message: "Entering the one time boot configuration" message in the upper right corner of the screen. Use the arrow keys to select "Device Configuration" option, then press the Enter key.
This will open the system setup UEFI configuration options for your LSI MegaRAID RAID controller. (Figure 15)
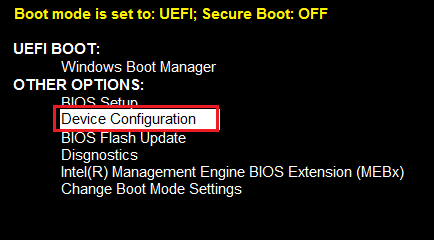
Figure 15. - Entering the Device Configuration Menu - Use the Up/Down arrow and select the section "Virtual Drive Management" and then press the Enter Key. (Figure 16)
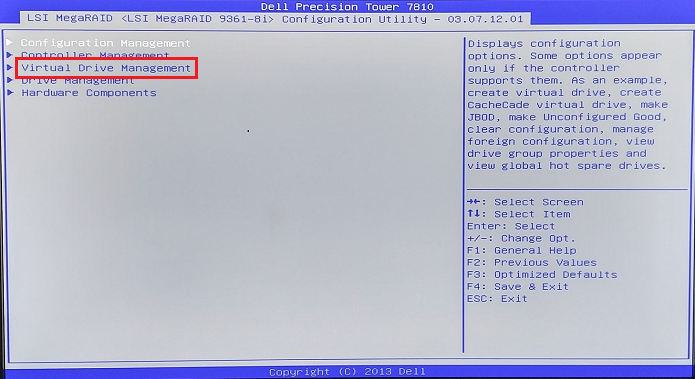
Figure 16. - Selecting the Virtual Drive Management Menu - You will now see the available RAID configurations. For our example we only have 1 RAID Arrays setup. At this step we have verified that the raid is optimal and setup for a RAID 1. (Figure 17)

Figure 17. - Virtual Drive Status Menu.
Delete ALL RAID Arrays
This is useful if you need to start from scratch and rebuild your RAIDs back up as needed.
- When you start your system, Slowly tap the F12 key until you see a message: "Entering the one time boot configuration" message in the upper right corner of the screen. Use the arrow keys to select "Device Configuration" option, then press the Enter key.
This will open the system setup UEFI configuration options for your LSI MegaRAID RAID controller. (Figure 18)
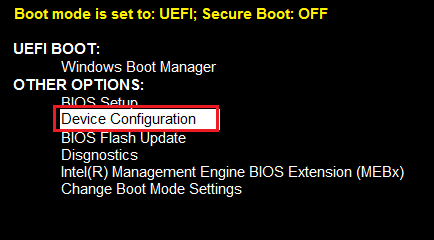
Figure 18. - Entering the Device Configuration Menu - On the next menu, press the Enter key for the first section Configuration Management. (Figure 19)
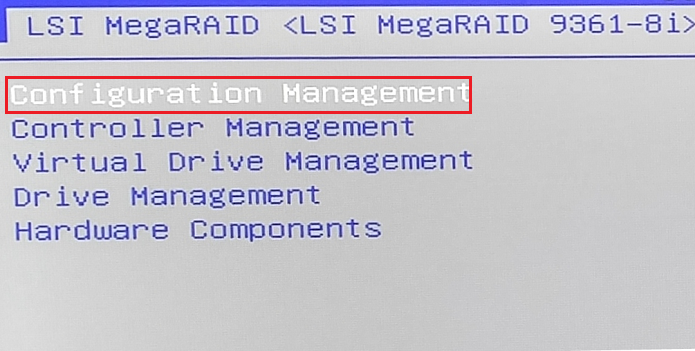
Figure 19. - Entering the Configuration Management Menu - On the next screen use the Up/Down arrow and select "Clear Configuration" and press the Enter key. (Figure 20)

Figure 20. - Entering the Device Configuration Menu - Next use the Up/Down arrows and select the section "Yes" and press the Enter key (Figure 21)
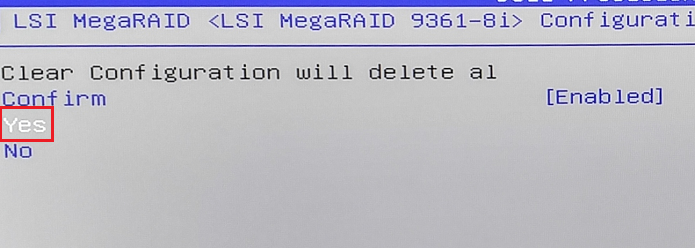
Figure 21. - Selecting Yes to confirm removal
Delete a Single RAID Array
- Next you will see a screen that you need to press the enter key for "Ok"
- If you need to only remove 1 RAID array and keep the other ones, this is the preferred method. Use the Up/Down arrow and select the section "Virtual Drive Management" and then press the Enter Key. (Figure 22)
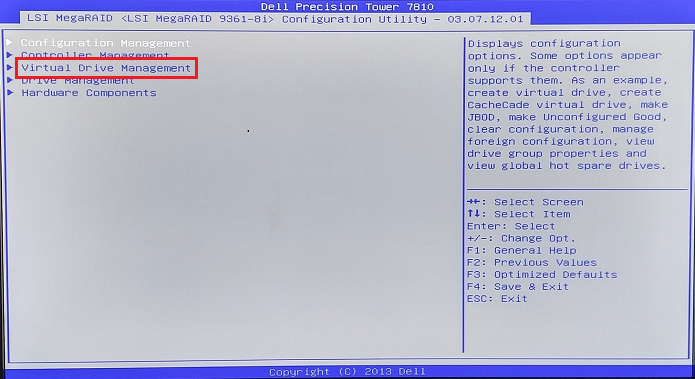
Figure 22. - Selecting the Virtual Drive Management Menu
- You will now see the available RAID configurations. For our example we only have 1 RAID Arrays setup. If multiple arrays, select the desired one to delete and press the Enter Key (Figure 23)

Figure 23. - Virtual Drive Status Menu - Press the enter key for the 1st section "Select Operation" and then use the Up/Down arrow and select the option "Delete Virtual Drive" and press the Enter key. (Figure 24)
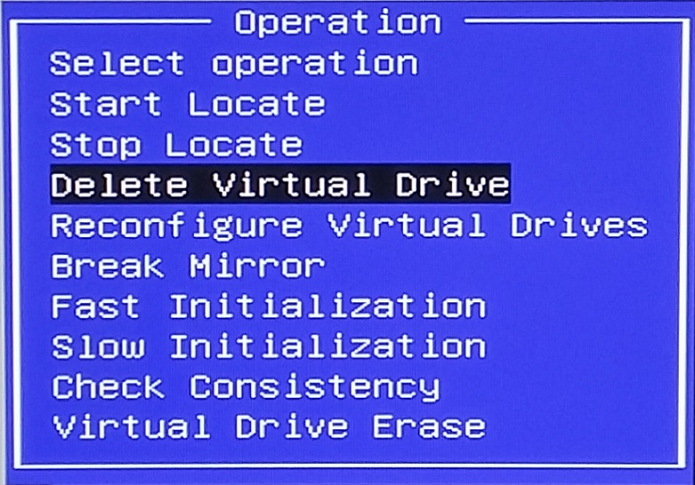
Figure 24. - Deleting a Virtual Drive
RAID Consistency Check
This is useful for when the RAID is not working as expected or if you have the operating system on the RAID and it will have issues rebooting. For example, when you have a RAID 1 and the drives become out of sync, they could have issues booting. This is when you would need to run a consistency check to restore functionality
- On the next menu, use the Up/Down arrow and select the option "Go" and press the Enter key (Figure 25)

Figure 25. - Selecting go when deleting a Virtual Drive
- Select the "Confirm" option, press the Enter key then use the Up/Down arrows to select "Enabled" and then press the Enter Key. (Figure 26)

Figure 26. - Confirmation when deleting a Virtual Drive
- Next use the Up/Down arrows and select the section "Yes" and press the Enter key. (Figure 27)

Figure 27. - Selecting Yes when deleting a Virtual Drive
- Next it should take you back to your Virtual Drive Manager, in our example we have no RAID arrays setup. (Figure 28)

Figure 28. - No Virtual Drives configured
- On the main screen you will see this:
- Use the Up/Down arrow and select the section "Virtual Drive Management" and then press the Enter Key (Figure 29)
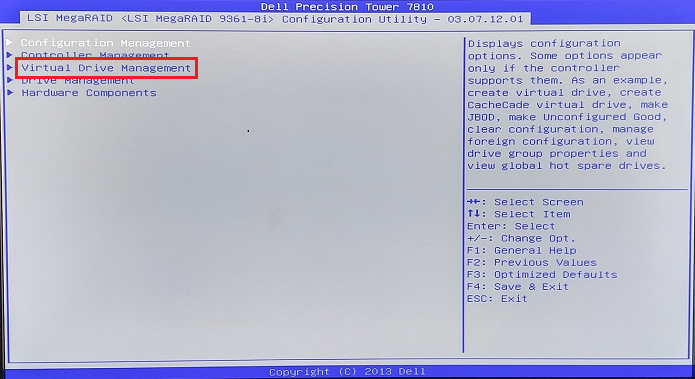
Figure 29. - Selecting the Virtual Drive Management Menu
- You will now see the available RAID configurations. For our example we only have 1 RAID Arrays setup. Click the enter key to get to our RAID operations menu (Figure 30)

Figure 30. - Virtual Drive Status Menu
- Once at the operations menu, select the first option "Select Operation" and press the Enter key (Figure 31.)

Figure 31. - Select Operation Menu
- Use the Up/Down arrows and select the option "Check Consistency" (Figure 32)
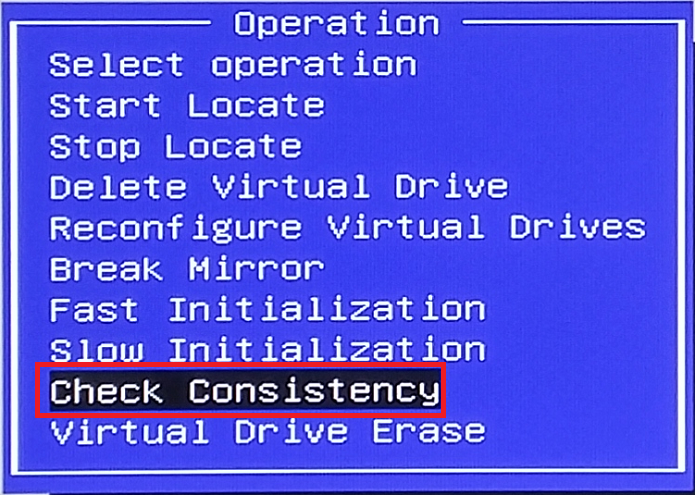
Figure 32. - Check Consistency Menu
- Then use the Up/Down arrow and selection the option "Go" and press the Enter key. (Figure 33)
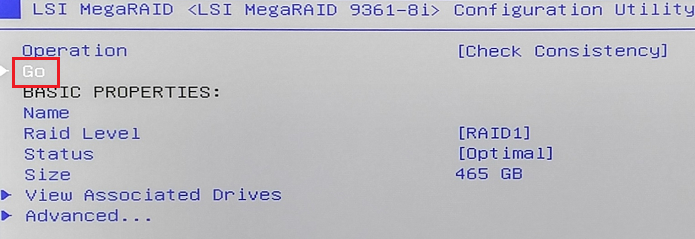
Figure 33. - Selecting Go Check Consistency Menu
- Select the "Confirm" option, press the Enter key then use the Up/Down arrows to select "Enabled" and then press the Enter Key. (Figure 34)
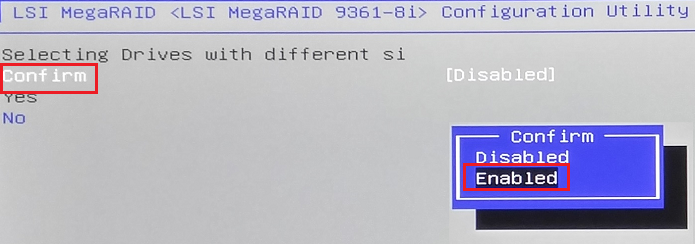
Figure 34. - Selecting Confirm and Enabled on the Check Consistency Menu
- Next use the Up/Down arrows and select the section "Yes" and press the Enter key (Figure 35)

Figure 35. - Check Consistency Menu
- Next you will see a screen that you need to press the enter key for "Ok" (Figure 36)

Figure 36. - Selecting OK on the Consistency Menu
- It will return you to the status page where you can see the percentage of the contingency check. Note that this could take multiple hours depending on the RAID 1 size and the errors that it has to correct. (Figure 37)

Figure 37. - Return to the Select Operation Menu