Installing Windows 10 on a Dell Computer with a RAID Controller Card
Summary: This article provides the steps to install Windows 10 using a Pre-OS Package on a Dell computer using a separate RAID controller card (LSI, PERC, or Intel/F6).
This article applies to
This article does not apply to
This article is not tied to any specific product.
Not all product versions are identified in this article.
Instructions
Installing Windows 10 on a Dell computer with RAID controller card
The following are required to get started to install Windows 10 onto a Dell computer with a RAID controller card.
- Actual Windows 10 Install Media (Recovery Media does not work for this process)
- Pre-OS Driver
Get Windows 10 Install Media:
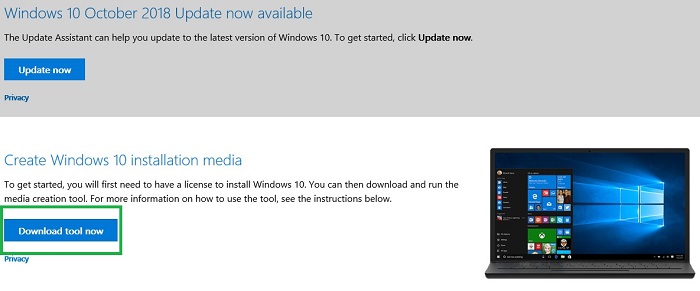
- Download the Microsoft Media Creation Tool from the following link: Microsoft - Create Windows 10 installation media
. Click Download Tool Now to download the Microsoft Media Creation Tool.

- Run the tool (if saving, do not save it to the USB you are formatting).
- Click Accept.
- Select the option Create installation media (USB flash drive, DVD, or ISO file) for another PC.
- Ensure that Language, Edition, & Architecture match with what was sold on the computer.
- Select USB Flash Drive.
- Select the drive.
- The media should then download and start burning automatically.
- Ensure that the Finish button is clicked at the end.
- Safely eject the USB.
Get Pre-OS RAID Controller driver:
- Go to Dell Drivers & Downloads for your Dell computer.
- Set the Category dropdown box to sort by Storage (sometimes the driver is in Storage Controller, as well).
- Download the driver that ties in with the controller in Service Tag Lookup.
- Intel controllers use the Intel Rapid Storage Technology enterprise F6 Driver:
Note: F6 may not always be in the description.

- LSI controllers use LSI <Controller’s #> drivers for Windows 10:
Note: There are several different LSI controllers. Ensure the Model Number matches with the one in Service Tag Lookup.

- Intel controllers use the Intel Rapid Storage Technology enterprise F6 Driver:
- Download the driver, choose to Run the driver, select the Extract option, and extract it to a blank USB.
Note: This CANNOT be the same USB where the Windows media was installed in the previous section.
Note: For additional reference on loading the Pre-OS Driver, see the following Dell Knowledgebase Article: How to Install the Storage Controller (F6) Driver During the Windows Installation Setup Process.
How to perform a clean installation of Windows 10:
Once you have the Windows media and controller driver downloaded to the separate USB drives, follow the steps below to install Windows 10:
- Insert the Windows 10 Boot USB.
- Power up the computer while tapping F12 on the keyboard.
- Select the USB UEFI option.
- Ensure that Language, Time/Currency, & Keyboard Input are all correct for your region.
- Click Install Now.
- Select I don’t have a product key (this is loaded in later).
- Select Custom: Install Windows only (advanced).
- Insert the Pre-OS Controller Driver USB made from the steps in the previous section.
- Select Load Driver and select the driver once prompted.
- Select the partitions one at a time and select the Delete option.
Note: If there are multiple drives in the computer, ensure that only the OS drive is cleared (typically Drive 0).
- Once the Drive shows only Unallocated Space, select Next and let the installation begin.
Article Properties
Article Number: 000133510
Article Type: How To
Last Modified: 31 Jan 2025
Version: 6
Find answers to your questions from other Dell users
Support Services
Check if your device is covered by Support Services.