Windows 10 Media Creation Tool: Install and Upgrade Guide and Dell Support
Summary: Learn how to use Microsoft Windows 10 Media Creation Tool for Dell computers. Upgrade, create installation media, and reinstall Windows 10 step-by-step.
Instructions
Windows 10 Upgrade Using Windows Update Fails
Once a computer has been upgraded to Windows 10 and registered. The computer can have a fresh installation of Windows 10 installed, without following the update process.
Using the Media Creation Tool
The media creation tool can be used to upgrade your computer to Windows 10 or to create a USB or DVD and install Windows 10 on a different computer. Microsoft has a step-by-step process to allow you to upgrade to Windows 10 using the media creation tool.
Click the Hyperlink below to download and run the tool:
Use Windows 10 Media Creation Tool to Create Installation Media or Upgrade PC
Once you open the link, click the SHOW ALL link to see all the instructions for running the upgrade on the computer you are on or how to create a DVD or USB Key to run the upgrade on another computer.
Create Windows 10 Installation Media
Pre-requisites:
- Working laptop or desktop (Windows based)
- 16 GB or larger USB drive
- Internet connection
- Go to the Microsoft website
, click "Download tool now" to download the Windows 10 installation media tool (Figure 1).
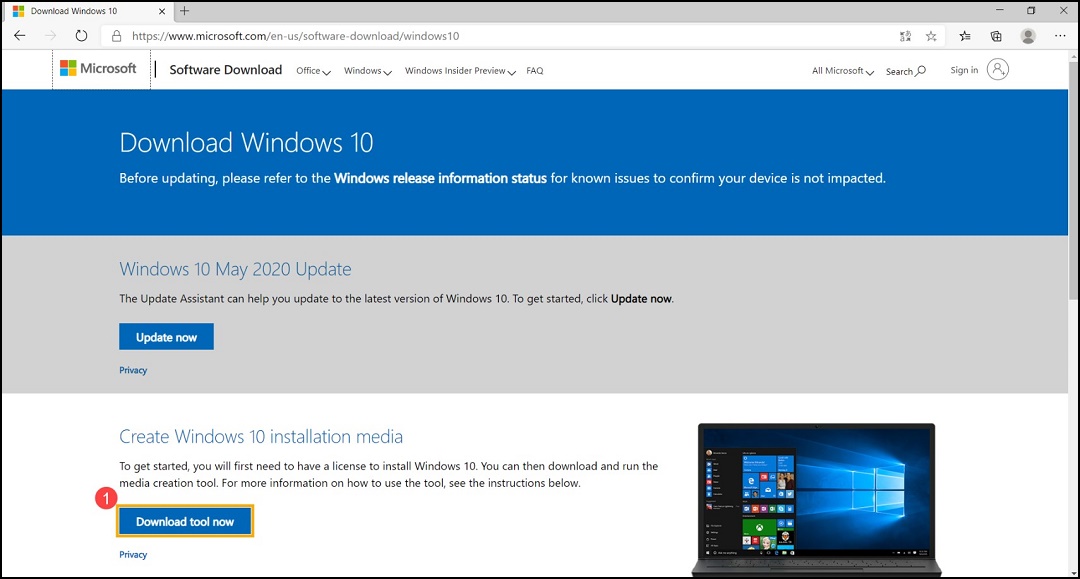
Figure 1 - Go to the folder that the install file was downloaded to, then double-click the "MediaCreationTool" file to start the installation (Figure 2).
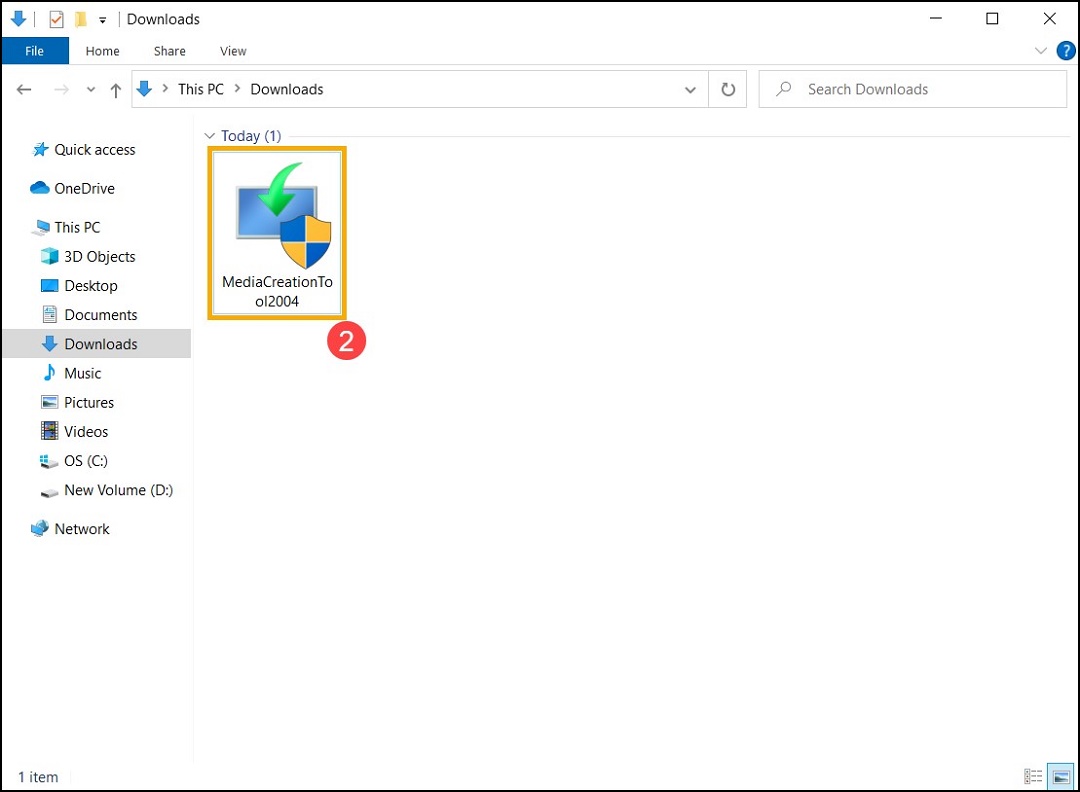
Figure 2 - If the User Account Control window appears, select "Yes" (Figure 3).
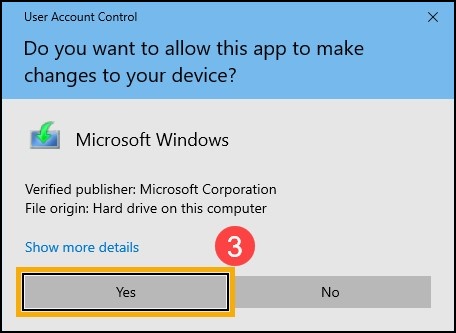
Figure 3 - Microsoft software license terms and applicable notices, select "Accept" (Figure 4).
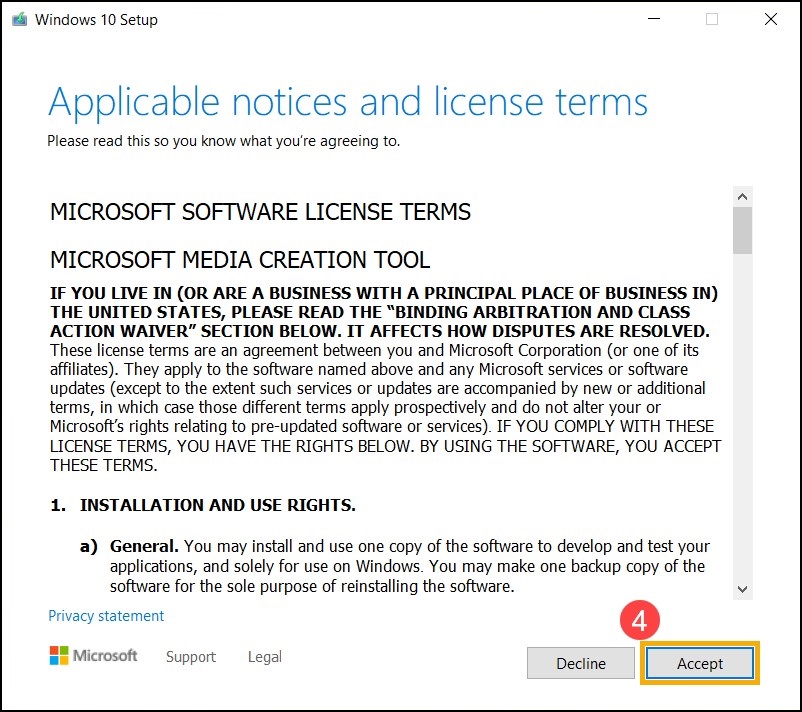
Figure 4 - Select "Create installation media (USB flash drive, DVD, or ISO file) for another PC," then select "Next" (Figure 5).
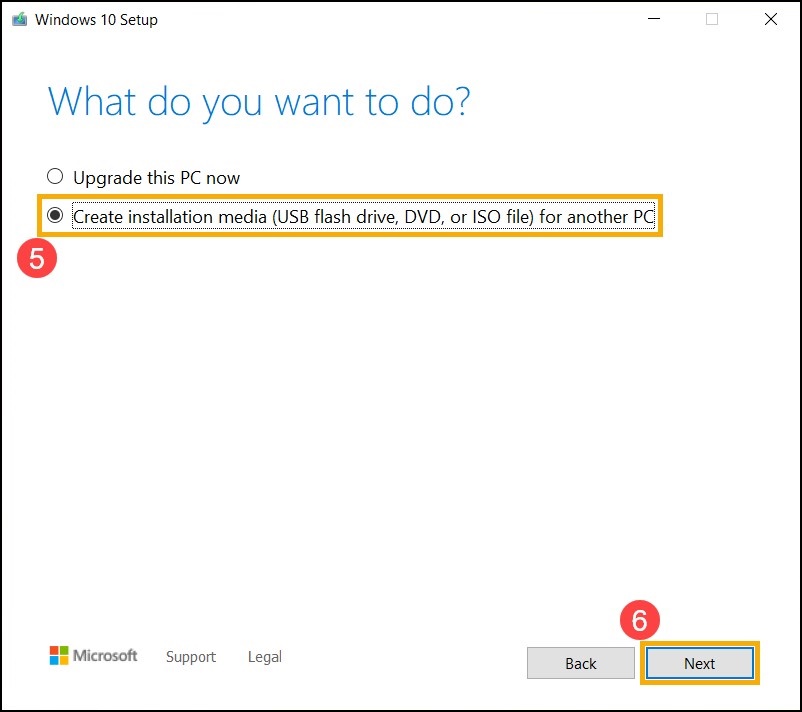
Figure 5 - Select the Language, Edition, and Architecture (64-bit or 32-bit) that you want to create for the Windows 10 installation media, then select "Next" (Figure 6).
Note: Select the correct language, edition, and architecture for your target unit to prevent any errors happened on the Windows 10 activation afterward (if your computer is with digital license, Windows 10 will be automatically activated when it is online after the installation is completed).
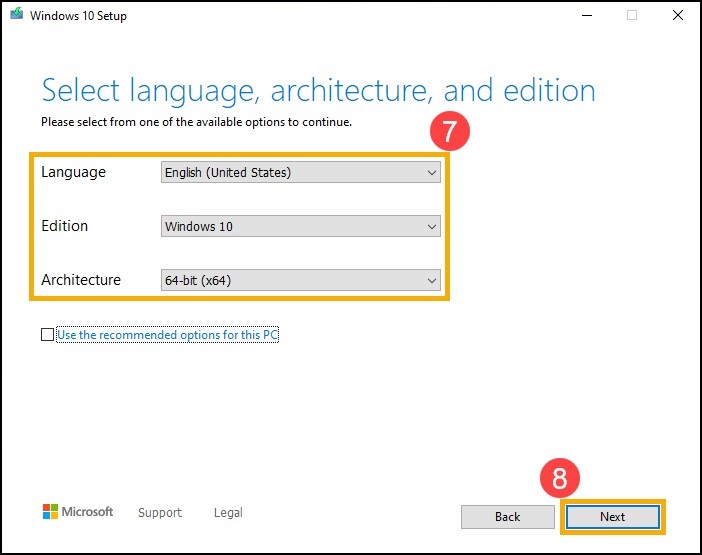
Figure 6 - Connect the USB drive that you want to create as a Windows 10 installation media to your computer, select "USB flash drive" and then select "Next" (Figure 7).
Note: All files on the USB drive will be deleted during the process, back up your files on the USB drive before proceeding with this process.
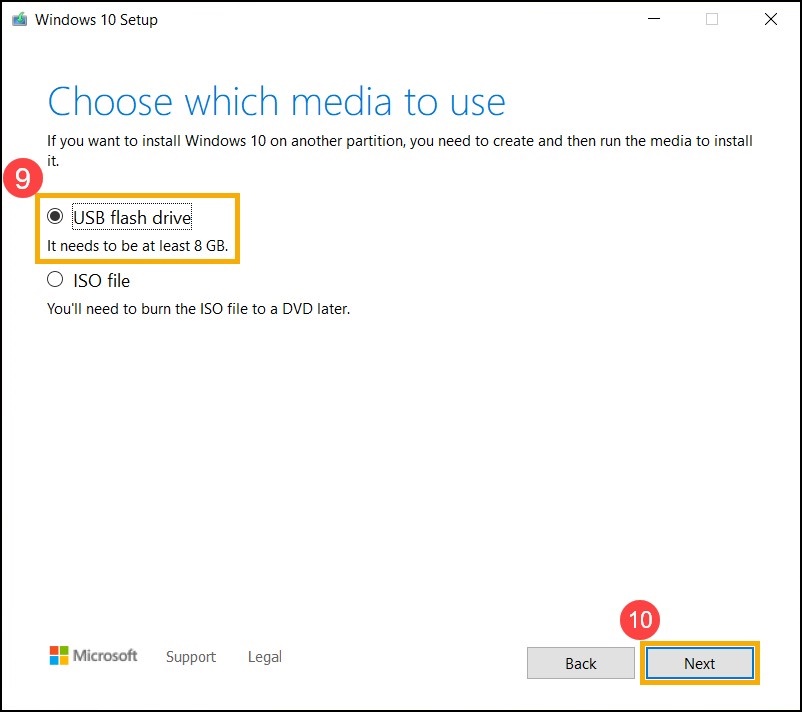
Figure 7 - In removable drives, confirm and select the USB drive that you want to use, then select "Next," and the computer will start the download and create the Windows 10 installation media. The creation takes a while, depending on your computer and the Internet connection (Figure 8).
Note: Ensure that the AC adapter is connected if using a laptop, and there is a stable Internet connection during the process, and do not force a shut-down to prevent the creation is incomplete.
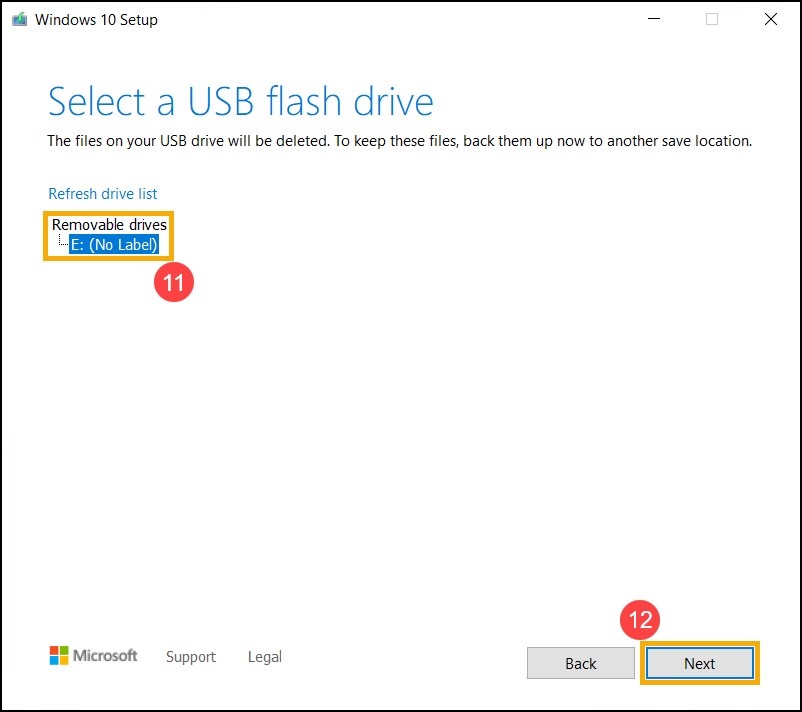
Figure 8 - The installation media has been created, click "Finish" (Figure 9).
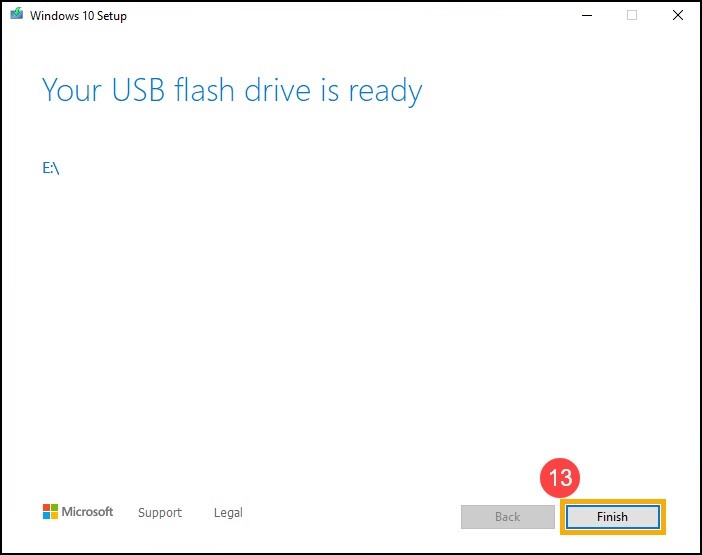
Figure 9
Reinstalling Windows 10
- Connect the installation media (USB drive) to your computer.
- Power on the computer, tap the F12 key to access ONE TIME BOOT MENU and select the boot option as the USB drive.
- The computer enters the Windows Setup. Choose the Language, Time and Currency Format, and Keyboard or Input Method, then click "Next" (Figure 10).
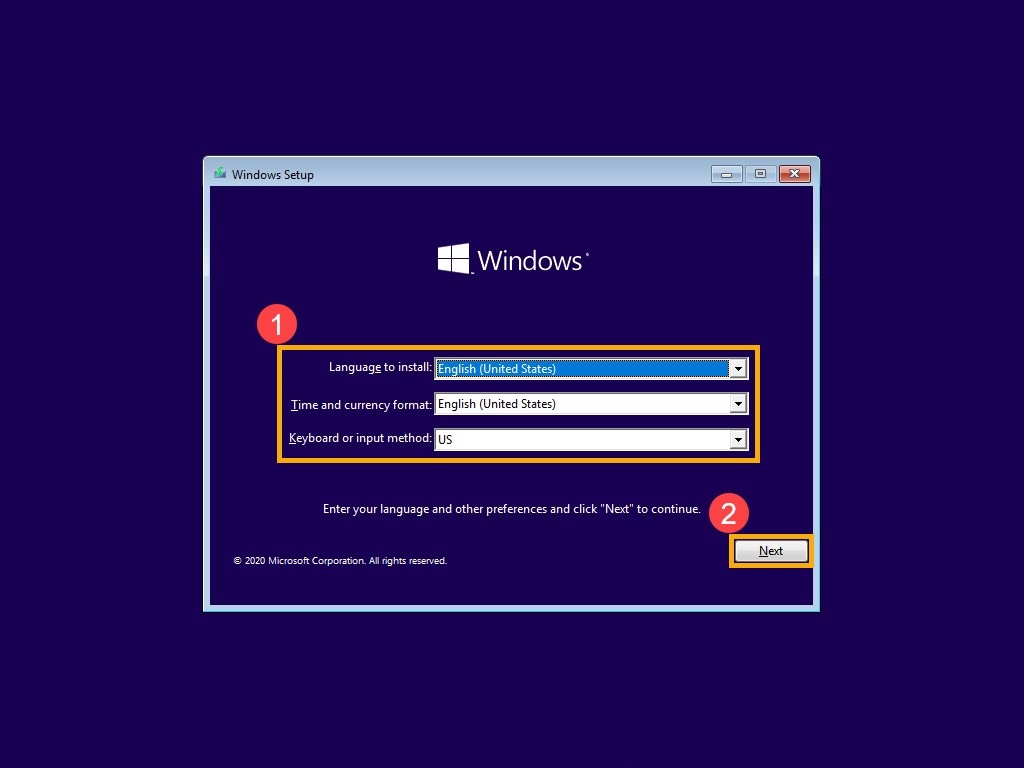
Figure 10 - Click "Install now" (Figure 11).
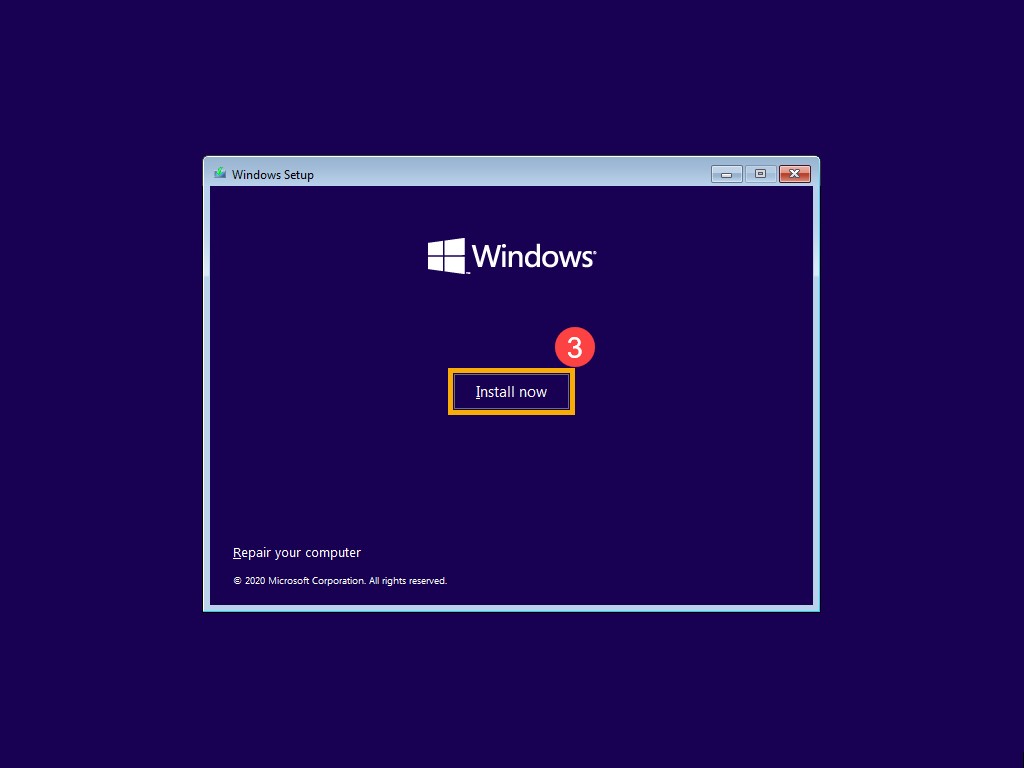
Figure 11 - If your computer has a built-in Windows Operating System (which is a digital license), select "I do not have a product key," Windows 10 will automatically be activated online after the installation is completed (Figure 12).
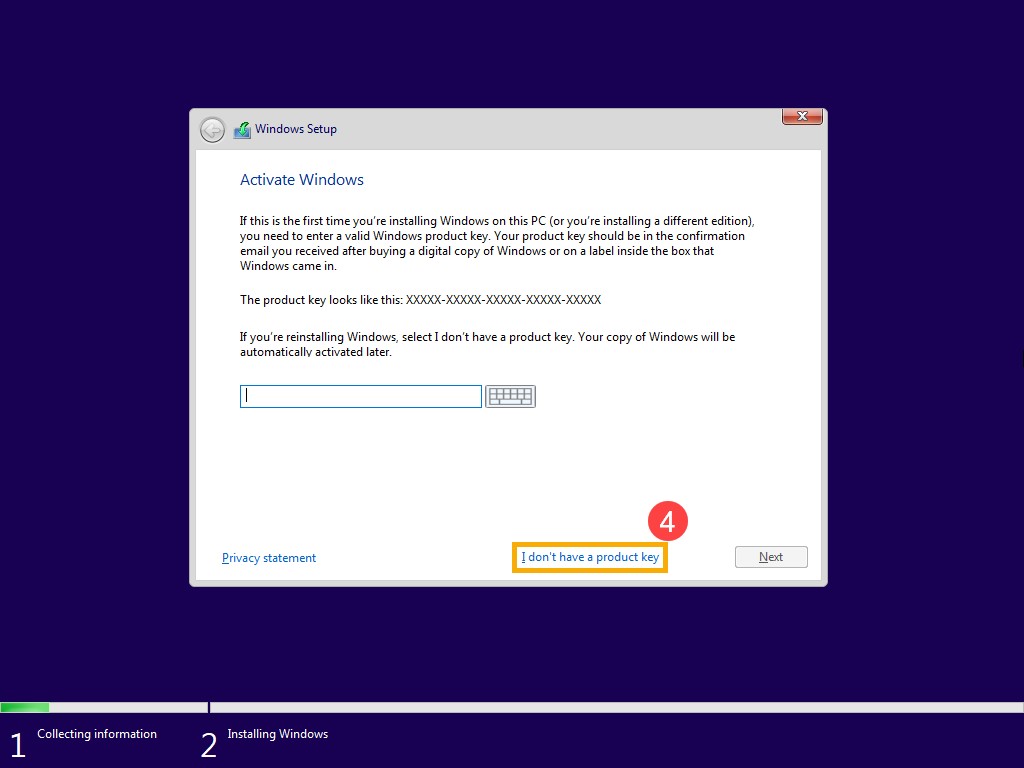
Figure 12 - Select the Operating System version which you want to "Install," then click "Next" (Figure 13).
Note: Select the version that your computer shipped with, otherwise, Windows might give an activation error if the version is not the same. To Verify, check the Order line Items or System Configuration of your computer on Dell.com/support
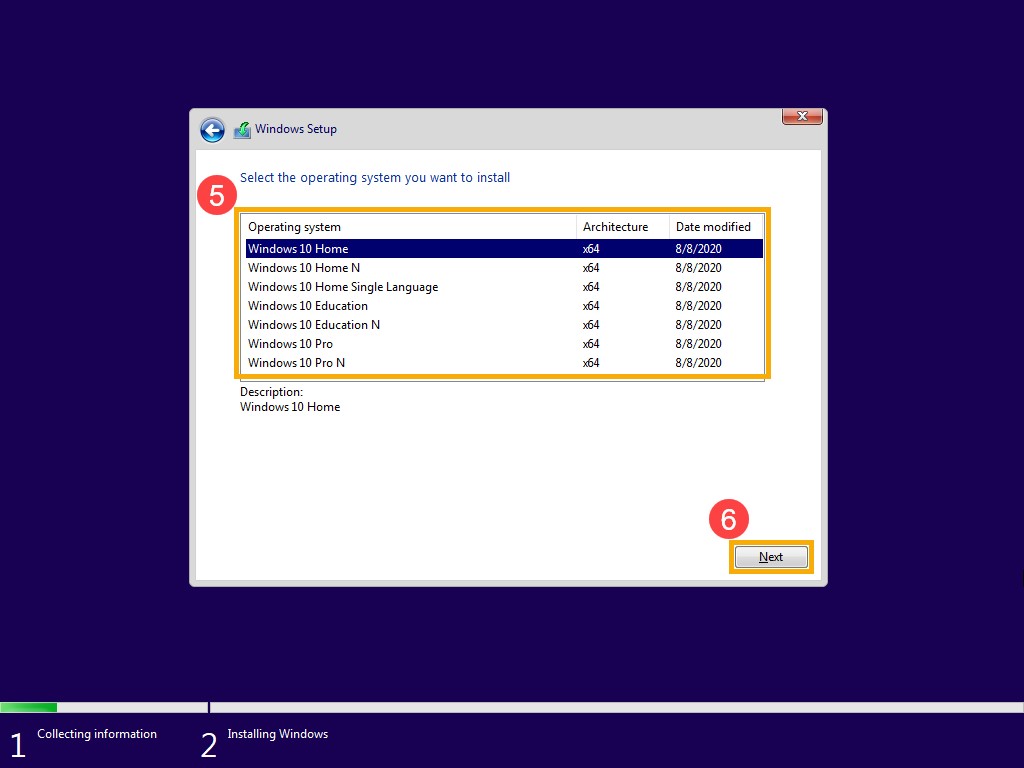
Figure 13 - Microsoft software license terms and applicable notices, check the box to "I accept the license terms," then click "Next" (Figure 14).
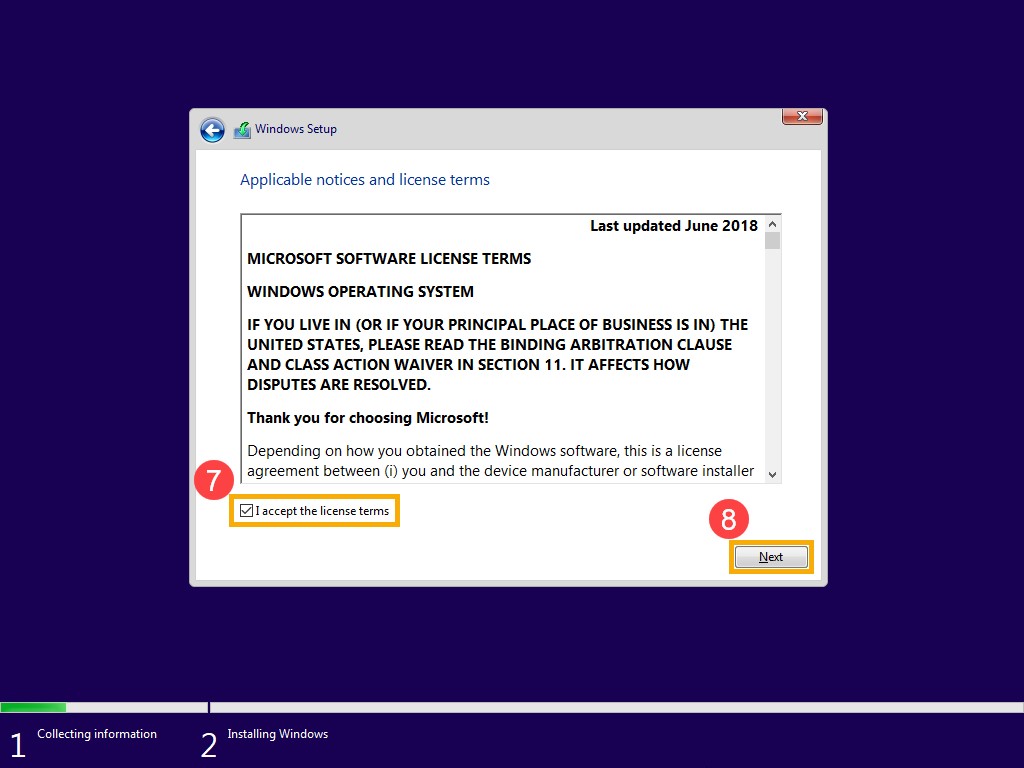
Figure 14 - Select "Custom: Install Windows only (advanced)" (Figure 15).
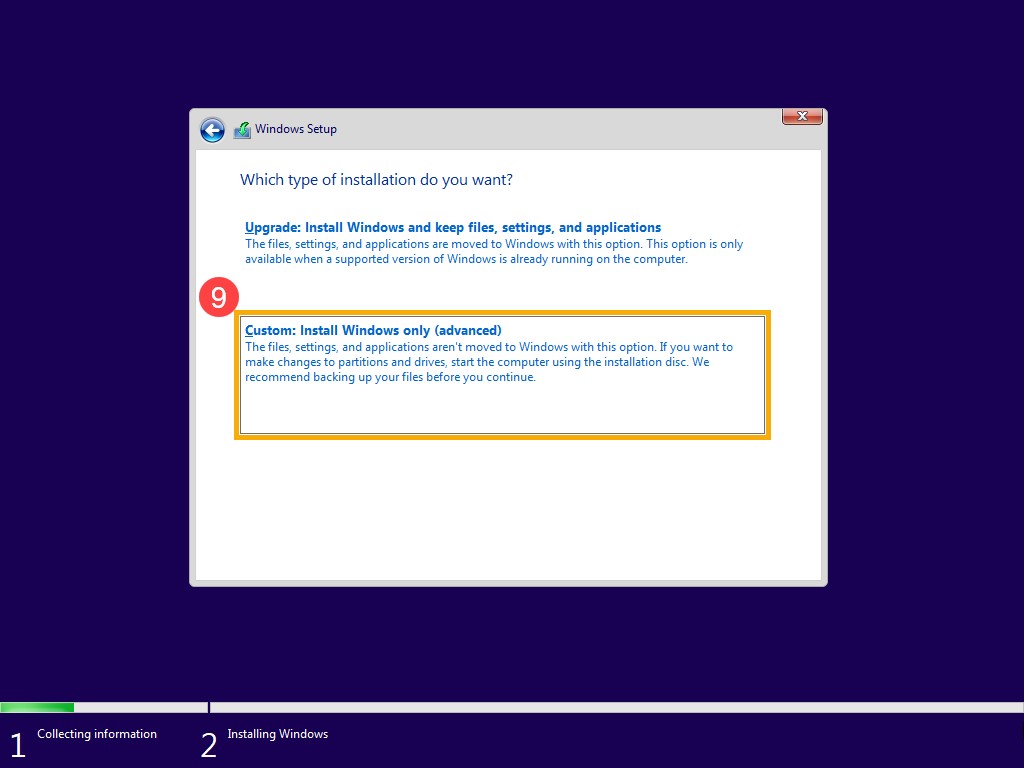
Figure 15 - You see the list of all drives and partitions on your computer. If multiple disks are displayed, delete all partitions from the disk where you want to install Windows (Disk C locates as Drive 0, so let us take Drive 0 as an example.) Select each partition of Drive 0 in the list, then select "Delete." If the Windows Setup notification appears, select "OK" (Figure 16 and 17).
Note: If you select "delete," all the data on the drive will be deleted, ensure to back up the data prior performing this step.
If the drives are not visible in the below screen and the computer is shipped with an 11th Generation Intel Processor, then see Article Number: Intel 11th Generation Processors: No Drives Can Be Found During Windows 10 Installation
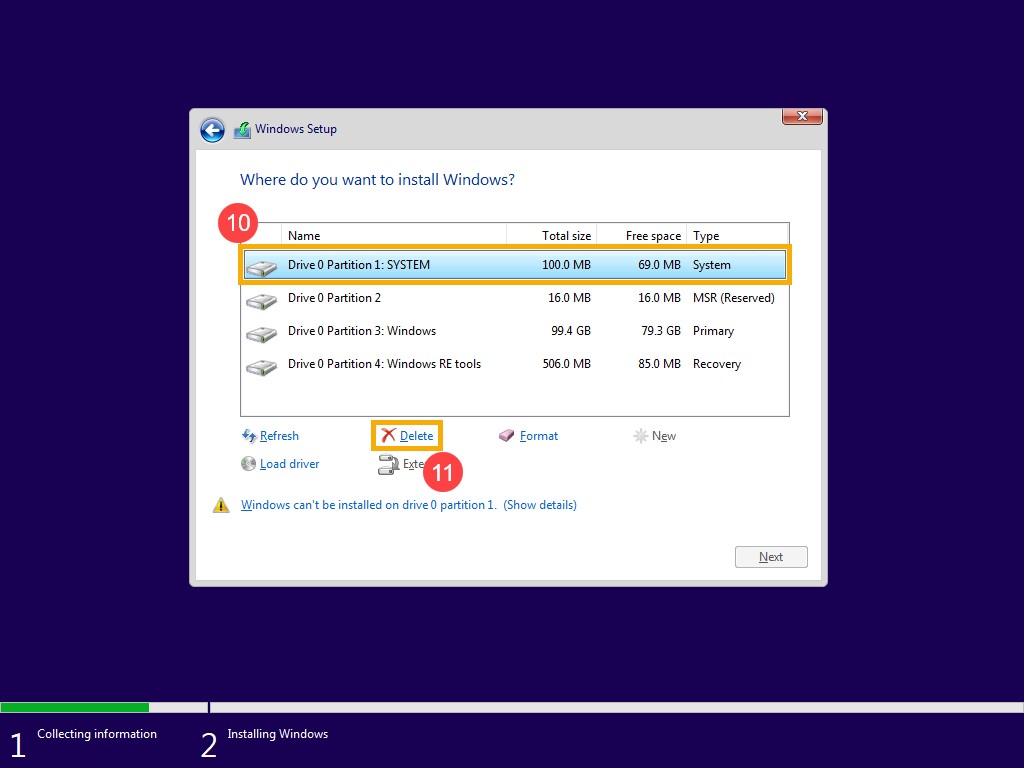
Figure 16
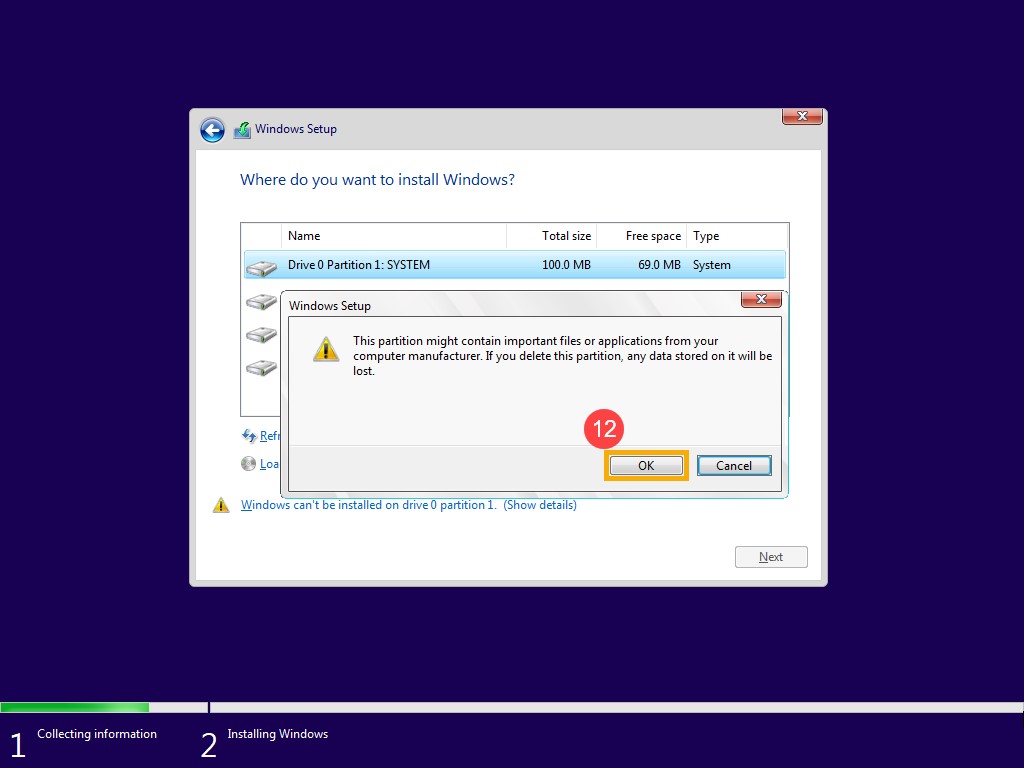
Figure 17 - After reproducing step 9 to delete all partitions of Drive 0, only Drive 0 Unallocated Space should remain. Select "Drive 0 Unallocated Space," then click "Next" to reinstall Windows.
Note: Ensure that the AC adapter is connected if using a laptop during the process, and do not force a shut-down to prevent issues.
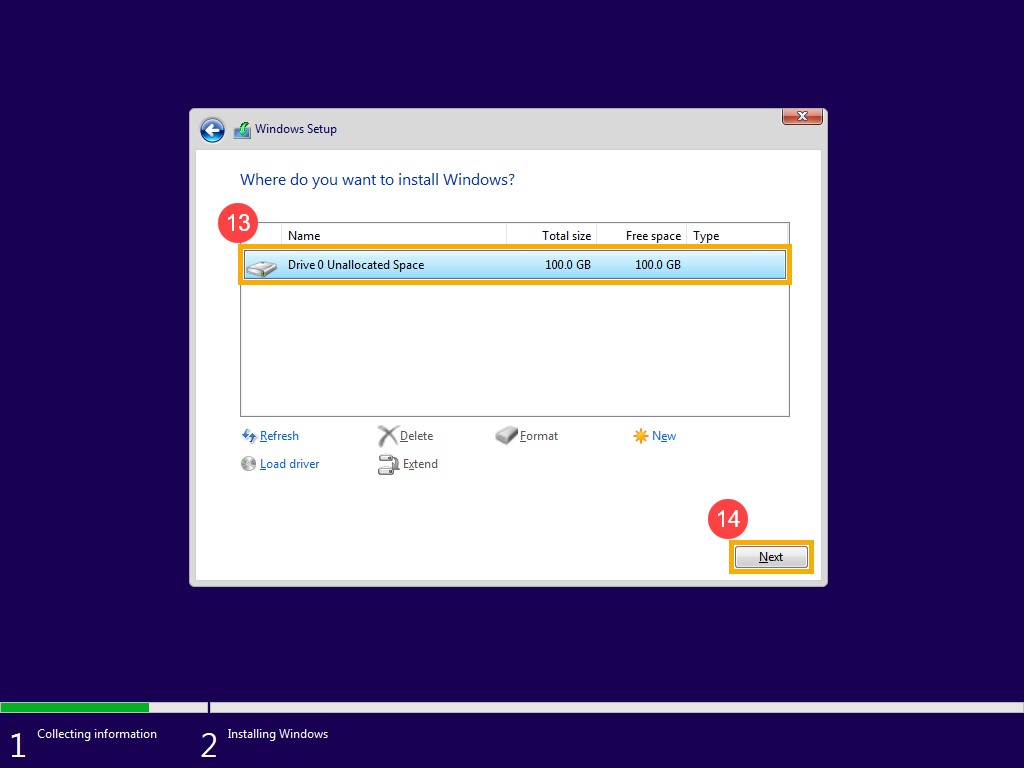
Figure 18 - The computer will restart and will enter the basic setting page of Windows after the reinstallation is completed (Figure 19).
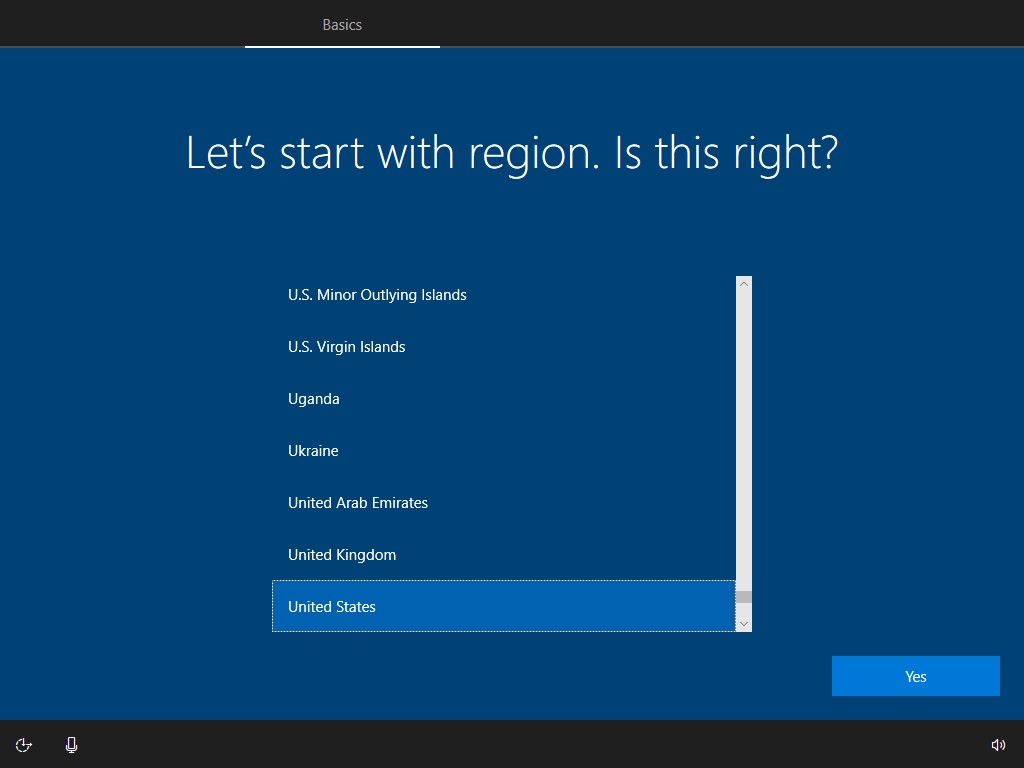
Figure 19 - After completing the basic settings of Windows and once you are on desktop screen. Update drivers by visiting Dell.com/Support or download and install Dell SupportAssist from: Dell SupportAssist
Additional Information
Recommended Articles
Here are some recommended articles related to this topic that might be of interest to you.