文章編號: 000138994
Migrate Outlook Email, Calendar, Contacts to a New Computer Using a PST File
摘要: Transfer Outlook email, calendar, and contacts to another computer using a PST file. Learn how to export Outlook items to an Outlook Data File (.pst) and import them seamlessly.
文章內容
說明
How do I migrate my email, calendar, contacts, tasks, and notes to another computer using Microsoft Outlook?
After receiving or updating to a new system, you may want to migrate your Outlook data to the new system running Microsoft Outlook. These steps show you how.
NOTE: These instructions apply to users who are NOT connected to an Exchange Server.
Export Outlook items to an Outlook Data File (.pst)
Outlook data can be exported to an Outlook Data File (.pst). This provides a way to transfer Outlook items such as Email, calendar, contacts, tasks, and notes, to another computer or to make a backup.
Folder properties such as permissions and views are not preserved when you export to an Outlook Data File (.pst). Only the content itself is exported.
- Click the File tab.
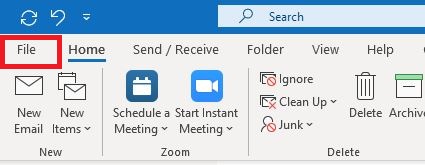
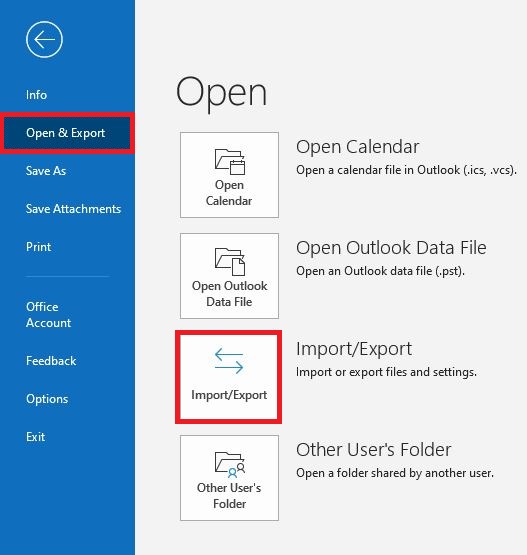
- Click Open & Export.
- Click Import/Export.
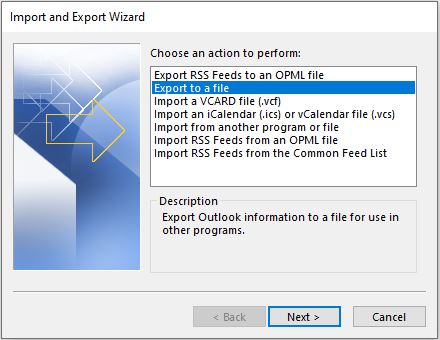
- In the Import and Export Wizard, select Export to a file, and the click Next.
- Click Outlook Data File (.pst), and then click Next.
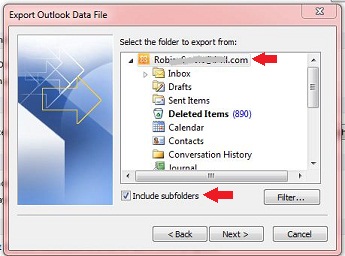
Select the account — a top-level folder — that you want to export. This enables exporting all mail, calendar, contacts, tasks, and notes if available for that account.NOTE: Only information for one account can be exported information at a time. - Ensure that the Include subfolders check box is selected.
- Click Next.
- Click Browse to select where you want to save the Outlook Data File (.pst) and to enter a file name. Click OK to continue.
NOTE: If you have previously used the export feature, the previous folder location and file name appear. Ensure to change the file name if you want to create a new file instead of using the existing file.
- If you are exporting to an existing Outlook Data File (.pst), under Options, specify what to do when exporting items that already exist in the file.
- Click Finish.
- The export begins immediately unless a new Outlook Data File (.pst) is created or the export is to an existing file that is password protected.
- If you are creating a new Outlook Data File (.pst), an optional password can help protect the file. When the Create Outlook Data File dialog box appears, enter the password in the Password and Verify Password fields. Then click OK. In the Outlook Data File Password dialog box, enter the password, and then click OK.
- If you are exporting to an existing Outlook Data File (.pst) that is password protected, in the Outlook Data File Password dialog box, enter the password, and then click OK.
- Copy the exported .pst file to a removable media, so that you can then use it on your other computer.
If you want to export items for multiple accounts, repeat these steps for each account. You can then make a copy of this file, and place it on your target machine, ready to be imported.
NOTE: For more information, see Microsoft Knowledge Base article: Export or backup email, contacts, and calendar to an Outlook .pst file

Import Outlook items from an Outlook Data File (.pst)
When you want to migrate Outlook messages, contacts, calendar items, tasks, and notes from one computer to another or restore a backup of your Outlook data, the Import and Export Wizard is the easiest way to complete the task.
- Click the File tab.

- Click Open & Export.
- Click Import/Export.

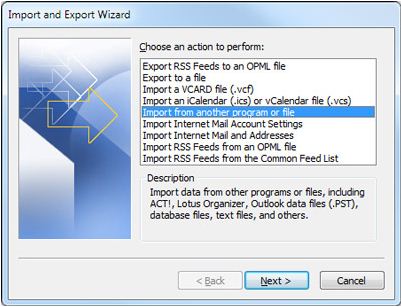
- In the Import and Export Wizard, select Import from another program or file, and the click Next.
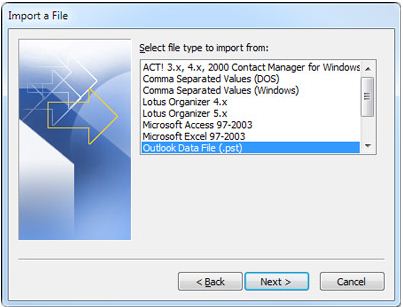
- Click Outlook Data File (.pst), and then click Next.
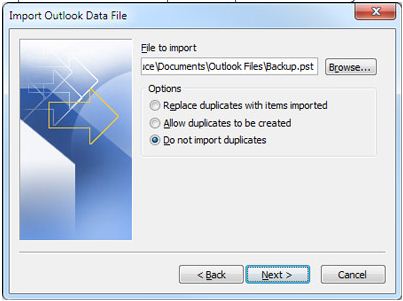
- Click Browse, and then choose the file that you have copied from the source machine onto the target machine from Step 1. above, that is ready to import.
NOTE: Under Options, it is recommended that you click Do not import duplicates unless you want the imported information to replace or duplicate items already in Outlook.
- Click Next.
- If a password was assigned to the Outlook Data File (.pst), you are prompted to enter the password, and then click OK.
- Set the options for importing items. The default settings usually do not need to be changed.
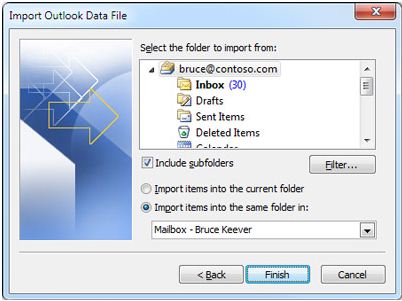
The top folder — Personal Folders, Outlook Data File, or your email address as in the above picture— is selected automatically.
Include subfolders is selected by default. All folders under the folder selected will be imported.
The default selection of Import items into the same folder in matches the folders from the imported file to the folders in Outlook. If a folder does not exist in Outlook, it is created. - Click Finish.
NOTE: For more information, see Microsoft Knowledge Base article: Import email, contacts, and calendar from an Outlook .pst file
文章屬性
受影響的產品
Inspiron, Latitude, Vostro, XPS, Legacy Laptop Models, Fixed Workstations
上次發佈日期
08 7月 2024
版本
10
文章類型
How To