Dell Data Security ServerのCompliance Reporterを有効にする方法
摘要: Compliance Reporterは、次の手順に従ってDell Data Securityサーバーで有効にすることができます。
本文适用于
本文不适用于
本文并非针对某种特定的产品。
本文并非包含所有产品版本。
症状
この記事では、Dell Data Securityサーバー製品でDell Compliance Reporterを有効にする手順について説明します。
対象製品:
- Dell Security Management Server
- Dell Security Management Server Virtual
影響を受けるバージョン:
- v10.1.0~11.2.0
対象オペレーティング システム:
- Windows
- Linux
原因
該当なし
解决方案
Dell Compliance Reporterは既知の脆弱性により無効になり、Dell Data Security製品のv10.1で管理対象レポートに置き換えられました。
- Dell Security Management Server
- Dell Security Management Server Virtual
まれに、レガシーレポートまたはカスタムレポートに対して Dell Compliance Reporter を再度有効にする必要があります。詳細については、 Dell Security Management Server または Dell Security Management Server Virtual のいずれかをクリックしてください。
注:Dell Compliance Reporterはバージョン11.3.0以降で削除されています。
Warning: Dell Compliance Reporterは、Dell ProSupportから指示を受けた場合にのみ有効にする必要があります。
Dell Security Management Server
- 次のリンクにアクセスする:
%SystemRoot%\System32. - Notepad.exeを右クリックして、[Run as administrator]を選択します。
![[Run as administrator]](https://supportkb.dell.com/img/ka06P000000smn7QAA/ka06P000000smn7QAA_ja_1.jpeg)
- [File]をクリックし、[Open]を選択します。

- [Open]UIで、次の手順を実行します。
- ファイル名 に移動します
C:\Program Files\Dell\Enterprise Edition\Security Server\conf\application.propertiesに戻ります。 - メニューの選択項目を[テキスト ドキュメント (*.txt)]から[すべてのファイル]に変更します。
- [開く]をクリックします。
- ファイル名 に移動します
![[Open]UI](https://supportkb.dell.com/img/ka06P000000smn7QAA/ka06P000000smn7QAA_ja_3.jpeg)
注:のディレクトリ
application.properties は、インストール時に構成された内容によって異なる場合があります。
- 変更
reporter.server.url=からreporter.server.url=https://FQDN.domain.com:8084/reporterに戻ります。

注:
FQDN.domain.com= Dell Security Management Server の完全修飾ドメイン名(FQDN)- 例のFQDNは、ご使用の環境によって異なります。
- Dell Compliance Reporterのデフォルト ポートは8084です。
- [ファイル]をクリックし、[保存する]を選択します。

- Windowsの[スタート]メニューを右クリックして、[ファイル名を指定して実行]をクリックします。
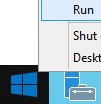
- [ファイル名を指定して実行]UIで、「 」と入力します。
services.mscOK をクリック します。
![[ファイル名を指定して実行]UI](https://supportkb.dell.com/img/ka06P000000smn7QAA/ka06P000000smn7QAA_ja_7.jpeg)
- Dell Compliance Reporterを見つけてダブルクリックします。

- [Dell Compliance Reporter Properties]から、次の手順を実行します。
- [Startup type]を[Automatic]に変更します。
- [Service status]で[Start]ボタンを選択します。
- 「OK」をクリックします。
![[Dell Compliance Reporter properties]](https://supportkb.dell.com/img/ka06P000000smn7QAA/ka06P000000smn7QAA_ja_9.jpeg)
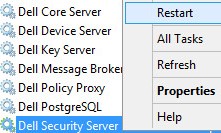
- [Dell Security Server]を右クリックし、[Restart]をクリックします。
Dell Security Management Server Virtual
- Dell Enterprise Server Virtual管理コンソールにログインします。

注:
- Dell Security Management Server Virtualのデフォルト認証情報は次のとおりです。
- Username:
delluser - Password:
delluser
- Username:
- 管理者は、製品の[Virtual Appliance Menu]内でデフォルトのパスワードを変更できます。
- サーバー サービスを停止します。
注:サービスを停止する方法の詳細については、「 Dell Security Management Server Virtualでサービスを停止および開始する方法 」を参照してください。
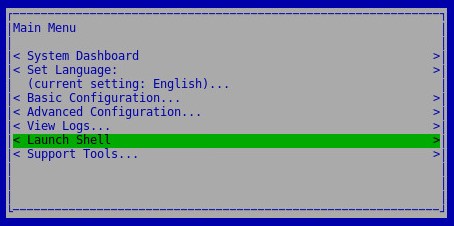
- メイン メニューから、[Launch Shell]を選択し、Enterを押します。
- シェルから、 と入力します。
su dellsupportEnterキーを押します。

- パスワードを入力して、Enterを押します。

注:
- Dell Security Management Server Virtualのデフォルト認証情報は次のとおりです。
- Username:
dellsupport - Password:
dellsupport
- Username:
- 管理者は、製品の[Virtual Appliance Menu]内でデフォルトのパスワードを変更できます。
- 次のコマンドを入力します。
sudo vi /opt/dell/server/security-server/conf/application.propertiesEnterキーを押します。

- スクロールして次の操作を行います
reporter.server.urlに戻ります。
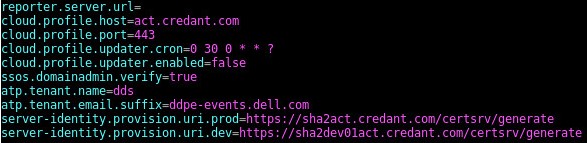
- で
reporter.server.url=I を押 して挿入します。

- で
reporter.server.url=型https://FQDN.domain.com:8084/reporterに戻ります。

注:
FQDN.domain.com= Dell Security Management Server Virtual の完全修飾ドメイン名(FQDN)- FQDNの例は、ご使用の環境で異なります。
- Dell Compliance Reporterのデフォルト ポートは8084です。
- ESCを押して挿入オプションを終了し、「 」と入力します。
:wq!Enterキーを押します。

- 次のコマンドを入力します。
sudo ufw allow in "Dell Compliance Reporter"Enterキーを押します。

- 次のコマンドを入力します。
exitEnterキーを押します。
![[終了(E)]](https://supportkb.dell.com/img/ka06P000000smn7QAA/ka06P000000smn7QAA_ja_21.jpeg)
- 次のコマンドを入力します。
exitEnterキーを押します。
![[終了(E)]](https://supportkb.dell.com/img/ka06P000000smn7QAA/ka06P000000smn7QAA_ja_22.jpeg)
- サーバー サービスを開始します。
注:サービスを開始する方法の詳細については、「 Dell Security Management Server Virtualでサービスを停止および開始する方法 」を参照してください。
サポートに問い合わせるには、「Dell Data Securityのインターナショナル サポート電話番号」を参照してください。
TechDirectにアクセスして、テクニカル サポート リクエストをオンラインで生成します。
さらに詳しい情報やリソースについては、「デル セキュリティ コミュニティー フォーラム」に参加してください。
其他信息
视频
受影响的产品
Dell Encryption文章属性
文章编号: 000156418
文章类型: Solution
上次修改时间: 02 11月 2023
版本: 13
从其他戴尔用户那里查找问题的答案
支持服务
检查您的设备是否在支持服务涵盖的范围内。