How to use and troubleshoot the Dell WR517 wireless receiver?
Resumo: Learn how to setup and use Dell WR517 Wireless Receiver. Find troubleshooting steps to resolve common issues.
Sintomas
This article provides information about the Dell WR517 wireless receiver, how to setup the receiver with a display, connect to the wireless receiver in Windows 10, Windows 8.1, Windows 7 and Google Android devices with Miracast capability, troubleshooting common issues with the receiver and answers to some frequently asked questions.
Table of contents:
- Features of Dell WR517 wireless receiver
- Hardware & software requirements
- Setting up the wireless receiver with a display
- Setting up the wireless connection from your PC, smartphone or tablet
- Updating the firmware of the wireless receiver
- Connecting a keyboard and mouse to the wireless receiver
- Troubleshooting
- Frequently asked questions
Features of Dell WR517 wireless receiver
Dell WR517 wireless receiver enables your Windows laptop computer, Android smartphone or tablet with Miracast capability to display the screen image to the Dell Conference Room Monitor (e.g. Dell C7016H monitor) using a Wi-Fi Direct interface.
The Dell WR517 wireless receiver features include:
- Wireless connectivity via IEEE 802.11 ac (Wi-Fi), bluetooth and Screencast.
- The connectivity makes it simple and easy to connect with legacy and new systems.
- Screenovate drivers/app to support additional/enhanced HID sharing features will be included for Windows 10, Windows 8.x and Windows 7.
Hardware & software requirements
In order for the Dell WR517 wireless receiver to perform optimally, it is strongly recommended that the device meets the minimum requirements for hardware and software.
| Hardware requirements |
|
|---|---|
| Software requirements |
|
| Operating System requirements |
|
 Note: Apple iPhone, iPad and Macbooks are not supported. Sony smartphones are not supported as a secondary device for dual cast.
Setting up the wireless receiver with a display
Connecting your Dell WR517 wireless receiver with a Dell C7016H conference room monitor:
- Use a Phillips crosshead screwdriver to fasten the two screws (shipped with the receiver) to the mounting rack on the rear of your display.
- Align the mounting holes of the Dell WR517 wireless receiver with the two screws that were secured on the rear side of the display, and then push the receiver downward until it is locked it into place.
- Connect the micro USB cable (supplied with the receiver) from the Dell WR517 wireless receiver to the USB port on the display to get power.
- Connect the HDMI cable (supplied with the receiver) from the Dell WR517 wireless receiver to the display.
- Connect your USB cable from the Dell WR517 wireless receiver to your USB keyboard and mouse.
- Turn On the display and the Dell WR517 wireless receiver will be activated at the same time.

Figure 1: Setting up the wireless receiver with a display. Steps 1 & 2.

Figure 2: Setting up the wireless receiver with a display. Steps 3, 4 & 5.
Navigating the Home Screen
When the input source for the monitor is set to HDMI, the Dell wireless home screen allows you to configure more advanced wireless settings of the Dell WR517 wireless receiver.
| Label | Item | Description |
|---|---|---|
| 1 | SSID (Service Set IDentifier) | Displays the network name(SSID) of the wireless receiver broadcasted over Wi-Fi and identified by your smart devices. You may change the name using the Settings menu on the home screen. |
| 2 | Settings icon | The Settings menu is the main hub for your wireless receiver and general settings. |
| 3 | Information and assistance | For further information, download the Dell Wireless Monitor app from Google Play Store for your Android smartphone or tablet. |

Figure 3: Home screen.
Using the Settings menu
To navigate the Home Screen and access the Settings menu, you need to connect a USB keyboard and mouse to the Dell WR517 wireless receiver. Clicking the Settings menu icon opens the following menu options:
| Menu option | Description |
|---|---|
| Band Selection | Allows you to switch between 2.4 GHz and 5 GHz band. The default setting is Auto. Note: It is recommended that you use the default setting of Auto if you cannot determine the best Wi-Fi band for your device. |
| Rename | Select to display the Rename dialog box. Then use the keyboard to change the network name(SSID) of the wireless receiver. |
| Advanced | The default setting is Enabled, allowing you to mirror your screencast capable devices' screen in real-time. |
| Factory Reset | Select OK to restore factory default settings. Selecting Cancel will quit without saving. Warning: Resetting the monitor to factory defaults will rename the network name(SSID) and unpair the devices. You will be required to setup screencast of your devices again. |
| About | This menu option will allow you to view the current firmware version number of the wireless receiver. |

Figure 4: Settings menu.
Back to top
Setting up the wireless connection from your PC, smartphone or tablet
Dell WR517 wireless receiver allows you to wirelessly display and manage content. Wireless display is supported by Microsoft Windows 10, Windows 8.1, Google Android 5.0 or newer version operating systems via Screencast. Wireless display is supported by Microsoft Windows 7 via the Dell Wireless Monitor software.
Click on the operating system below for more instructions.
Connecting to the Dell WR517 wireless monitor from Microsoft Windows 10
- Verify that the device meets the Hardware and software requirements.
- Press the Windows logo + K key on the keyboard.
You can also click on the Notification Icon and click Connect in the Action Center menu.
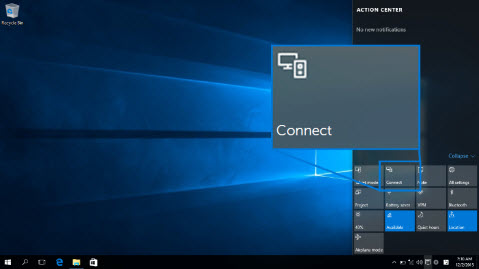
Figure 4: Action Center
- Select the monitor from the list.
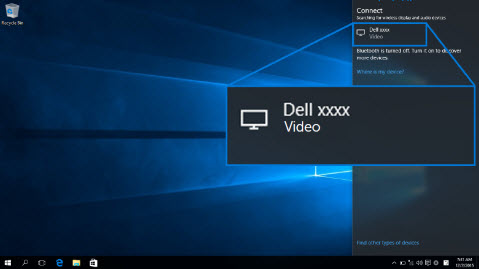
Figure 5: Select the monitor
- Follow the on-screen instructions displayed on the monitor. An 8-digit PIN code will be displayed on the monitor, enter the PIN code on your Microsoft Windows 10 device to complete the pairing process (Figure 6).
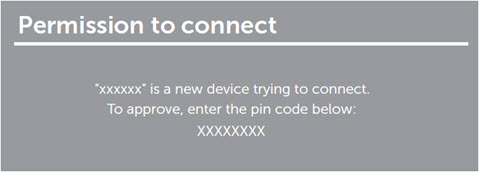
Figure 6: Enter 8-digit PIN on your device
Disconnecting from a device in Microsoft Windows 10
Changing the projection mode in Microsoft Windows 10
- Click on Allow input from a keyboard or mouse connected to this display on the computer to complete the setup process.
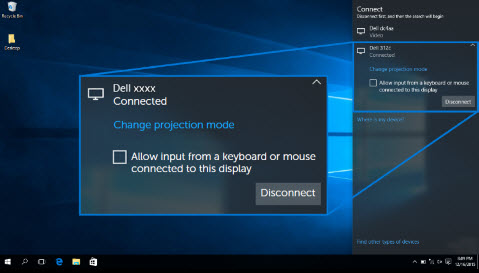
Figure 7: Allow input from keyboard or mouse- Press the Windows logo + K key on the keyboard.
- Click Disconnect and your device will stop projecting to the monitor.
- Press the Windows logo + P key on the keyboard.
- Select the Projection mode of your choice.
Connecting to the Dell WR517 wireless monitor from Microsoft Windows 8.1
- Verify that the device meets the Hardware and software requirements.
- Press the Windows + C key on the keyboard to open the Charms menu.
You can also swipe-in from the right to open the Charms menu.
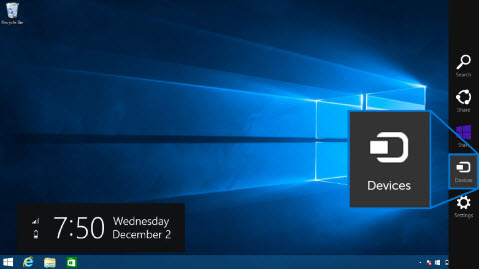
Figure 8: Charms bar
- Click Devices and then select Project.
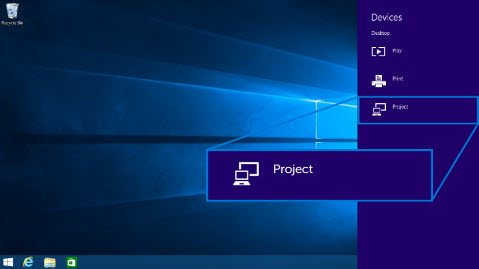
Figure 9: Devices menu
- Click Add a wireless display and select the monitor
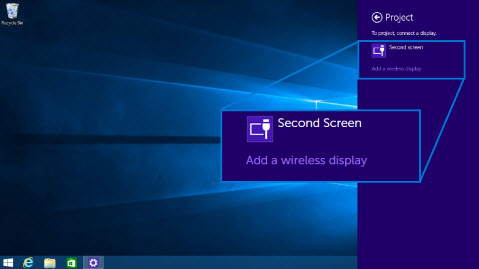
Figure 10: Add a wireless display
- An 8-digit PIN code will be displayed on the monitor, enter the PIN code on your Microsoft Windows 8.1 device to complete the pairing process (Figure X).
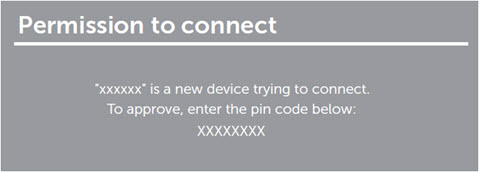
Figure 11: Enter 8-digit PIN on your Windows device
Disconnecting from a device in Microsoft Windows 8.1
Changing the projection mode in Microsoft Windows 8.1
- Click on Allow input from a keyboard or mouse connected to this display on the computer to complete the setup process.
- Press the Windows logo + P key on the keyboard.
- Click Disconnect.
- Press the Windows logo + P key on the keyboard.
- Select the Projection mode of your choice.
Connecting to the Dell WR517 wireless monitor from Microsoft Windows 7
Connecting to the Dell wireless monitor in Windows 7 requires you to install the Dell Wireless Monitor software. This application will help you connect, disconnect and change the projection mode.
- Verify that the device meets the Hardware and software requirements.
- Download and install the Dell Wireless Monitor software from Dell Support website.
- Open the Dell Wireless Monitor software. The application will automatically search for available devices.
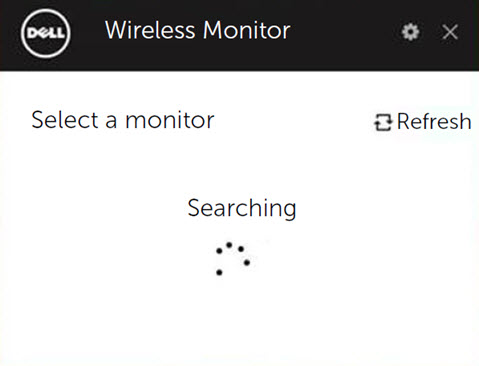
Figure 12: Dell Wireless Monitor software searching for nearby wireless receivers
- Click Connect once the monitor name is displayed in the list.
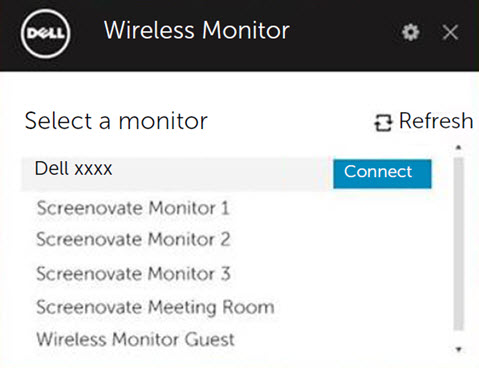
Figure 13: Connecting using Dell Wireless Monitor software
- An 8-digit PIN code will be displayed on the monitor, enter the PIN code on your Microsoft Windows 7 device to complete the pairing process (Figure X).
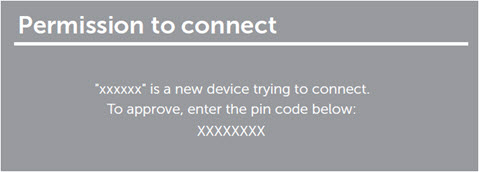
Figure 14: Enter 8-digit PIN on your Windows device
Disconnecting from a device in Microsoft Windows 7
Changing the projection mode in Microsoft Windows 7
- If you are prompted to update the Firmware of the monitor, click Yes.
- Open the Dell Wireless Monitor software.
- Click Disconnect and your device will stop projecting to the monitor.
- Open the Dell Wireless Monitor software.
- Select the Projection mode of your choice.
Connecting to the Dell WR517 wireless monitor from Google Android
- Verify that the Android smartphone or tablet meets the Hardware and software requirements.
- Go to the app drawer and open the Dell wireless monitor app.
 Note: Download the Dell Wireless Monitor app from Google Play Store.
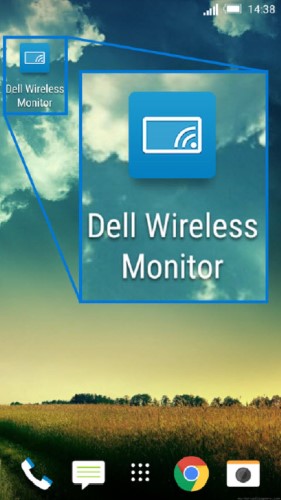
Figure 15: Dell Wireless Monitor app
- Tap Cast Settings in the Dell Wireless Monitor app.
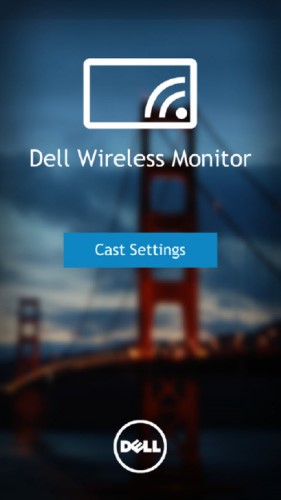
Figure 16: Cast settings
- Tap on the Wireless Monitor in the list.
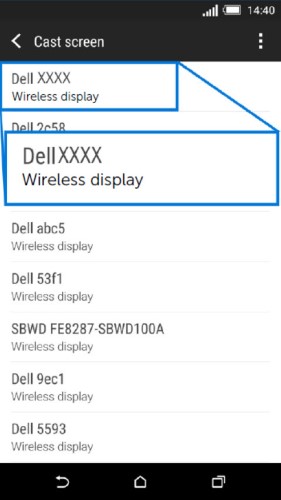
Figure 17: Wireless displays that are detected
- An 8-digit PIN code will be displayed on the monitor, enter the PIN code on your Microsoft Windows 7 device to complete the pairing process (Figure X).
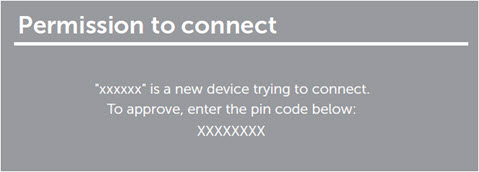
Figure 18: Enter 8-digit PIN on your Android device
Disconnecting from a device in Google Android
To stop projecting the screen of your Android device to the monitor, swipe down the notification share with two-finger swipe from the top of your screen and select Disconnect.
- Allow the Bluetooth Input connection on your device.
 Note: Ensure that you allow the bluetooth input connection to control your Android tablet or smartphone using the keyboard and mouse that is connected to the monitor.
Updating the firmware of the Dell WR517 wireless receiver
With the OTA (over-the-air) upgrade feature, the Dell WR517 wireless receiver can be upgraded to the latest version.
Please make sure that you have the following installed and ready for successfully upgrading the firmware of the wireless receiver:
- Install the Dell Wireless Monitor software on your Windows PC.
- Connect your Windows PC to the internet.
- Connect your Windows PC to the wireless receiver.
The Dell Wireless Monitor software will check for the latest firmware version. Click Accept to download and install the latest firmware. Updating takes place in the background.
Back to topConnecting a keyboard and mouse to the Dell WR517 wireless receiver
Dell wireless receiver allows user to control device from a single keyboard and mouse connected to the receiver.
- Connect the keyboard and/or mouse to the USB downstream port of the wireless receiver.
- Use the keyboard and/or mouse to control the Home Screen, PC or Android device.
 Note: Only standard USB keyboard and mice are supported.
Troubleshooting
| Issue (Symptom) | Possible Solution |
|---|---|
| Laptop computer cannot connect to the Dell WR517 wireless receiver |
 Note: Dell recommends Windows 10 and beyond for the best experience with Miracast. Miracast extensions are constantly refined for speed, performance, stability and compatibility. Consider upgrading to Windows 10 to solve basic Miracast problems as older versions of Windows may not have the right device drivers to meet the minimum requirements for this new technology. The Dell Wireless Receiver WR517 works best with Windows 10 and Android (5.1 and above) devices. Note: Dell recommends Windows 10 and beyond for the best experience with Miracast. Miracast extensions are constantly refined for speed, performance, stability and compatibility. Consider upgrading to Windows 10 to solve basic Miracast problems as older versions of Windows may not have the right device drivers to meet the minimum requirements for this new technology. The Dell Wireless Receiver WR517 works best with Windows 10 and Android (5.1 and above) devices.
|
| Keyboard and Mouse connected to the wireless receiver not working on the laptop computer |
|
| Keyboard and Mouse connected to the wireless receiver not working on the Tablet or Smartphone |
|
| No Audio from the wireless receiver |
|
| Android tablet or smartphone cannot connect to the wireless receiver |
|
| Video quality is not good |
|
| Audio quality is not good |
|
| Blu-ray disc playback does not work with Cyberlink PowerDVD 1.3 | Blu-ray playback is supported over Miracast with Cyberlink PowerDVD version 1.4 or higher. Please ensure that Cyberlink PowerDVD is updated to version 1.4 or higher. |
| Cannot see the wireless receiver name on the computer, tablet or smartphone |
|
| Long connection time when switching between Windows 7 PCs | This is a design limitation and not a defect. Below are the expected connection timing:
|
| Cannot connect to the wireless receiver on a network behind a firewall (corporate network) | If you have administrator rights on your Windows 10 or Windows 8.1 PC, you can try the following steps:
Contact your IT administrator to review the following settings and verify that the settings do not block Wi-Fi Direct, Virtual Wi-Fi port 7236 which is used for screen cast:
For Windows 10 and Windows 8.1 PCs, request your network administrator to add an incoming rule to Windows firewall advanced security to allow wireless display to accept connection on any protocol and on all network profiles (domain, private or public).
Disclaimer: Do not attempt to do this on your own without consulting your network administrators. Please always ensure that you have your network administrators’ prior approval and guidance before attempting this. Dell will not be liable in any manner whatsoever for any unauthorized, improper and/or incorrect action on your part.
|
Back to Top
Common error messages
| Error Message | Solution |
| Channel optimization The W-Fi channel between your Windows device and Dell WR517 wireless receiver has been changed. To optimize the performance, it is advised to reconnect to the wireless receiver. |
Reconnect your Windows computer, Android smartphone or tablet to the wireless receiver. |
Back to top
Frequently asked questions
Here are some frequently asked questions. Click on the questions below to find more information.
In order for the Dell WR517 wireless receiver to perform optimally, it is strongly recommended that the device meets the minimum requirements for hardware and software.
| Hardware requirements |
|
|---|---|
| Software requirements |
|
| Operating System requirements |
|
 Note: Apple iPhone, iPad and Macbooks are not supported.
The maximum resolution supported by Dell WR517 wireless receiver is 1920 x 1080.
At any given time, you can connect One device to the Dell WR517 wireless receiver. Dual connection is not supported.
Ensure that the keyboard and mouse are connected to the Dell WR517 wireless receiver. Once the keyboard and mouse are connected, you can access the home screen settings and also control the device that is connected to the wireless receiver.
To change the name of the Dell WR517 wireless receiver, follow these steps:
- Ensure that the keyboard and mouse are connected to the wireless receiver.
- Power ON the monitor.
- Set the source of the monitor to HDMI. You should now see the home screen of Dell WR517 wireless receiver.
- Click on the gear icon on the top-right corner.
- Click Rename and enter a name of your choice.
- Click OK to save the settings.
To check the current firmware version number of the Dell WR517 wireless receiver:
- Ensure that the keyboard and mouse are connected to the wireless receiver.
- Power ON the monitor.
- Set the source of the monitor to HDMI. You should now see the home screen of Dell WR517 wireless receiver.
- Click on the gear icon on the top-right corner.
- Click on the gear icon on the top-right corner.
- Click About.
Currently, Apple iPhone or iPad is not compatible with Dell WR517 wireless receiver.
Currently, Apple Macbooks are not compatible with Dell WR517 wireless receiver.
With the OTA (over-the-air) upgrade feature, the firmware of the Dell WR517 wireless receiver can be upgraded to the most up-to-date version.
- Install the Dell Wireless Monitor software on your Windows PC.
- Connect your Windows PC to the internet and verify if you are able to browse websites.
- Connect your Windows PC to the Dell WR517 wireless receiver. Refer to the Setting up the wireless connection from your PC, smartphone or tablet section of this article.
The Dell Wireless Monitor software will check for the latest version. If a newer version is detected, click Accept to download and install. Firmware upgrade happens in the background.