Windows: How to identify your Dell Docking station using PowerShell
Résumé: Learn how to use the Windows PowerShell application to identify which type of Dell Docking station is attached to your Dell computer.
Instructions
You want to know the type of Dell Docking station that is attached to your computer?
The information in this article has been checked and verified as correct. However, it is not something that would be covered under our standard computer warranties.
If you are experiencing any issues or are trying to troubleshoot a technical fault with your computer or dock? We recommend you download the latest driver versions from the Dell Support Site for your computer and dock, to ensure you are up to date.
This article provides a way to identify what type of Dell Docking Station is attached to your computer using the PowerShell application.
One of the reasons you would want to locate this information is so that you can use it along with System Center Configuration Manager (SCCM) scripting. This lets you customize installing and updating the dock drivers and firmware.
- Version 2.41 and earlier: Updates on a biweekly schedule
- Version 3.0 and newer: Updates on a weekly schedule
What is PowerShell?
PowerShell: replaced the Command Prompt application in newer versions of Windows 10. PowerShell is a more powerful tool than Command Prompt. Microsoft designed it as a tool that helps you automate and quickly solve many tedious administration tasks. You can create and use scripts to simplify and automate repetitive tasks.
- Click the Start Menu and Type PowerShell and select the version that you want from the search list.
- Right-click the Start Menu and select the version that you want from the Power Users menu that appears
Steps to identify your Dell Dock
-
Install the Dell System Inventory Agent (DSIA).
-
Download the latest DellSDPCatalogPC.cab file from our Downloads site:
-
Using an Extractor application such as WinZip, open the .cab file, but do not extract all the contents of the file.
-
Extract DellSDPCatalogPC.xml from the .cab file to your desktop.
-
Open DellSPDCatalogPC.xml with a text editor application
-
Either search or scroll down the file for the DSIA entry.
-
Identify the DSIA URL from the file (for example DSIAPC 1.6.5.3.msi).
-
Use that link to download the latest version of DSIA to your computer.
-
Double-click the downloaded file and follow the on-screen instructions.
Note: Ensure that you open PowerShell with administrator privileges, to carry out the following steps. (Your user account requires administrator rights for this guide to work.) -
-
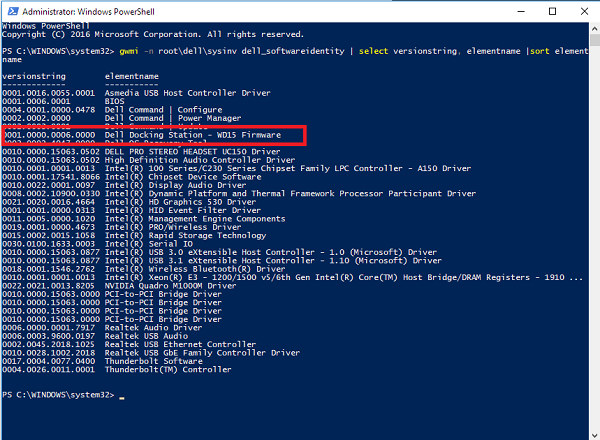
Open PowerShell and type the following Windows Management Instrumentation (WMI) command, followed by pressing the enter key to obtain the computer inventory:
PS C:\WINDOWS\system32> gwmi -n root\dell\sysinv dell_softwareidentity | select versionstring, elementname |sort elementname -
You are looking to identify something similar to the example shown below from the inventory list:
0001.0000.0006.0000 Dell Docking Station - WD15 Firmware
