RecoverPoint for VMs How to protect Virtual Machines using shared VMDK or RDM disks
Summary: This article details the steps that are needed in order to protect Virtual Machines using shared VMDK or RDM disks.
This article applies to
This article does not apply to
This article is not tied to any specific product.
Not all product versions are identified in this article.
Instructions
Note: RecoverPoint for VMs 6.x does not support replicating shared VMDKs and RDMs.
Note: See the Broadcom KB articles below to verify if the configuration of shared disk used is supported.
In particular SCSI-3 (such as used by MSFC) with VAIO or vSCSI filter is not supported by Broadcom.
In particular SCSI-3 (such as used by MSFC) with VAIO or vSCSI filter is not supported by Broadcom.
Note: VAIO and vSCSI filter are used by RecoverPoint for Virtual Machines Splitter for data replication in vSphere v.8 and vSphere v.7.
https://knowledge.broadcom.com/external/article/313230/microsoft-windows-server-failover-cluste.html
https://knowledge.broadcom.com/external/article/313472/microsoft-windows-server-failover-cluste.html
https://knowledge.broadcom.com/external/article/313230/microsoft-windows-server-failover-cluste.html
https://knowledge.broadcom.com/external/article/313472/microsoft-windows-server-failover-cluste.html
RecoverPoint for Virtual Machines replication using shared VMDK or RDM disks:
- You can replicate Source VMs using shared RDM disks to Target VMs using shared RDM disks. Follow the manual Target VM creation explained in Chapter A.
- You can replicate Source VMs using shared VMDK disks to Target VMs using shared RDM disks. Follow the manual Target VM creation explained in Chapter A.
- You can replicate Source VMs using RDM shared disks to Target VMs using shared VMDK disks. RecoverPoint Support team has an automated script to configure the Target VM. A manual process is also valid, and detailed in the manual Target VM creation in Chapter A.
- You can replicate Source VMs using VMDK shared disks to Target VMs using shared VMDK disks. RecoverPoint Support team has an automated script to configure the Target VM. A manual process is also valid, and detailed in the manual Target VM creation in Chapter A.
Requirements for a successful replication:
- Create a Target VMs.
- The number of shared disks must match between Source and Target VMs, and their Sharing settings.
- SCSI IDs must be matching between each replication pair VM.
- For example: VM1-Source must have the exact same disks SCSI IDs when compared with VM1-Target. The same must happen between VM2-Source and VM2-Target.
- Disks sizes must be matching between Source and Target VMs. If replicating from RDM to shared VMDK, the block size is different.
- Once the Target VMs matches the Source VMs, you can protect them using RecoverPoint.
- Multi-Writer Configuration on shared VMDKs is only supported with Thick Provision Eager Zero VMDKs.
- Network Adapters on Target VMs should match in type (E1000 or VMXNET3) and number to the source VM. (Example: If Source VMs have only "Network Adapter 2," then the target VMs should have "Network Adapter 2.")
- When creating the second VM onwards, ensure to use "Existing Hard Disk" and select the shared Hard Disk of the first VM when adding the shared hard disks.
- The Firmware of the Target VM (BIOS or UEFI) under VM Options -> Boot Options -> Firmware should match the Source VM.
- All the shared VMDKs/RDMs have to be added as hard disks to one VM and added as existing hard disk on the second VM onwards. Do not create some hard disks on VM1 and some on VM2 and then cross-share.
- When using RDMs, the LUN ID of the RDM device has to be the same across all the ESXs in the ESXi cluster. (A mapping error might show if it is not).
A. Target VMs
1. Create Target VMs.
You have two options to create the Target VMs, you can do it from vCenter UI, or you can use RecoverPoint.
1.1 Create Target VMs from vCenter UI.
- Access your vCenter https://VC/ui (replace 'VC' with your vCenter's IP/hostname)
- Right-click your DataCenter/ESXi Cluster/ESXi host and select New Virtual Machine.

- On the New Virtual Machine wizard, select Create a new virtual machine, and press NEXT.

- Enter the Virtual machine name, which should have the extension like.copy (for example VM_Name.copy).
- Select a location for the virtual machine, and press NEXT.
- Select a compute Resource, and press NEXT.
- Select storage and press NEXT.
- Select compatibility, and press NEXT.
- Select a guest operating system (which should be the same as for the production VM you want to protect), and press NEXT.
- Customize the hardware (Review steps 2, 3, 4 and 5), and press NEXT.
- Review the configuration, and if all looks correct press FINISH.
Repeat the same process or clone VM, for the other VMs that will be protected.
1.2 Create Target VMs using RecoverPoint.
You can use RecoverPoint to replicate the Source VMs to the Target site.
- Access your vCenter https://VC/ui (replace 'VC' with your vCenter's IP/hostname)
- Right-click the ESXi cluster.
- Select RecoverPoint for VMs.
- Select Protect VMs.

- You can display all VMs that are placed on that Cluster.
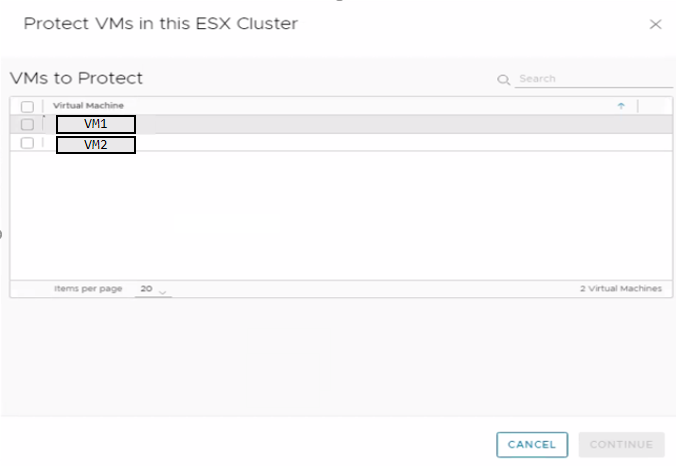
- Select the VMs to protect.
- Press Continue.
- Select your RecoverPoint Cluster (vRPA Cluster), target ESXi Cluster and Copy Datastore.

- Press Protect.
- Allow RecoverPoint to replicate VM configuration to the Target site.
- Once replication is complete, you see at the Target site a new power on VM named rp.VM_NAME.shadow.
- Now you should go to RecoverPoint Plugin and Unprotect the CG.
- That leaves on the Target site the VM with basic configuration and named VM_NAME.copy.
NOTE: RecoverPoint cannot replicate a shared RDM or shared VMDK disks configuration. You have to manually add at target VMs the disks used to replicate shared RDM or shared VMDK disks.
NOTE: In case your Copy VMs uses shared VMDK disks, there is a script to automate steps 2, 3, 4 and 5. Contact the RecoverPoint Support team and request the script referencing this KB. The same script can be used as a validation tool for the configuration settings on Target VM.
2. SCSI Controller (manual target VM creation)
- Add same SCSI Controller on target as per source VM configuration.
NOTE: This configuration parameter has to be checked when manually creating the VMs at the target site. If you use RecoverPoint to replicate the Source VMs, it automatically adds the SCSI controllers.
3. SCSI Bus Sharing (manual target VM creation)
Ensure that the SCSI BUS Sharing is set to Physical.

NOTE: This configuration parameter has to be checked when manually creating the VMs at the target site. If you use RecoverPoint to replicate the Source VMs, it automatically configures the SCSI BUS Sharing to Physical.
The SCSI Controller Type may defer on each environment. See the VMware documentation below for additional detail:
https://docs.vmware.com/en/VMware-vSphere/7.0/com.vmware.vsphere.vm_admin.doc/GUID-5872D173-A076-42FE-8D0B-9DB0EB0E7362.html
4. Target VM disk size (manual target VM creation).
Add all shared VMDK or RDM disks in the target Virtual Machine, using the same exact size as the source VMs.
Create disks at Target site with the same exact size as shared VMDK or RDM disks at Source. You can replicate to RDM or shared VMDK disks.
If you replicate RDM disks at Source to RDM disks at Target, or shared VMDK disks at Source to RDM at Target, the RDM disks have to be provisioned from the storage side.
For replication between RDM disks at Source to shared VMDK disks at Target or shared VMDK disks at Source to shared VMDK disks at Target, you have to create the VMDK disks at Target vCenter.
If you replicate RDM disks at Source to shared VMDK disks at Target, due to block size difference, you must match the same size as in production RDM. See the example shown below.
Example, for RDM disks at Source and shared VMDK disks at Target:
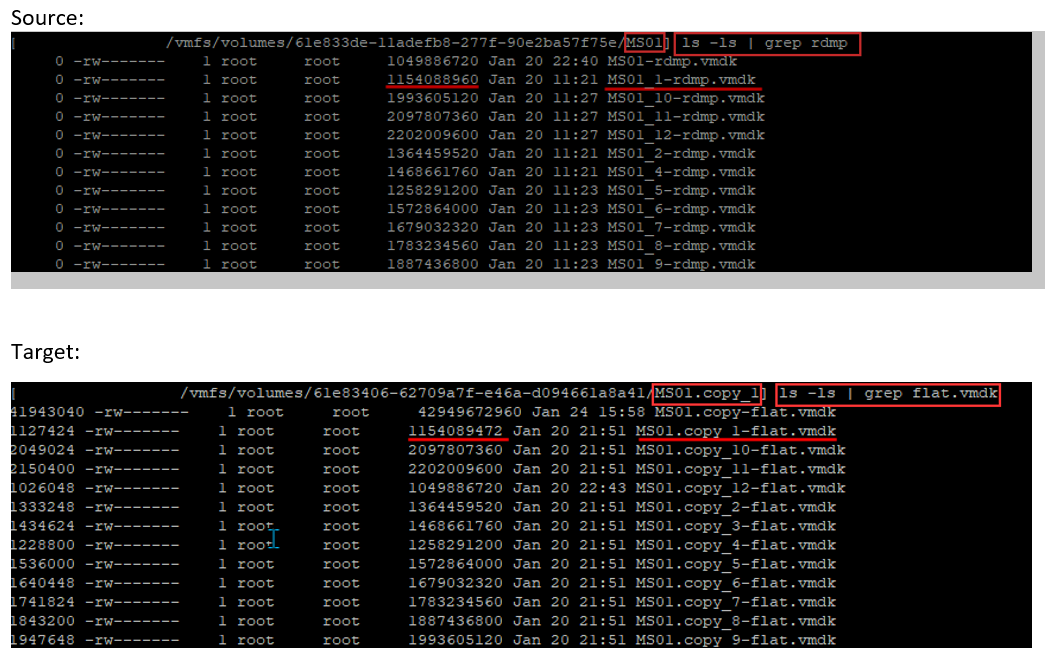
You see that Source disk, MS01_1-rdmp.vmdk as 1,154,088,960 bytes, and Target disk MS01.copy_1-flat.vmdk has 1,154,089,472 bytes. We have a 512-byte difference between them.
We cannot use the Target VM to replicate the Source VM, as you have different disk sizes. You must correct the size for that disk. The best option is to remove the disk and create it again with the exact size.
You may create the Target disks using ESXi CLI, which allows selecting the exact size for the disks created.
- SSH to the ESXi host using root user
- Change the directory to where the copy VM has its configuration files.
cd /vmfs/volumes/81e833de-11adefb8-277f-90e2ca57f75e/MS01.copy
- Run the command below to create a VMDK with the same exact size:
vmkfstools --createvirtual 2202009600b --diskformat eagerzeroedthick MS01.copy_1.vmdk
- Once you complete the disk creation at the target site, you may run command:
ls -ls | grep flat.vmdk
Once you complete the target disks creation, you may compare the flat.vmdk (Target VM) against the rdpm.vmdk (Source VM), and validate that the size is matching.
On the Target VM, you must attach the newly created disks, follow the below steps.
- Right-click the Target VM, and select Edit Settings.
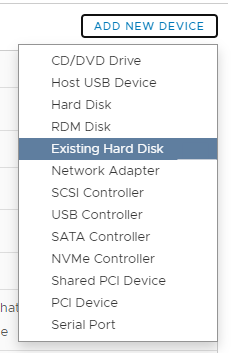
- Select option ADD NEW DEVICE.

- Select Existing Hard Disk.
- Browse to the location where you have created the VMDK disks.
- Select the correct disk, and Press OK.
- From the Edit Settings page, select the newly added disk.
- Review setting Virtual Device Node, and assign it to the correct SCSI ID.

- Ensure that the SCSI ID for the disk is matching the Source VMs disk that you want to replicate.
- Repeat the same process for other disks that you may have to replicate.
NOTE: In case your Copy VMs uses shared VMDK disks, there is a script to automate steps 2, 3, 4 and 5. Contact the RecoverPoint Support team, and request the script referencing this article.
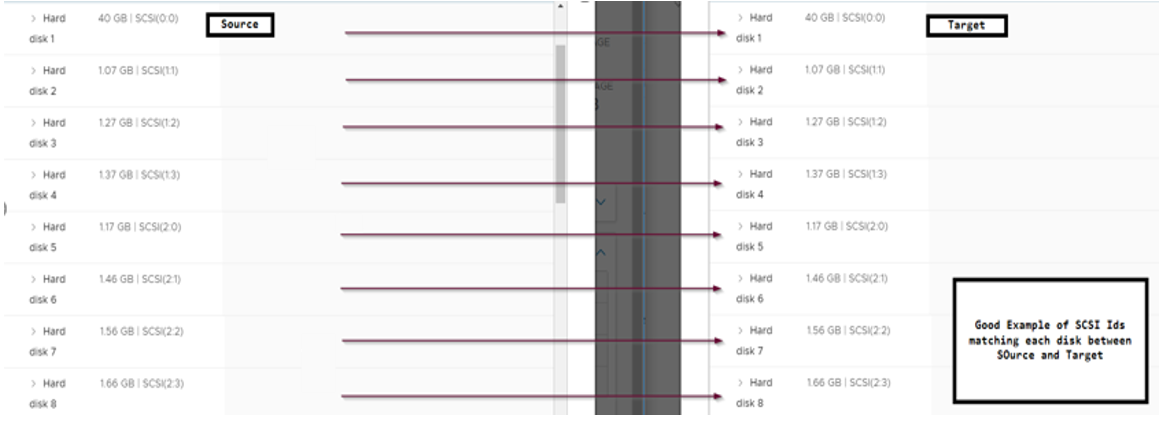
5. SCSI ID matching between Source and Target VMs disks (manual target VM creation)
Ensure that the Disk SCSI controller ID at the target VM matches the disks being protected at the source.
- It means that if on the source that we have one disk that is assigned with 40 GB in SCSI(0:1), on the target we must have the same 40 GB disk on SCSI(0:1).
B. Protecting Source VMs
Protecting VMs which are part of a cluster, and using shared VMDK/RDM disks, all VMS part of the Cluster must be protected under the same CG.
To protect VMs under the same CG:
- Right-click the ESXi cluster and select Protect VMs. You can display all VMs that are placed on that Cluster.
- Select your Clustered VMs.
- Press CONTINUE and select options regarding the copy target.
- Under the Copies option, select the

- For the Copy VM Creation, select to Manually Select the copy VM.
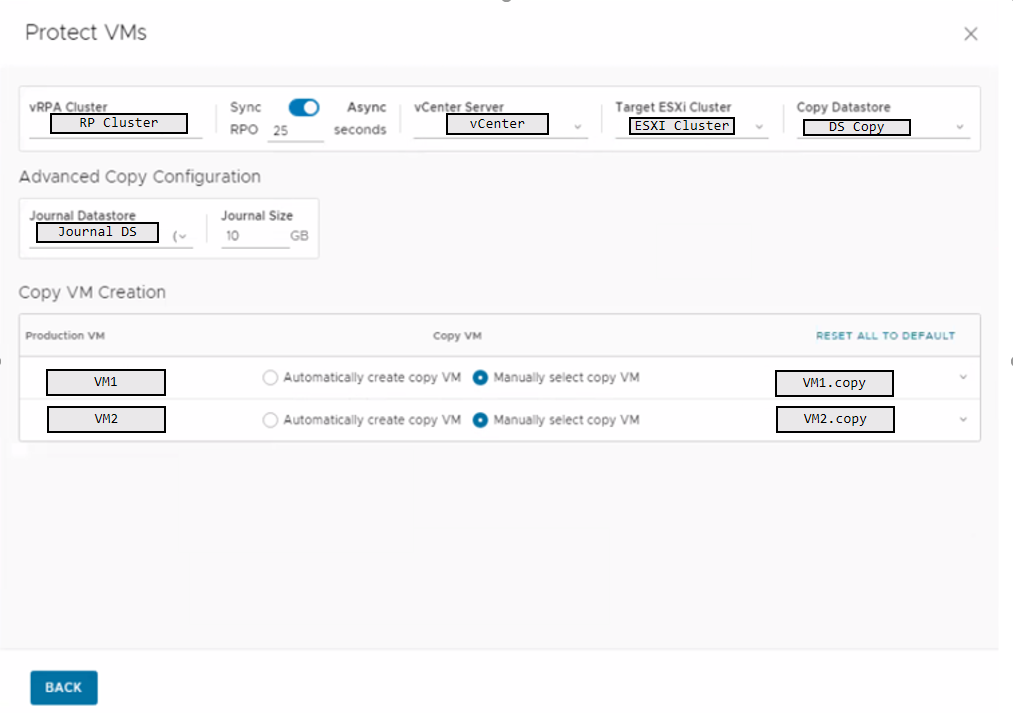
- Press Back.
- And then Protect.
You see on RecoverPoint for Virtual Machines Plugin, that a new Consistency Group is created, and it starts to initialize.
C. Target VM configuration mismatch
- If you fail to create a valid target VM copy, when you manually select the VM, you may see an error as the below example.
"Error: Failed to find a suitable target VM with identical disk configuration"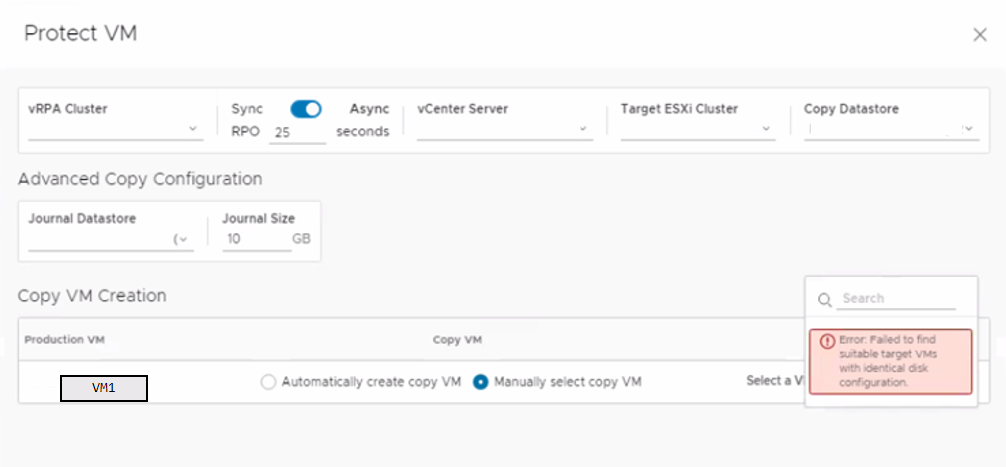
At this stage, you must double-check if the requirements were followed and verify that there is no mismatch between SCSI ID on the disks, or disk size.
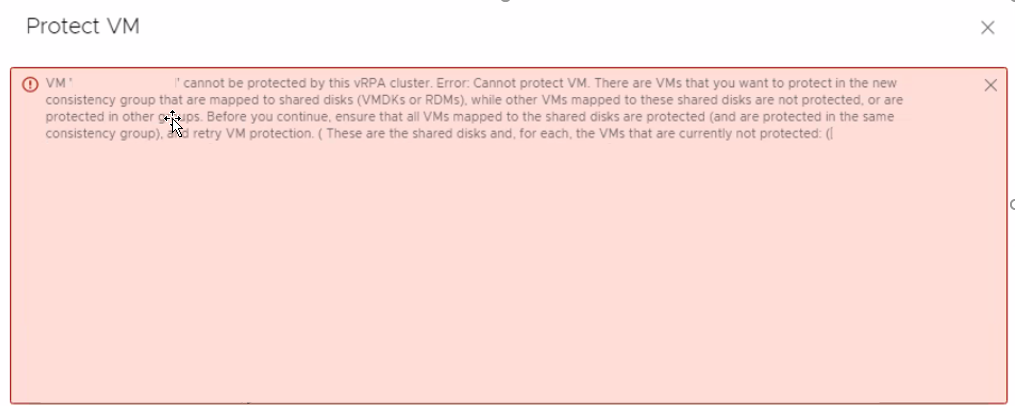
- If you select individual VMs to be protected, or the SCSI ID does not match between Source and Target VMs, you see the below error:
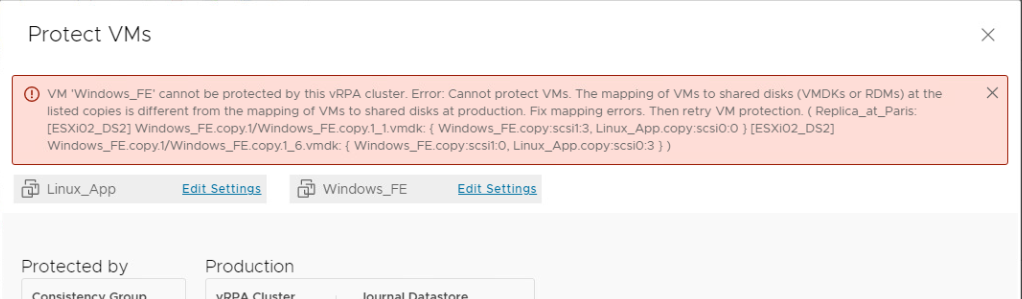
- If the SCSI ID does not properly match, the Virtual Machine protection fails with the error below:
- SCSI IDs assignment examples:
- Good example of SCSI IDs
- Bad example of SCSI IDs
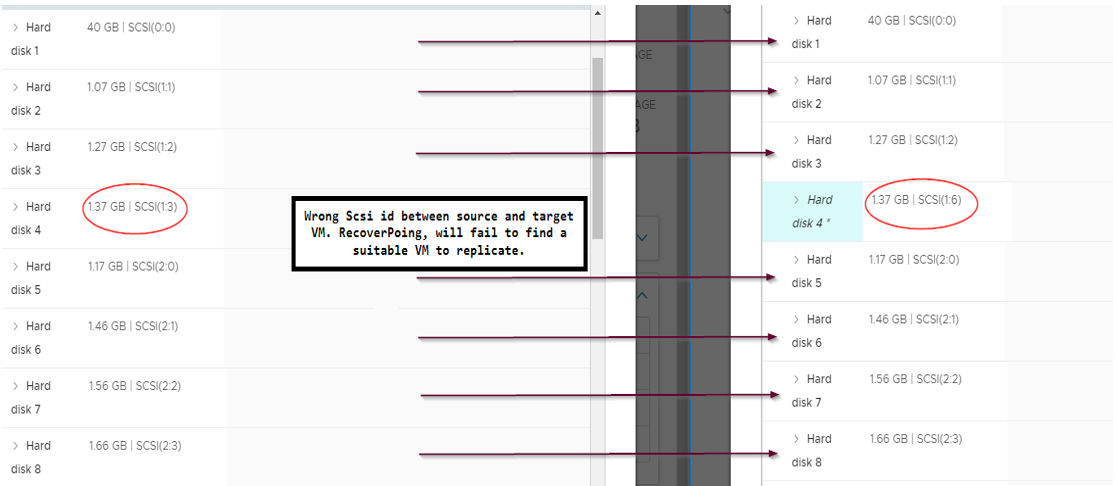
- Good example of SCSI IDs
Affected Products
RecoverPoint for Virtual MachinesArticle Properties
Article Number: 000197050
Article Type: How To
Last Modified: 14 Feb 2025
Version: 19
Find answers to your questions from other Dell users
Support Services
Check if your device is covered by Support Services.