NetWorker Management Web UI (NWUI): How to Use
Summary: This KB provides an overview of the NetWorker Web User Interface (NWUI). This is an HTML web-based NetWorker management interface which provides similar functionality as the legacy Java-based NetWorker Management Console. ...
Instructions
Refer to this video:
You can also view this video on YouTube .
What is the NetWorker Management Web User Interface (NWUI)
How to Install
- The UI can be installed either on the NetWorker Server or on the NetWorker Management Console server.
- It can be installed on Linux or Windows Operating Systems. See the NetWorker Compatibility Guide for a full list of supported platforms.
- The NetWorker Installation Guide provides full details on how to install the NetWorker Management UI on your chosen platform.
'View Certificate'; 'Install Certificate'; 'Place all certificates on the following store'; 'Browse'; 'Trusted Root Certificate Authorities; 'Ok'; 'Yes'.
Linux, extract using the tar command and install using the rpm command. There is a prompt to run a configuration script called nwui_configure.sh which will run through configuring the software.
- As part of the installation, the authentication host is specified which points to a NetWorker server running the authentication service. The NetWorker Management Web UI uses NetWorker credentials for authentication. These are the same credentials as are used for the NetWorker Management Console.
- Once installed, we control the NetWorker Management UI daemons
Linux sysvinit: /etc/init.d/nwui start/stop/status
Linux systemd: systemctl start/stop/status nwui
For full details on how to install the NWUI, see the following article: NetWorker Management Web UI (NWUI): How to Install
How to Use
- Access the NetWorker Management Web UI by pointing the browser to the following address: https://<IP_address_or_hostname>:9090/nwui
- Log in with a NetWorker user account and password.

- NetWorker NWUI: How to Configure AD/LDAP from the NetWorker Web User Interface
- NetWorker: How to configure "AD over SSL" (LDAPS) from The NetWorker Web User Interface (NWUI)
How to add the vCenter server:
2. Go to VMware vCenters.
3. Click +Add.


- An entry for the added vCenter server appears automatically in the Protection window's VMware vCenters pane. If an entry for the added vCenter does not appear, click the Refresh icon.
- When you select one of the available vCenter resources, the vCenter inventory displays in the right pane of the window in a tree structure that allows you to view all virtual machines and entities, and select individual items to view the entity's properties.
- If you need to edit the vCenter server properties, you can do so under: Protection > VMware vCenters.

How to Install the vCenter plug-in:
1. Expand the Protection drop-down in the NWUI menu.
2. Go to VMware vCenters.
3. Select the VMware vCenter you want to install the plug-in on.
4. Click the ... option and select Install vCenter Plugin.


7. Log in to the vSphere web client. The NetWorker plug-in is available from the home page.
How to add and configure the vProxy
- After deploying the OVA for the vProxy host, perform the following steps to add the vProxy by using the NetWorker Management Web UI.
- You must first have followed the above procedure to add the vCenter.

4. In the Selection page, ensure that the correct vCenter is selected. Click Select Proxies to select one or more vProxies.


- You can edit the properties of the vProxy, using the Edit icon in the Protection->VMware Proxies page.
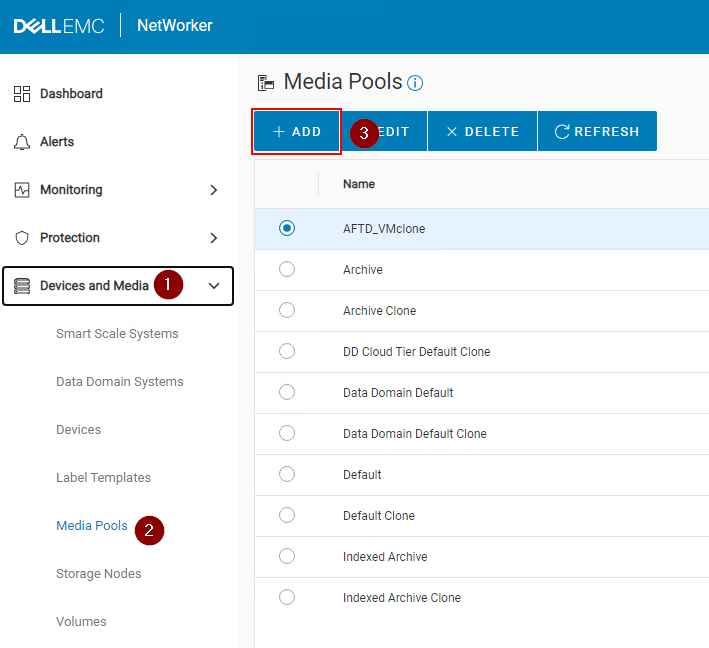
Adding a Pool
1. Expand the Devices and Media drop-down in the left menu.
2. Go to Media Pools.
3. Click +Add.

4. Populate the required fields:
a. Specify a Name for the pool.
b. Specify a Type (Backup or Backup Clone).
c. Select a Label Template or click Add Label Template. See below Adding a Label Template section.
d. Select a Media Type Required for the device type which will be used by the Pool.
e. Optional: Select configured devices which will use this pool. This can be left blank if you intend on creating new devices to be used by the pool.

f. Click Finish.
Adding A Label Template:
- Can be accessed from NWUI under Devices and Media->Label Templates.
- Can be accessed during Pool creation by selecting Add Label Template.
2. Specify a field component, i.e Character String.
3. Add a field component, i.e: Range of Numbers: 001 to 999 would be a common one used with NetWorker.
5. Specify the Next Label to be used by the Label Template. For the options used in this example this would be TestPool.001.

6. Click Create.
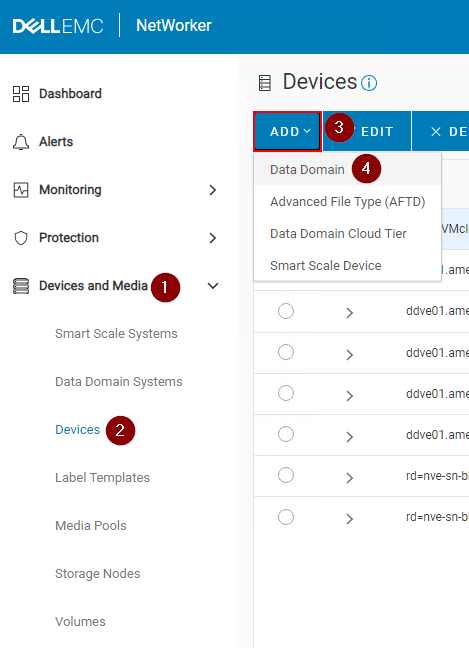
Creating a Data Domain Device
1. Expand the Devices and Media drop down in the left menu.
2. Go to Devices.
3. Click on +Add.
4. Select Data Domain.

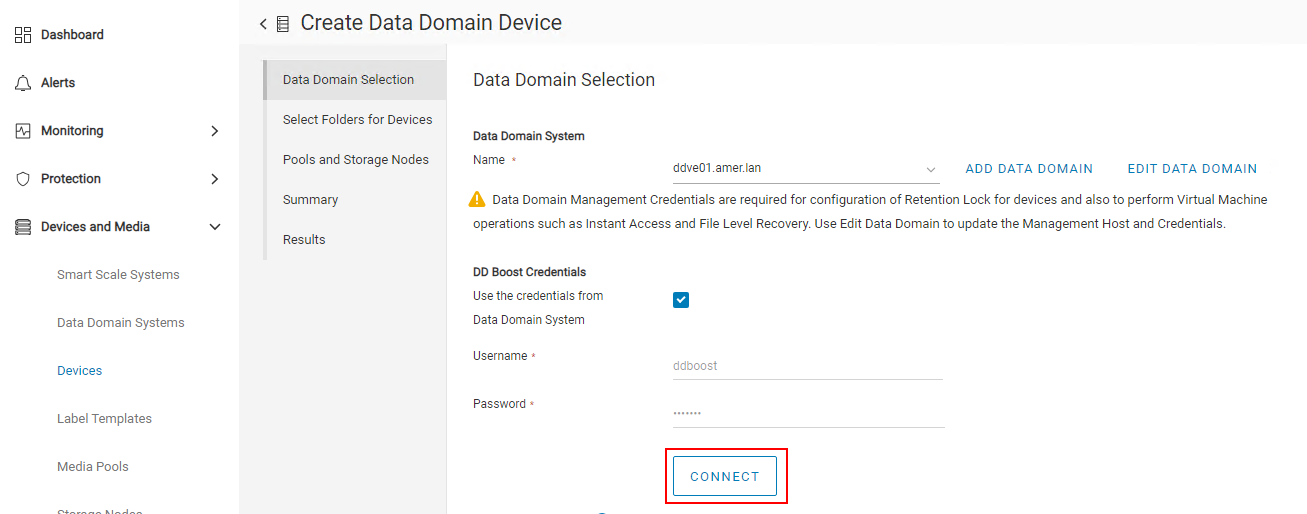
5. Select a Data Domain which already exists on the NetWorker server. If no Data Domain exists, click Add Data Domain.
6. Ensure that the correct ddboost user is shown when selecting a pre-existing Data Domain.
7. Click Connect.

8. Click Next.
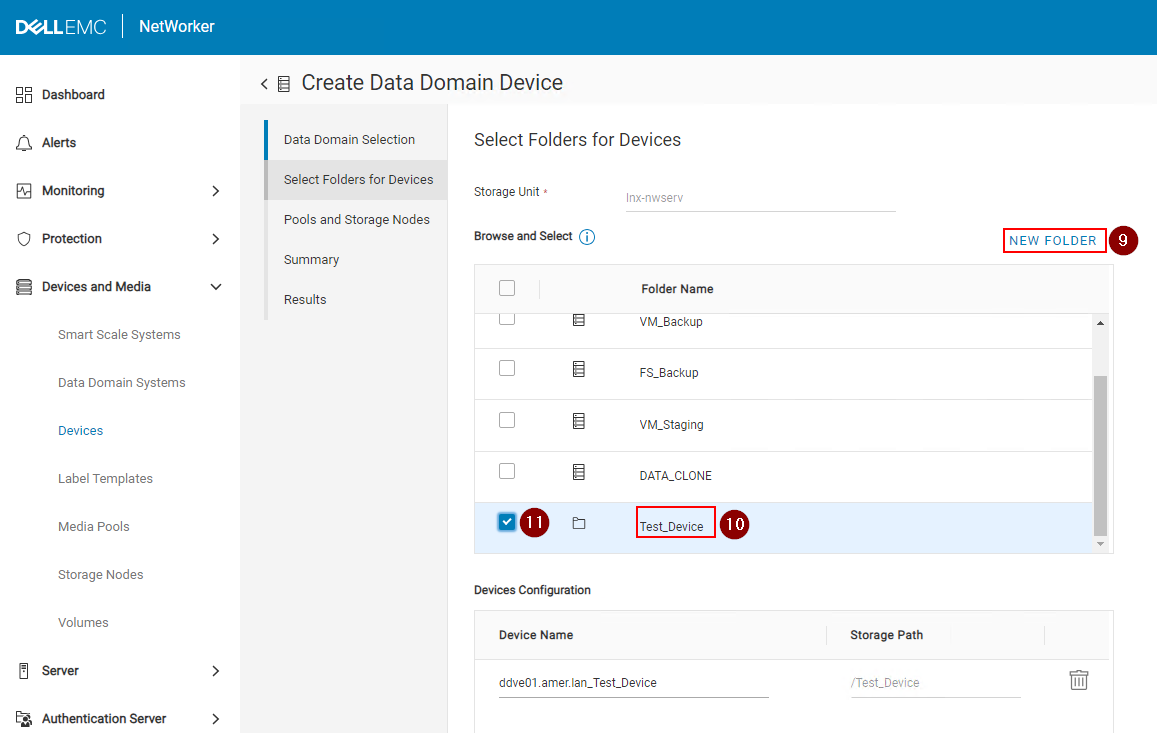
9. Click New Folder.
10. Enter a name for the device.
11. Check the device. The Device Name and Storage Path should appear in the lower pane.

12. Click Next.
13. Select a Storage Node that the device is configured through.
13. Select a Pool Type (Backup or Backup Clone). This should match the Pool type of the Pool selected in the next step. See the Adding a Pool section for more details.
14. Select a Pool. See the Adding a Pool section for more details.

15. Click Next.
16. Review the Summary details and click Create.
17. Monitor the Results and click Finish.
18. Click Refresh in the Devices pane to see the newly created device.
NVP-vProxy Recovery Operations
2. Select or specify a Time Range.
3. Select the VMware client type.
4. Select the source vCenter.
5. Select the Virtual Machine needed for restore. Click Refresh if Virtual Machine pane does not populate.
6. Click Refresh over the right pane to populate a list of backups and clones within the time range specified.


Recover to a new Virtual Machine - Recover a VM to a new VM.
Instant Restore - VM backup is read directly from the Data Domain device.
Virtual Disk (VMDK) Recovery - Recovers a virtual disk and adds it to an existing VM.
Emergency Recovery - Add ESXi server details to recover a VM using that ESXi host (when no vCenter Server is available).
File Level Recovery - Recover individual files from a backup.
Additional Information
NetWorker Management Web UI (NWUI): How to Install
NetWorker NWUI: How to Configure AD/LDAP from the NetWorker Web User Interface
NetWorker: How to configure "AD over SSL" (LDAPS) from The NetWorker Web User Interface (NWUI)
NetWorker: How to Perform a VMware FLR from the NetWorker Web User Interface
NetWorker Management Web UI (NWUI): Triage and Troubleshooting Guide