A Basic Guide to Identifying the Major Components in a Desktop
Summary: This article is a basic reference guide to the types of hardware that goes into making a Dell desktop.
Instructions
The following sections provide a visual guide to each of the major components found in any desktop. (Shipping now or having shipped in the last 10 years.) They also give some basic info on each component as well.
Visual Guides to the Various Desktop Components
What it looks like and what it does?
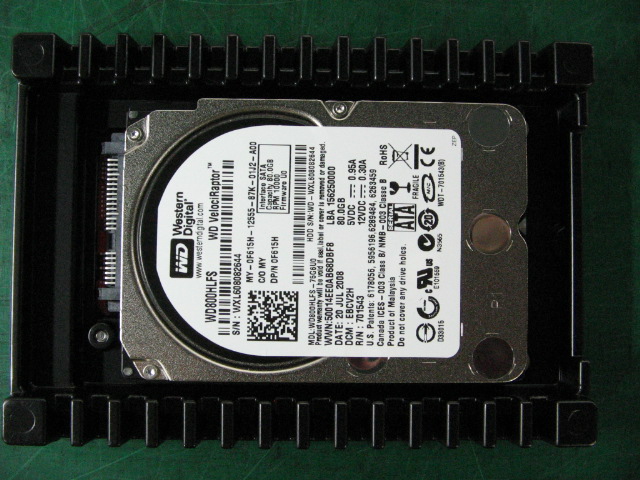
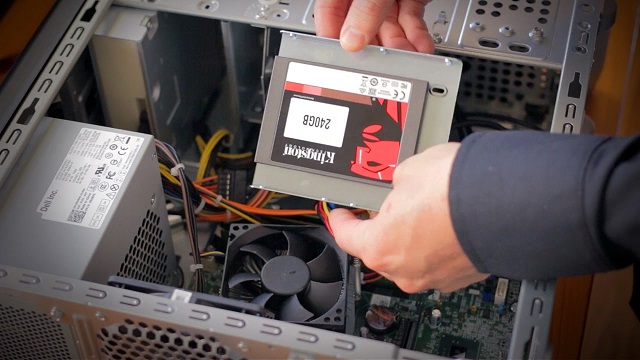
The HDD (Hard Drive) or solid state drive (SSD) is the part of the desktop which holds the Software and Data.
The Hard drive is most often Silver and Black and is either 2.5" or 3.5" wide. It usually has a raised circle on top with a circuit card on the bottom. The rear of the drive has various female connectors.
The SSD is most often Silver and Black and is 2.5" wide. It has the same connectors as the Hard drive.
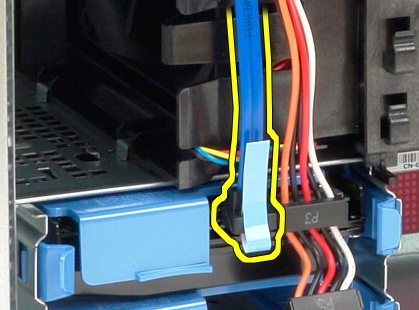
The Hard drive or SSD both have the same two cables which connect to it: The Data Serial ATA (SATA) cable and the Power cable
These cables connect simply by pushing them in place or pulling them out. There are no catches locking them in place.
The Hard drive or SSD is secured in place either in a Cage or on Runners depending on the Model Type.
Hard drives are older technology with spinning platters that can store a lot of data. SSDs are newer technology which ups the drives access speeds by using flash memory instead of platters. SSDs are a common upgrade part to improve the speed of most desktops, but the storage sizes are short of what a Hard drive can handle. Combinations of both have been used for fast boot and seek speeds, while still holding space for saved data.
What it looks like and what it does?
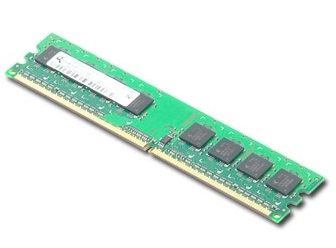
The Memory is the part of the desktop which lets it transfer Data between the Software programs. The more that is installed the more it speeds up the experience of using the programs and applications.
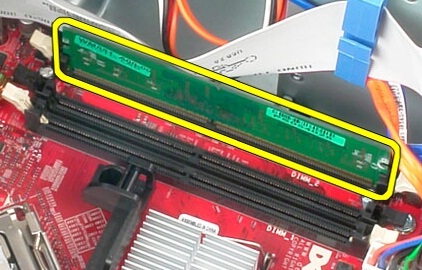
The Memory in a Desktop is usually 2.5" to 3" long and about 1" tall. There is a golden fringe along the bottom of the circuit card and the fringe has a notch cut into it.
To Release the Memory: Pull apart the clips at either side of the Memory and it rises from the slot so it can be pulled out of the slot.
To Reseat the Memory: Push the Memory into the slot and ensure that it is the correct way round. The clips either side of the slot come up and clip the memory in place. (They secure the Memory in place and if the clips do not catch the memory then it is not seated properly.)
The Memory card notch matches a bar in the Memory slot. It only allows the memory to be fitted in the Memory slot when it is the correct way round. The notch also changes position depending on what type of memory that it is. (For example, it stops a DDR3 memory from fitting in a DDR4 slot.)
What it looks like and what it does?
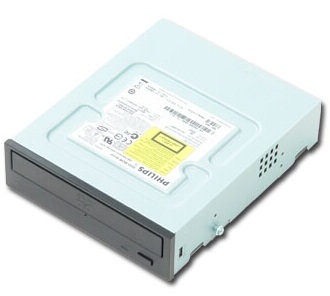
The Compact Disc (CD) or Digital Versatile Disc (DVD) drive is the part of the desktop which reads CD or DVD media. Depending on the type of drive fitted, it may create media as well.
The CD or DVD drive is usually a rectangular box with a Black or White face where the media is inserted. If a slimline CD or DVD drive, is fitted it still follows this basic shape.
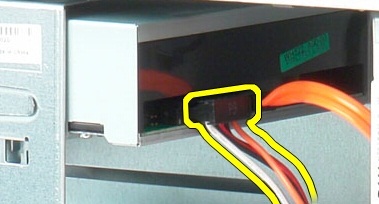
The CD or DVD Drive has three cables that connect to it: The Data SATA cable and the Power cable
These cables connect by pushing them in place or pulling them out. There are no catches locking them in place. Depending on the model of drive, it may also have an Audio cable plugged. This does have a catch with a small lever that must be pressed to remove the cable from the Drive.
The CD or DVD Drive is secured in place with Phillips head screws or with Dell brackets.
What it looks like and what it does?
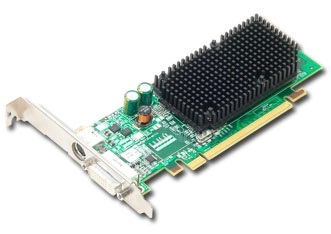
The Video Card is an optional add-in card. It is added to the desktop to improve the graphics above the level supplied by the graphics chip built into the Motherboard.
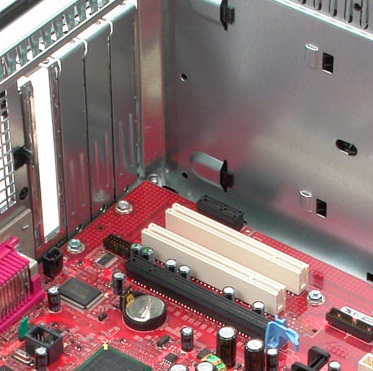
The Video Card follows the normal configuration for an Option Card. There is a blanking plate that contains the female connectors and points out the back of the desktop. There is a golden fringe along the bottom of the circuit board that makes up the card itself. The configuration of the fringe matches the appropriate slot that it uses. A card does not fit in the wrong slot.
To Remove the card: Release it from the option slots on the back of the desktop. On PCIe Cards release the locking clip at the back of the card slot.
To Reseat the card: Locate the front of the card into the correct option slot and push down into the slot until it firmly seats in place.
The Video Card is secured with a Clip or Lock, or Phillips head screw, depending on the Model Type.
What it looks like and what it does?
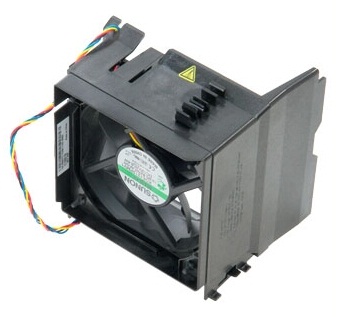
The System Fan is used to pull air into the desktop to cool the chassis down. This stops it from overheating and makes it work more efficiently.

The System Fan is black and is usually fitted within a Black or Blue Shroud.
The System Fan connects to the Motherboard by a Controller cable. The cable usually has a lever clip securing the connector in place.
The System Fan secures to the chassis using Rubber clips or a Cage.
What it looks like and what it does?
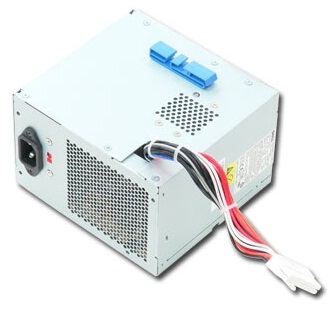
The Power Supply Unit (PSU) is the part of the desktop which powers the machine and all its components.
The PSU is usually a square or rectangular metal box. It has a Power Cord connector on the rear and has multiple multicolored power cables projecting out of the front or connected to the front.
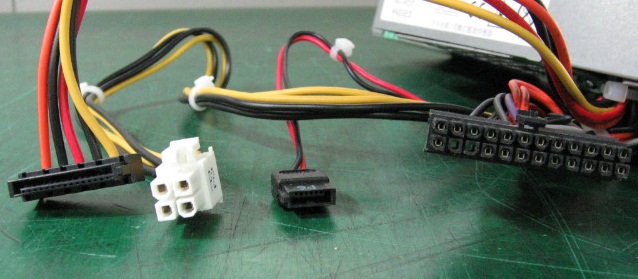
The SATA PSU has four main types of cable connector which connect from it to the various parts in the desktop.
The 24-pin and four-pin connectors plug to the Motherboard. The cables plugging to the Motherboard does have catches that lock them in place. The other two connectors plug to any of the Drives in the desktop. These cables connect by pushing them in place or pulling them out, without a catch or clip.
The PSU is secured in place to an internal catch and with external Phillips head screws.
What it looks like and what it does?
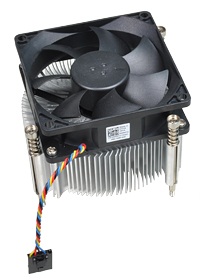
The heat-sink is the part of the desktop which directs heat away from the processor which is the brain of the desktop. It does sometimes have an integrated fan.
The heat-sink usually takes the form of multiple metal fins that are contained within a Black shroud, sometimes with a fan on top.
To Remove it, take out the screws and disconnect the fan cable and Remove the Assembly from the desktop.
To Reseat the heat-sink, reconnect the fan cable and once the heat-sink is back in place, put the screws back in.
The heat-sink and fan are secured to the Motherboard with Phillips Head screws.
What it looks like and what it does?
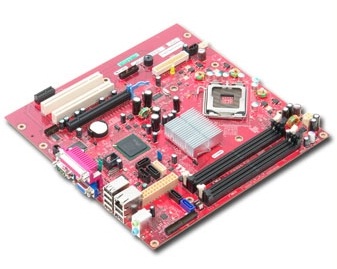
The Motherboard is the part of the desktop which every other part connects to and it controls how those parts are used.

This is not generally a customer removable part.
The Motherboard is the biggest circuit card in the desktop and is secured to the base of the chassis.
It has multiple connectors soldered to it and all the other parts in the desktop plug to this component by one of the various connectors.
The Motherboard has the Processor fitted to it and is secured to the chassis with Philips head screws.