How to disable Windows Defender if you have a Third Party alternative
摘要: How to disable Windows Defender in Group Policy Editor when a third-party antivirus is running on your computer.
本文章適用於
本文章不適用於
本文無關於任何特定產品。
本文未識別所有產品版本。
說明
If you have a third-party anti-virus that is installed and active on your computer, you may wish to disable Windows Defender. This article walks you through disabling Windows Defender using the Group Policy Editor within Windows.
Disabling Windows Defender using Group Policy Editor
 It is recommended you follow these steps to disable Windows Defender ONLY if you are running a third-party anti-virus program on your computer.
If you are running a third-party anti-virus and wish to disable Windows Defender, you can do so using the Group Policy Editor in Windows following the steps below:
- Open a command prompt by pressing the Windows + R keys on the keyboard, type cmd in the search box, and click OK.
- Type gpedit.msc at the command prompt and press Enter.
- Confirm the UAC prompt to continue.
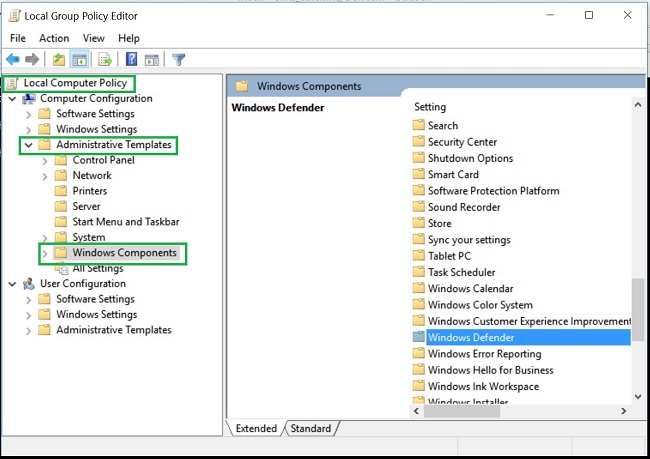
- Navigate through the following path to open the Windows Defender settings: Local Computer Policy > Computer Configuration > Administrative Templates > Windows Components > Windows Defender (Figure 1):

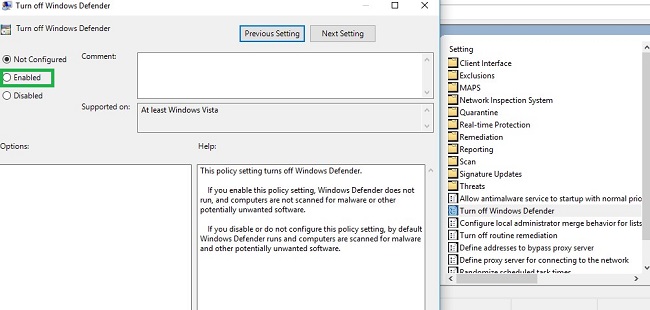
Figure 1: gpedit.msc Windows Defender folder - Double-click the Windows Defender folder to open the settings and look for the Turn off Windows Defender policy setting (Figure 2):

Figure 2: gpedit.msc Turn off Windows Defender policy - Select Enabled to enable this policy and turn off Windows Defender (Figure 3):

Figure 3: gpedit.msc Enable Turn off Windows Defender policy - Restart your computer for the changes to take effect.
 NOTE: If you remove your third-party anti-virus and wish to reenable Windows Defender on your computer, follow the steps above using the group policy editor. Select either Not Configured or Disabled for the Turn off Windows Defender policy.
文章屬性
文章編號: 000108754
文章類型: How To
上次修改時間: 30 1月 2024
版本: 4
向其他 Dell 使用者尋求您問題的答案
支援服務
檢查您的裝置是否在支援服務的涵蓋範圍內。