How to Share Log Files, Screenshots, and Error Messages with Dell
摘要: Instructions on how to upload files, screenshots, and error messages to Service Requests.
本文章適用於
本文章不適用於
本文無關於任何特定產品。
本文未識別所有產品版本。
說明
Why should I use Dell Support to upload logs?
As part of Dells Digital Concierge we have a common entry or staging area for all customer logs.
This fulfills several functions, including:
- Security - A secure protected trusted platform from which customer can enter sensitive data (like Logs) can be uploaded safely into the Dell support sphere.
- AI - From the two entrance points dell.support.com and Tech Direct, logs enter an environment which provides the telemetry data to AI programs to examine and suggest solutions to the engineer.
- Log Tools - From this single staging point, logs are uploaded to an internal environment, from where they are assimilated, organized for engineer use.
- Customer facing - Virtual assistants from the backend interact with AI and log analysis to assist the customer using chats or suggestions and case resolution (Eventually).
Table of Contents:
- Option 1: Use your Dell account.
- Option 2: Without a Dell account, but then stating the file size limitation
- Link to video showing all options.
- If the above options around accounts do not work, then it must be escalated up through the business units.
Instructions
Option 1 - Use your Dell Account.
- Go to Dell.com/Support
- Sign In to your account if you are not already logged in.

Figure 1: Dell Technologies Sign In process.
- For information about registering for a Dell account or updating an existing account, see How to Register for Access to Dell Technologies Online Support or Upgrade an Existing Account.
- Failure to Sign In results in a 50MB max file size and five file max attachment limitation
- Select Support > Service Requests & Dispatch Status

Figure 2: Dell Technologies Support Page
- Search using the Service Request (SR) Number

Figure 3: Dell Support Service Request search
- If prompted, you must enter the email address of the primary case contact
This may be different than the account login depending on who created the case.
A support agent can find this information by going to the SR and looking at the case contact
A support agent can find this information by going to the SR and looking at the case contact
- Once a Service Request Number match is found, the Service Request Details page is displayed
- In the Activity Center section of the page, see Attachments.
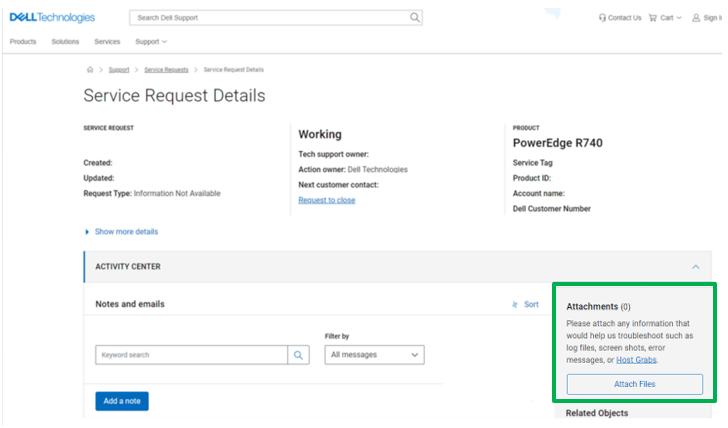
Figure 4: Activity Center Attachments Page
- Click the Attach Files button
You can either drag and drop files or Select Files to upload.
- Once the files are added to the upload window, either select Upload (1 by 1) or Upload All
Upload speeds vary due to the size of the file and the user's local network speed.

Figure 5: Upload Selected Attachments
- Once the files are uploaded, they are visible within the Dell Ticketing tool and in the agent’s troubleshooting console
Option 2 Uploading Logs without a Dell Account.
(For information about registering for a Dell account or updating an existing account, see How to Register for Access to Dell Technologies Online Support or Upgrade an Existing Account)
- Go to Dell.com/Support
(Because you are not signing in, there is a 50MB max file size and five file max attachment limitation)
Double check this.
- Select Support > Service Requests & Dispatch Status.
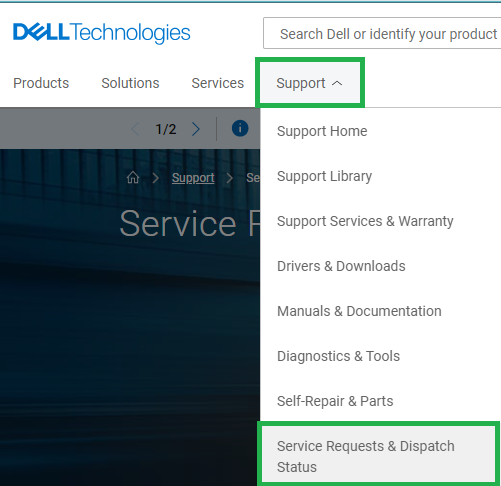
Figure 1: Dell Technologies Support Page
- Search using the Service Request (SR) Number
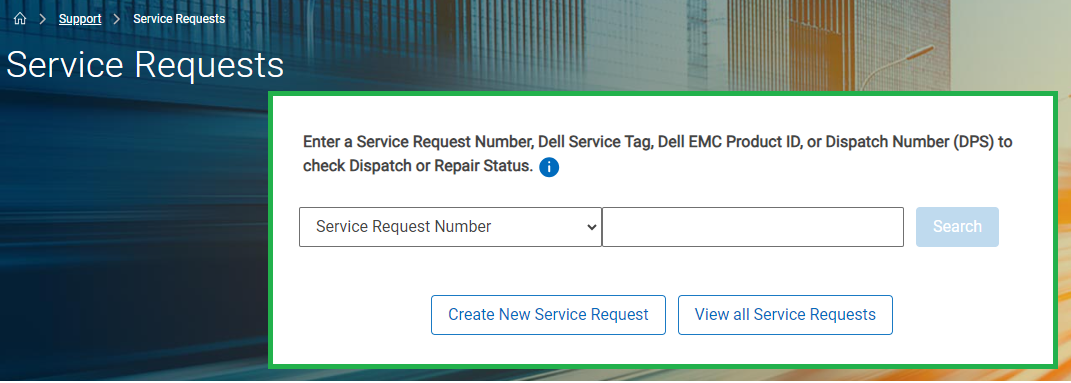
Figure 2: Dell Support Service Request
- If prompted, you must enter the email address of the primary case contact.
This may be different than the account login depending on who created the case.
A support agent can find this information by going to the SR and looking at the case contact.
A support agent can find this information by going to the SR and looking at the case contact.
- Once a Service Request Number match is found, the Service Request Details page is displayed

Figure 3: Activity Center Attachments Page
- In the Activity Center section of the page, see Attachments.
- Click the Attach Files button
You can either drag and drop files or Select Files to upload.
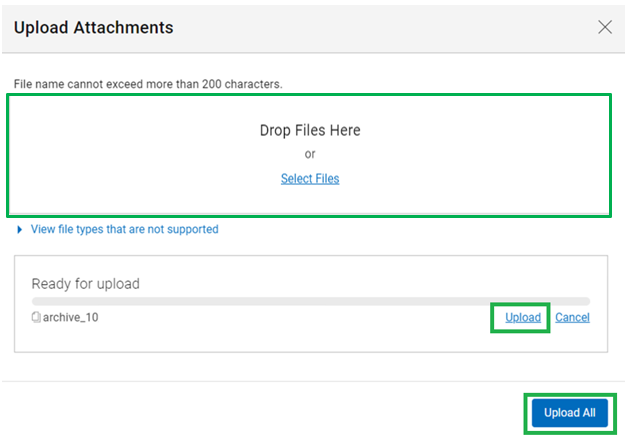
Figure 4: Upload Selected Attachments
- Once the files are added to the upload window, either select Upload (1 by 1) or Upload All
Upload speeds vary due to the size of the file and the user's local network speed.
- Once the files are uploaded, they are visible within the Dell Ticketing tool and in the agent’s troubleshooting console
其他資訊
受影響的產品
Entry Level & Midrange文章屬性
文章編號: 000212038
文章類型: How To
上次修改時間: 22 1月 2025
版本: 8
向其他 Dell 使用者尋求您問題的答案
支援服務
檢查您的裝置是否在支援服務的涵蓋範圍內。