文章編號: 000125171
如何为 Dell Data Security 服务器配置 SMTP 设置
摘要: 可按照以下说明为 Dell Data Security/Dell Data Protection 服务器配置简单邮件传输协议 (SMTP) 设置。
文章內容
症狀
本文提供了配置有关 Dell Security Management Server(以前称为 Dell Data Protection | Enterprise Edition)和 Dell Security Management Server Virtual(以前称为 Dell Data Protection | Virtual Edition)的 SMTP 服务器信息的步骤。
受影响的产品:
Dell Security Management Server
Dell Data Protection | Enterprise Edition
Dell Security Management Server Virtual
Dell Data Protection | Virtual Edition
受影响的版本:
v8.0.0 及更高版本
受影响的操作系统:
Windows
Linux
原因
不适用。
解析度
为 Dell Security Management Server 或 Dell Security Management Server Virtual 手动执行 SMTP 配置。单击相应的服务器类型以了解更多信息。
要输入 SMTP 服务器信息,请执行以下操作:
- 登录到 Dell Security Management Server。
- 停止所有 [产品] 服务。
提醒:
- [产品]=
- v8.15 及更高版本 = Dell
- v8.14.1 及更低版本 = Dell Data Protection
- 有关更多信息,请参阅如何在 Dell Security Management Server/Dell Data Protection Enterprise Edition Server 中停止和启动服务。
- 在 Windows 资源管理器中,转至
C:\Program Files\Dell\Enterprise Edition\Server Configuration Tool\,然后双击Credant.Configuration.exe以打开该服务器配置工具。

提醒:如果 Dell Security Management Server 已安装到自定义位置,则目录会有所不同。
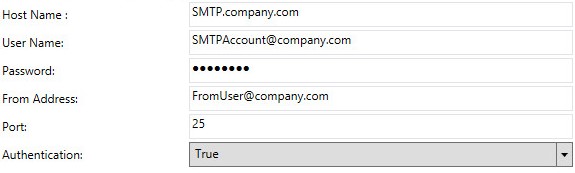
- 在该服务器配置工具中,单击 SMTP 选项卡。

- 从 SMTP 菜单中:
- 填充 SMTP 主机名。
- 填充 SMTP 服务器的用户名。
- 填充用户的密码。
- 填充电子邮件消息的发件人地址。
- 填充 SMTP 端口。
- 针对 Authentication,选择“True”或“False”。
提醒:
- 主机名、帐户、端口和设置在您的环境中可能会有所不同。
- 如果环境需要身份验证来中继,请将“Authentication”设置为“True”。如果不需要身份验证来中继,请将“Authentication”设置为“False”。
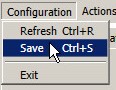
- 单击 Configuration,然后选择 Save。
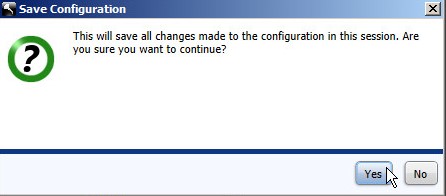
- 单击 Yes。
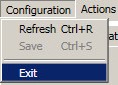
- 单击 Configuration,然后单击 Exit。
- 启动所有 [产品] 服务。
提醒:有关启动服务的更多信息,请参阅如何在 Dell Security Management Server/Dell Data Protection Enterprise Edition Server 中停止和启动服务(英文版)。
在 Dell Security Management Server Virtual 中输入 SMTP 服务器信息的步骤因版本而异。单击相应的版本以了解更多信息。有关版本信息,请参阅如何确定 Dell Data Security/Dell Data Protection Server 版本。
要输入 SMTP 服务器信息,请执行以下操作:
- 使用默认管理员 (
delluser) 凭据登录 Dell Enterprise Server Virtual 管理控制台。

提醒:
- Dell Security Management Server Virtual 的默认凭据为:
- 用户名:
delluser - 密码:
delluser
- 用户名:
- 管理员可以更改产品的虚拟设备菜单中的默认密码。
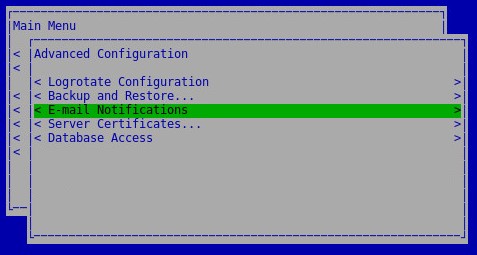
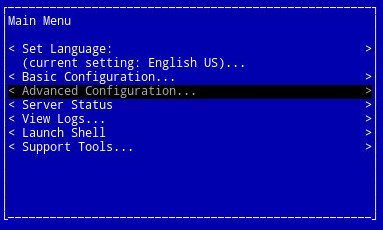
- 在主菜单中,选择 Advanced Configuration,然后按 Enter 键。

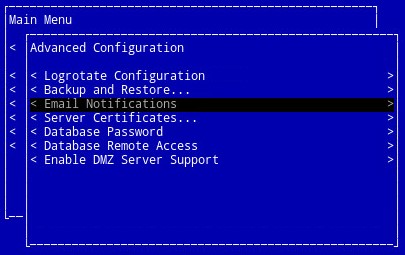
- 选择 E-mail Notifications,然后按 Enter 键。
- 从“Setup E-mail Notifications”菜单中:
- 选中 Enable E-mail Alerts。
- 填充 SMTP 服务器主机名。
- 填充 SMTP 端口。
- 填充 SMTP 用户。
- 填充 SMTP 用户的密码。
- 填充要从中发送通知的帐户。
- 填充要向其发送服务器状态的电子邮件。
- 填充要向其发送密码更改的电子邮件。
- 填充要向其发送软件更新的电子邮件。
- (可选)选中 Service Alert Reminder,然后填充提醒间隔(以分钟为单位)。
- 选择摘要报告的频率。
- 选择“OK(确定)”。
- 按Enter键
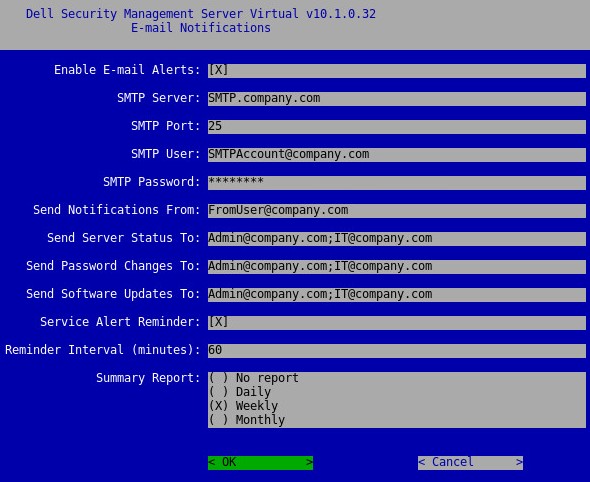
提醒:
- 主机名、帐户、端口和设置在您的环境中可能会有所不同。
- 多个电子邮件地址可以用分号分隔。
要输入 SMTP 服务器信息,请执行以下操作:
- 使用默认管理员 (
ddpuser) 凭据登录 Dell Enterprise Server Virtual 管理控制台。

提醒:
- Dell Security Management Server Virtual 的默认凭据为:
- 用户名:
ddpuser - 密码:
ddpuser
- 用户名:
- 管理员可以更改产品的虚拟设备菜单中的默认密码。
- 在主菜单中,选择 Advanced Configuration,然后按 Enter 键。
- 选择 Email Notifications,然后按 Enter 键。
- 从“Setup Email Notifications”菜单中:
- 选中 Enable Email Alerts。
- 填充 SMTP 服务器主机名。
- 填充 SMTP 端口。
- 填充来自用户的 SMTP。
- 填充 SMTP(输入)用户。
- 填充 SMTP 用户的密码。
- 填充要向其发送 VE 状态通知的电子邮件。
- 填充要向其发送密码更改通知的电子邮件。
- 填充要向其发送软件更新通知的电子邮件。
- (可选)选中 Service Alert Reminder,然后填充提醒间隔(以分钟为单位)。
- 选择摘要报告的频率。
- 选择“OK(确定)”。
- 按Enter键

提醒:
- 主机名、帐户、端口和设置在您的环境中可能会有所不同。
- 多个电子邮件消息可以用逗号或分号分隔。
要输入 SMTP 服务器信息,请执行以下操作:
- 使用默认管理员 (
ddpuser) 凭据登录 Dell Enterprise Server Virtual 管理控制台。

提醒:
- Dell Security Management Server Virtual 的默认凭据为:
- 用户名:
ddpuser - 密码:
ddpuser
- 用户名:
- 管理员可以更改产品的虚拟设备菜单中的默认密码。
- 在主菜单中,选择 Advanced Configuration,然后按 Enter 键。

- 选择 Email Notifications,然后按 Enter 键。

- 从“Setup Email Notifications”菜单中:
- 选中 Enable Email Alerts。
- 填充 SMTP 服务器主机名。
- 填充 SMTP 端口。
- 填充来自用户的 SMTP。
- 填充 SMTP(输入)用户。
- 填充 SMTP 用户的密码。
- 填充要向其发送 VE 状态通知的电子邮件。
- 填充要向其发送密码更改通知的电子邮件。
- 填充要向其发送软件更新通知的电子邮件。
- 选择“OK(确定)”。
- 按Enter键

提醒:
- 主机名、帐户、端口和设置在您的环境中可能会有所不同。
- 多个电子邮件消息可以用逗号或分号分隔。
要联系支持部门,请参阅 Dell Data Security 国际支持电话号码。
转至 TechDirect,在线生成技术支持请求。
要获得更多见解和资源,请加入戴尔安全社区论坛。
其他資訊
影片
文章屬性
受影響的產品
Dell Encryption
上次發佈日期
20 12月 2022
版本
12
文章類型
Solution