文章编号: 000126208
How to Collect Dell Trusted Device Logs
摘要: Learn how to collect logs for Dell Trusted Device (formerly Dell BIOS Verification) by following these instructions.
文章内容
说明
This article covers how to collect logs for Dell Trusted Device (formerly Dell BIOS Verification). It is highly recommended to collect logs prior to troubleshooting or contacting Dell Data Security ProSupport.
Affected Products:
- Dell Trusted Device
- Dell BIOS Verification
Affected Versions:
- v1.0 and Later
Affected Platforms:
- Latitude
- OptiPlex
- Precision
- XPS
Affected Operating Systems:
- Windows
The process of gathering logs varies based on version. Click the appropriate version for specific steps. For versioning information, reference How to Identify the Dell Trusted Device Version.
v2.1.0 and Later
To gather logs, you must Enable Verbosity, reproduce the issue, and then Capture Logs. Click the appropriate process for more information.
Enable Verbosity
Warning: Verbosity should only be enabled to troubleshoot an issue. Dell Technologies recommends disabling verbosity after the issue is resolved. Endpoints may experience performance degradation while verbosity is enabled.
To enable advanced logging for Dell Trusted Device, a registry entry must be created or modified if it already exists.
- Log in to the affected endpoint.
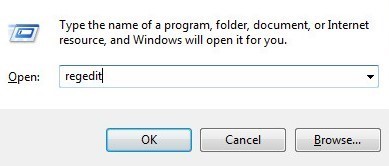
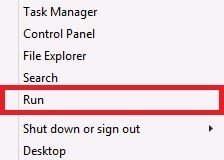
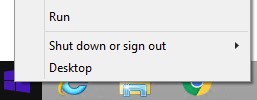
- Right-click the Windows Start menu and then select Run.

- In the Run UI (user interface), type
regeditand then press CTRL+SHIFT+ENTER to run the Registry Editor as an administrator.
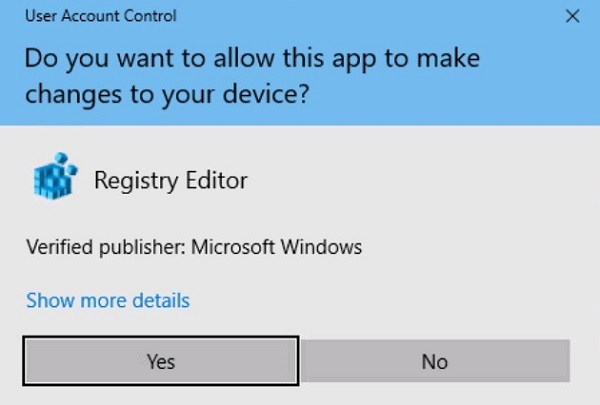
- If User Account Control (UAC) is enabled, click Yes. Otherwise, go to Step 5.
- Go to
HKEY_LOCAL_MACHINE\Software\Dell\TrustedDevice.
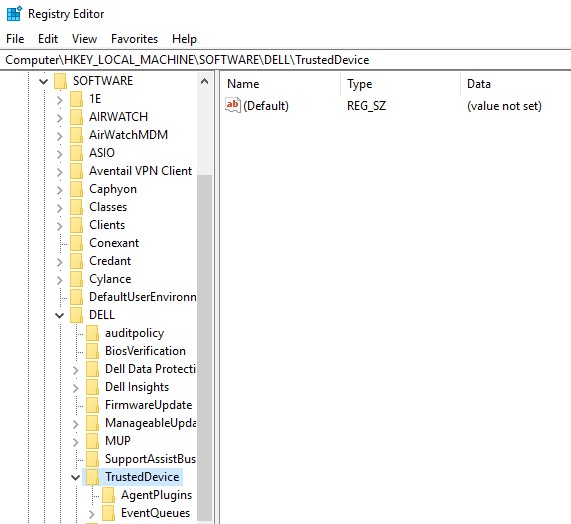
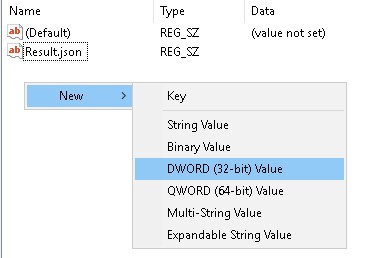
- Right-click in the right pane, select New, and then click DWORD (32-bit) Value.

Note: If a DWORD named LogVerbosity already exists, go to Step 8.
- Name the DWORD
LogVerbosity.

- Double-click
LogVerbosity.
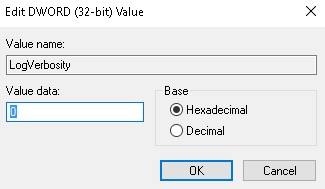
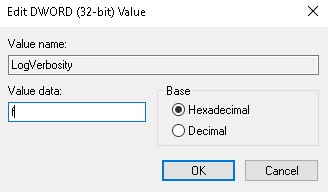
- Populate Value data with
fin hexadecimal and then click OK.
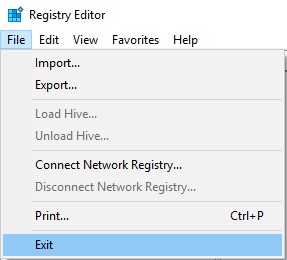
- Click File and then select Exit.
Note: Once verbosity is enabled on an endpoint, reproduce the issue before capturing logs.
Capture Logs
Dell Trusted Device logs must be manually collected for:
- Installation logs - Used to troubleshoot installation and uninstall issues.
- Application logs - Used to troubleshoot communication and behavior issues.
- Log in to the endpoint with the user that attempted the install or uninstall.
- Right-click the Windows Start menu and then click Run.

- In the Run UI, type
%temp%and then press OK. - From Windows Explorer:
- Sort the files by Date modified.

- Identify the date and timeframe of the install or uninstall to collect logs for.
- Capture all logs named
MSI*.logwith a timestamp close to the install or uninstall.
Note:
* represents an alphanumeric string.
Dell Trusted Device Application logs may be collected Manually or by running DiagnosticInfo. Click the appropriate process for more information.
Manually
- Go to
C:\ProgramData\Dell\TrustedDevice.

Note: The directory path may differ based on the installation settings.
- Capture
Service.log.
DiagnosticInfo
- Go to
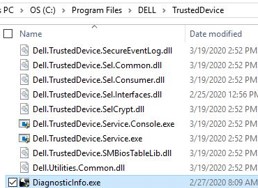
C:\Program Files\DELL\TrustedDevice.
Note: The directory path may differ based on the installation settings.
- Double-click DiagnosticInfo.exe.
For more information about DiagnosticInfo, reference How to Collect Logs for Dell Data Security Using DiagnosticInfo.
1.0.0 to 1.7.0
To gather logs, you must Enable Verbosity, reproduce the issue, and then Capture Logs. Click the appropriate step for more information.
Enable Verbosity
To enable verbosity:
Warning: Verbosity should only be enabled to troubleshoot an issue. Dell Technologies recommends disabling verbosity after the issue is resolved. Endpoints may experience performance degradation while verbosity is enabled.
To enable advanced logging for Dell BIOS Verification, a registry entry must be created or modified if it already exists.
- Log in to the affected endpoint.
- Right-click the Windows Start menu and then select Run.
- In the Run UI (user interface), type
regeditand then press CTRL+SHIFT+ENTER to run the Registry Editor as an administrator.

- If User Account Control (UAC) is enabled, click Yes. Otherwise, go to Step 5.

- Go to
HKEY_LOCAL_MACHINE\Software\Dell\BiosVerification.

- Right-click in the right pane, select New, and then click DWORD (32-bit) Value).
Note: If a DWORD named
LogVerbosity already exists, go to Step 8.
- Name the DWORD
LogVerbosity.

- Double-click
LogVerbosity.

- Populate Value data with
fin hexadecimal and then click OK.

- Click File and then select Exit.

Note: Once verbosity is enabled on an endpoint, reproduce the issue before capturing logs.
Capture Logs
Dell BIOS Verification logs must be manually collected for:
- Installation logs - Used to troubleshoot installation and uninstall issues.
- Application logs - Used to troubleshoot communication and behavior issues.
- Log in to the endpoint with the user that attempted the install and uninstall.
- Right-click the Windows Start menu and then click Run.
- In the Run UI, type
%temp%and then press OK. - From Windows Explorer:
- Sort the files by Date modified.

- Identify the date and timeframe of the install or uninstall to collect logs for.
- Capture all logs named
MSI*.logwith a timestamp close to the install or uninstall.
Note:
* represents an alphanumeric string.
- Go to
C:\ProgramData\Dell\BIOS Verification.

Note: The directory path may differ based on the installation settings.
- Capture
DellBiosVerification.log.
To contact support, reference Dell Data Security International Support Phone Numbers.
Go to TechDirect to generate a technical support request online.
For additional insights and resources, join the Dell Security Community Forum.
其他信息
视频
文章属性
受影响的产品
OptiPlex, XPS, Latitude, XPS, Fixed Workstations, Mobile Workstations, Dell Trusted Device
上次发布日期
10 5月 2024
版本
10
文章类型
How To