How to Install Dell Security Management Server
Sammanfattning: Learn how to install Dell Security Management Server by following these step-by-step instructions.
Den här artikeln gäller för
Den här artikeln gäller inte för
Den här artikeln är inte kopplad till någon specifik produkt.
Alla produktversioner identifieras inte i den här artikeln.
Instruktioner
This article covers the basic installation process for Dell Security Management Server (formerly Dell Data Protection | Enterprise Edition Server).
Affected Products:
- Dell Security Management Server
Affected Versions:
- v9.8.0 and later
Click the Dell Security Management Server version for appropriate installation steps. For how to install earlier versions of Dell Data Protection Enterprise Edition Server, reference How to Install Dell Data Protection Enterprise Edition Server. For versioning information, reference How to Identify the Dell Data Security Server Version.
Warning:
- Before installation, ensure that the environment meets Dell Security Management Server System Requirements.
- SQL databases configured to use Windows Authentication must use the same Windows account to install Dell Security Management Server.
- Anti-virus and anti-malware should be disabled while installing or upgrading the Dell Security Management Server to avoid impacting Microsoft C++ runtime installers, Java activities (certificate creation and manipulation), and PostgreSQLmodifications. All these items are triggered by executables or scripts.
- As a workaround, exclude:
- [INSTALLATION PATH]
:\Dell\Enterprise Edition C:\Windows\Installer- The file path from which the installer is run.
- [INSTALLATION PATH]
- As a workaround, exclude:
Note:
- This article only covers a new back-end deployment of Dell Security Management Server.
- Client Services is required for more complex or custom deployments of Dell Security Management Server. Client Service engagements can be purchased through your sales representative.
- Right-click and Extract the server software.
 Note: For more information about how to download the server software, reference How to Download Dell Security Management Server.
 - From the extracted root folder, copy
EnterpriseServerInstallKey.initoC:\Windows. Note: Optionally, the product key may be populated manually in Step 8.
 - Go to
\x64and then double-click setup.exe.
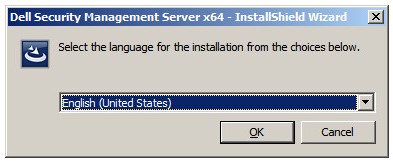
- Select the language and then click OK.
- If any missing requirements are detected, click Install. Otherwise, go to Step 6.
 Note: For more information about system requirements, reference Dell Security Management Server System Requirements.
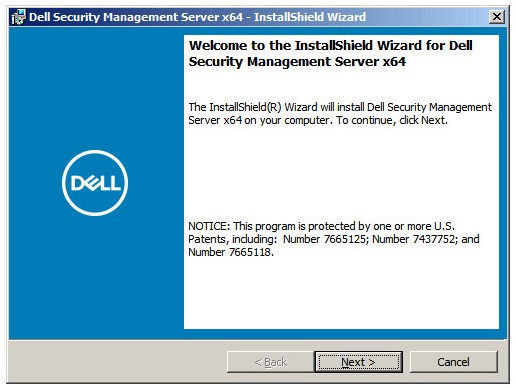
 - Click Next.
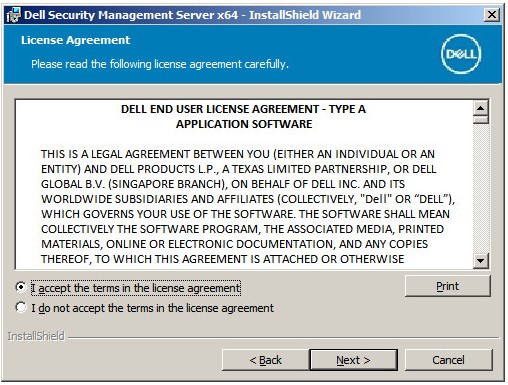
- Review the End User License Agreement (EULA). At the end of the EULA menu, select I accept the terms in the license agreement, and then click Next.
- Click Next.
 Note: The product key is autopopulated (Step 2).
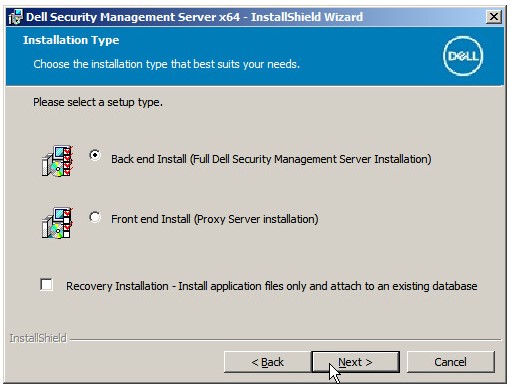
 - Verify Back end Install (Full Dell Security Management Server Installation) is selected and then click Next.
- Optionally, Change the install directory and then click Next.
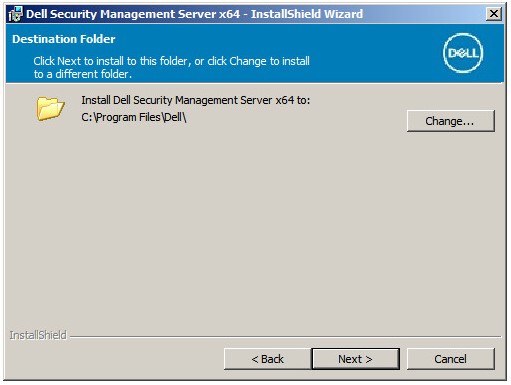
- If the UAC Enabled prompt does not appear, go to Step 12. If the UAC Enabled prompt appears:
- Click Yes to disable UAC.
- Reboot the server.
- Go to Step 3.
 Note: Clicking No stops setup to allow UAC to be disabled manually in Windows.
 - Optionally, Change the server configuration file backup location from the default and then click Next.
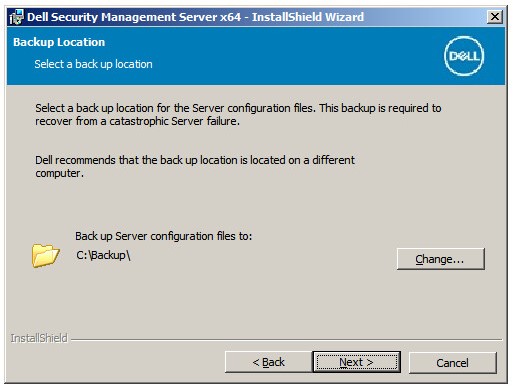
- Select one of the following:
- Import an existing certificate and then go to Step 14.
- Create a self-signed certificate and import it to key store and then go to Step 15.
 Note: This certificate is used to securely communicate data from the endpoint software to the server.
 - Browse to the path of the certificate to import and populate the Password of the certificate. Once finished, click Next. Go to Step 16.
 Note:
Note:- The certificate path and name will differ in your environment.
- For more information, reference How to Create a Domain or Third-Party Certificate for Dell Data Security.
- In the Set up a Certificate Authority (CA) menu:
- Confirm the Fully-qualified Computer Name.
- Populate the Organization.
- Populate the Organizational Unit.
- Populate the City.
- Populate the State.
- Populate the Country as a two-letter abbreviation.
- Click Next and then go to Step 16.
 Note: The examples that are used in the screenshot will differ in your environment.
 - Select either:
- Import an existing certificate and then go to Step 17.
- Create a self-signed certificate and import it to key store and then go to Step 18.
 Note: This certificate is used for SSOS (Dell Encryption Enterprise for Server, formerly known as Dell Data Protection | Server Encryption).
 - Browse to the path of the certificate to import and populate the Password of the certificate. Once finished, click Next. Go to Step 19.
 Note: The certificate path and name will differ in your environment.
 - In the Set up a Certificate Authority (CA) menu:
- Confirm the Fully-qualified Computer Name.
- Populate the Organization.
- Populate the Organizational Unit.
- Populate the City.
- Populate the State.
- Populate the Country as a two-letter abbreviation.
- Click Next and then go to Step 19.
 Note: The fields that are populated in the example above may differ in your environment.
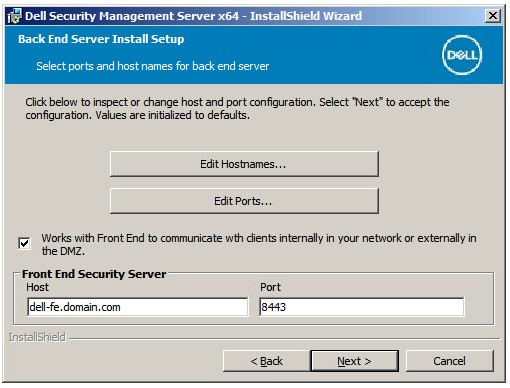
 - In the Back End Server Install Setup menu:
- Optionally, click Edit Hostnames go to Step 20.
- Optionally, click Edit Ports and go to Step 21.
- Optionally, check Works with Front End and then populate the Front End Security Server hostname and Port.
- Click Next and go to Step 22.
- If Edit Hostnames was clicked (Step 19), optionally, change hostnames and then click OK to return to Step 19.
 Note:
Note:- The hostname that is used must match the server name that is referenced in the certificate (Step 13).
- The hostnames in the screenshot examples will differ in your environment.
- If Edit Ports was clicked (Step 19), optionally, change ports, click OK, and return to Step 19.
 Note:
Note:- It is highly recommended to only change ports when there is a conflict in your environment.
- Due to the complexity of the software, ports can only be modified during the installation process.
- In the Database Server and Install-time Credentials menu:
- Populate a Database Server and, optionally, an Instance Name.
- Optionally, populate a Port.
- Select a Database catalog action.
- Select a SQL login action.
- Select either Windows authentication or SQL server authentication.
- If SQL server authentication was selected, populate a Login ID and Password.
- Click Next.
 Note:
Note:- If a port is not specified, the default SQL Server port of 1433 is used.
- Install-time credentials require the account that is chosen to have the sysadmin role assigned in SQL Server. For more information, reference How to Configure SQL for Dell Security Management Server / Dell Data Protection Enterprise Edition Server.
- The database server will differ in your environment.
- In the Database and Service Runtime Information menu:
- Populate the name of the database catalog.
- Select Windows authentication or SQL server authentication.
- Populate a user name and password.
- Click Next.
 Note: If the database was created before the installation of Dell Security Management Server, the credentials that are populated here require
db_ownerrights. For more information, reference How to Configure SQL for Dell Security Management Server. - Click Install.
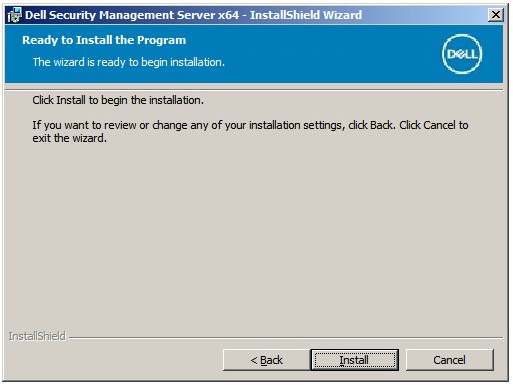
- Click Finish.
 Note: Upon completion, the Administration Console must be configured. For more information, reference How to Configure the Dell Data Security Server Administration Console.
- Right-click and Extract the server software.
 Note: For more information about how to download the server software, reference How to Download Dell Security Management Server.
 - From the extracted root folder, copy
EnterpriseServerInstallKey.initoC:\Windows. Note: Optionally, the product key may be populated manually in Step 8.
 - Go to
\x64and then double-click setup.exe.
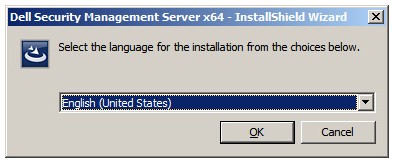
- Select the language and then click OK.
- If any missing requirements are detected, click Install. Otherwise, go to Step 6.
 Note: For more information about system requirements, reference Dell Security Management Server System Requirements.
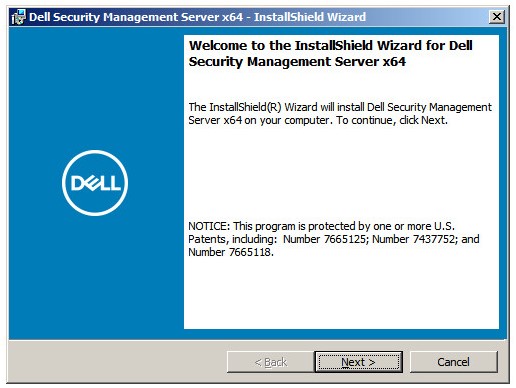
 - Click Next.
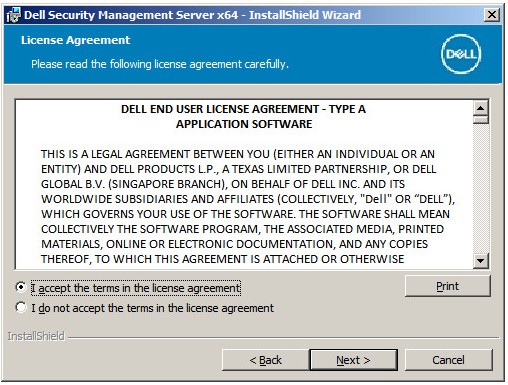
- Review the End User License Agreement (EULA). At the end of the EULA menu, select I accept the terms in the license agreement, and then click Next.
- Click Next.
 Note: The product key is autopopulated (Step 2).
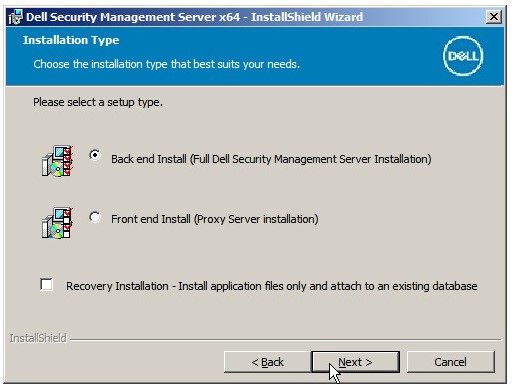
 - Verify Back end Install (Full Dell Security Management Server Installation) is selected and then click Next.
- Optionally, Change the install directory and then click Next.
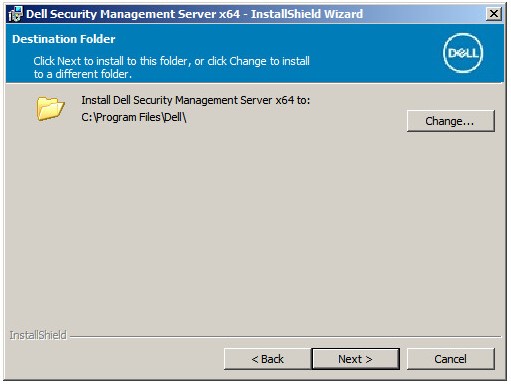
- If the UAC Enabled prompt does not appear, go to Step 12.If the UAC Enabled prompt appears:
- Click Yes to disable UAC.
- Reboot the server.
- Go to Step 3.
 Note: Clicking No stops setup to allow UAC to be disabled manually in Windows.
 - Optionally, Change the server configuration file backup location from the default and then click Next.
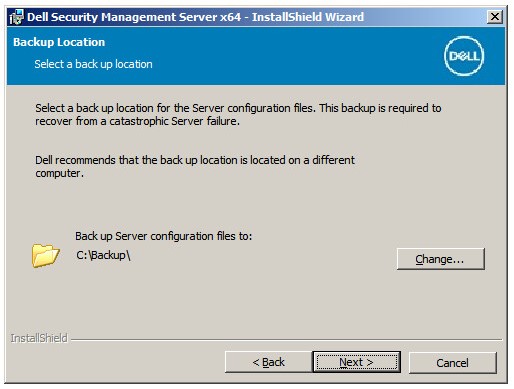
- Select one of the following:
- Import an existing certificate and then go to Step 14.
- Create a self-signed certificate and import it to key store and then go to Step 15.
 Note: This certificate is used to securely communicate data from the endpoint software to the server.
 - Browse to the path of the certificate to import and populate the Password of the certificate. Once finished, click Next. Go to Step 16.
 Note:
Note:- The certificate path and name will differ in your environment.
- For more information, reference How to Create a Domain or Third-Party Certificate for Dell Data Security.
- In the Set up a Certificate Authority (CA) menu:
- Confirm the Fully-qualified Computer Name.
- Populate the Organization.
- Populate the Organizational Unit.
- Populate the City.
- Populate the State.
- Populate the Country as a two-letter abbreviation.
- Click Next and then go to Step 16.
 Note: The examples that are used in the screenshot will differ in your environment.
 - Select either:
- Import an existing certificate and then go to Step 17.
- Create a self-signed certificate and import it to key store and then go to Step 18.
 Note: This certificate is used for SSOS (Dell Encryption Enterprise for Server, formerly known as Dell Data Protection | Server Encryption).
 - Browse to the path of the certificate to import and populate the Password of the certificate. Once finished, click Next. Go to Step 19.
 Note: The certificate path and name will differ in your environment.
 - In the Set up a Certificate Authority (CA) menu:
- Confirm the Fully-qualified Computer Name.
- Populate the Organization.
- Populate the Organizational Unit.
- Populate the City.
- Populate the State.
- Populate the Country as a two-letter abbreviation.
- Click Next and then go to Step 19.
 Note: The fields that are populated in the example above may differ in your environment.
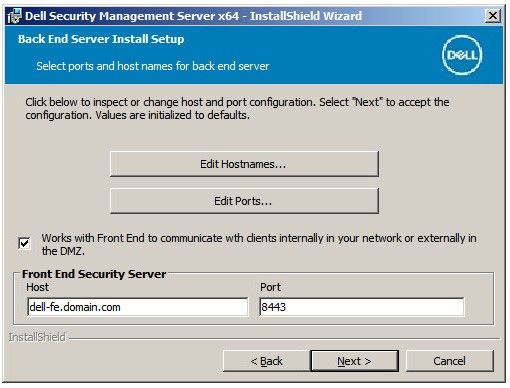
 - In the Back End Server Install Setup menu:
- Optionally, click Edit Hostnames go to Step 20.
- Optionally, click Edit Ports and go to Step 21.
- Optionally, check Works with Front End and then populate the Front End Security Server hostname and Port.
- Click Next and go to Step 22.
- If Edit Hostnames was clicked (Step 19), optionally, change hostnames and then click OK to return to Step 19.
 Note:
Note:- The hostname that is used must match the server name that is referenced in the certificate (Step 13).
- The hostnames in the screenshot examples will differ in your environment.
- If Edit Ports was clicked (Step 19), optionally, change ports, click OK, and return to Step 19.
 Note:
Note:- It is highly recommended to only change ports when there is a conflict in your environment.
- Due to the complexity of the software, ports can only be modified during the installation process.
- In the Database Server and Install-time Credentials menu:
- Populate a Database Server and, optionally, an Instance Name.
- Optionally, populate a Port.
- Select a Database catalog action.
- Select a SQL login action.
- Select either Windows authentication or SQL server authentication.
- If SQL server authentication was selected, populate a Login ID and Password.
- Click Next.
 Note:
Note:- If a port is not specified, the default SQL Server port of 1433 is used.
- Install-time credentials require the account that is chosen to have the sysadmin role assigned in SQL Server. For more information, reference How to Configure SQL for Dell Security Management Server.
- The database server will differ in your environment.
- In the Database and Service Runtime Information menu:
- Populate the name of the database catalog.
- Select Windows authentication or SQL server authentication.
- Populate a user name and password.
- Click Next.
 Note: If the database was created before the installation of Dell Security Management Server, the credentials that are populated here require
db_ownerrights. For more information, reference How to Configure SQL for Dell Security Management Server. - Click Install.
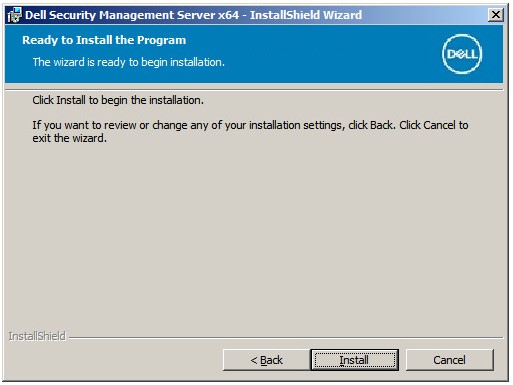
- Click Finish.
 Note: Upon completion, the Administration Console must be configured. For more information, reference How to Configure the Dell Data Security Server Administration Console.
- Right-click and Extract the server software.
 Note: For more information about how to download the server software, reference How to Download Dell Security Management Server.
 - From the extracted root folder, copy
EnterpriseServerInstallKey.initoC:\Windows. Note: Optionally, the product key may be populated manually in Step 8.
 - Go to
\x64and then double-click setup.exe.
- Select the language and then click OK.
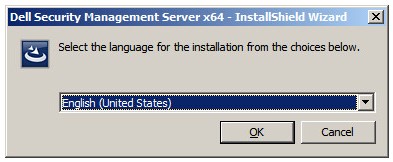
- If any missing requirements are detected, click Install. Otherwise, go to Step 6.
 Note: For more information about system requirements, reference Dell Security Management Server System Requirements.
 - Click Next.
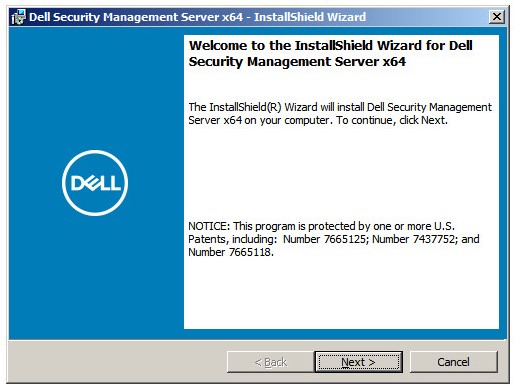
- Review the End User License Agreement (EULA). At the end of the EULA menu, select I accept the terms in the license agreement, and then click Next.
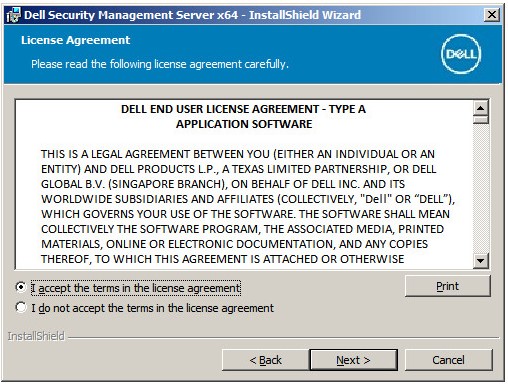
- Click Next.
 Note: The product key is autopopulated (Step 2).
 - Verify Back end Install (Full Dell Security Management Server Installation) is selected and then click Next.
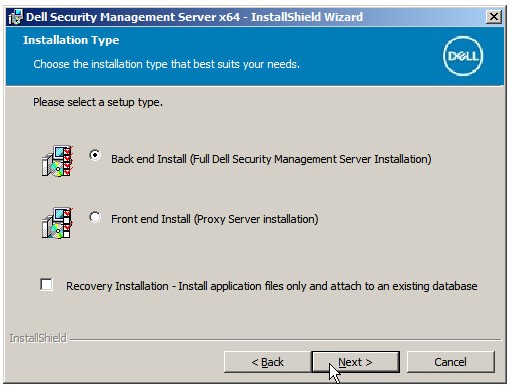
- Optionally, Change the install directory and then click Next.
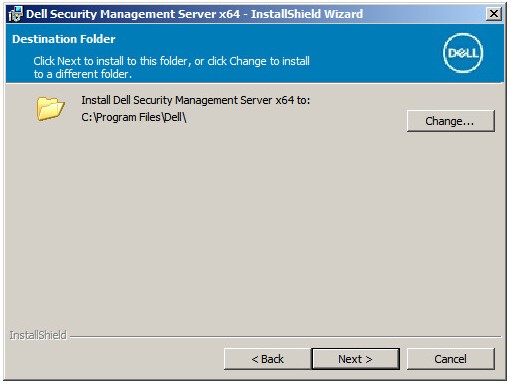
- If the UAC Enabled prompt does not appear, go to Step 12. If the UAC Enabled prompt appears:
- Click Yes to disable UAC.
- Reboot the server.
- Go to Step 3.
 Note: Clicking No stops setup to allow UAC to be disabled manually in Windows.
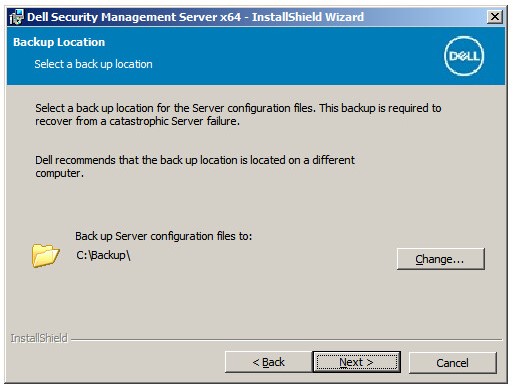
 - Optionally, Change the server configuration file backup location from the default and then click Next.
- Select one of the following:
- Import an existing certificate and then go to Step 14.
- Create a self-signed certificate and import it to key store and then go to Step 15.
 Note: This certificate is used to securely communicate data from the endpoint software to the server.
 - Browse to the path of the certificate to import and populate the Password of the certificate. Once finished, click Next. Go to Step 16.
 Note:
Note:- The certificate path and name will differ in your environment.
- For more information, reference How to Create a Domain or Third-Party Certificate for Dell Data Security.
- In the Set up a Certificate Authority (CA) menu:
- Confirm the Fully-qualified Computer Name.
- Populate the Organization.
- Populate the Organizational Unit.
- Populate the City.
- Populate the State.
- Populate the Country as a two-letter abbreviation.
- Click Next and then go to Step 16.
 Note: The examples that are used in the screenshot will differ in your environment.
 - Select either:
- Import an existing certificate and then go to Step 17.
- Create a self-signed certificate and import it to key store and then go to Step 18.
 Note: This certificate is used for SSOS (Dell Encryption Enterprise for Server, formerly known as Dell Data Protection | Server Encryption).
 - Browse to the path of the certificate to import and populate the Password of the certificate. Once finished, click Next. Go to Step 19.
 Note: The certificate path and name will differ in your environment.
 - In the Set up a Certificate Authority (CA) menu:
- Confirm the Fully-qualified Computer Name.
- Populate the Organization.
- Populate the Organizational Unit.
- Populate the City.
- Populate the State.
- Populate the Country as a two-letter abbreviation.
- Click Next and then go to Step 19.
 Note: The fields that are populated in the example above may differ in your environment.
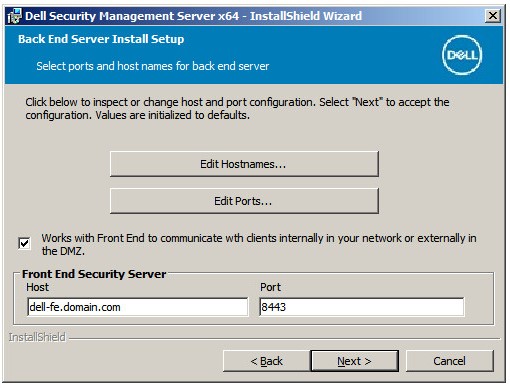
 - In the Back End Server Install Setup menu:
- Optionally, click Edit Hostnames go to Step 20.
- Optionally, click Edit Ports and go to Step 21.
- Optionally, check Works with Front End and then populate the Front End Security Server hostname and Port.
- Click Next and go to Step 22.
- If Edit Hostnames was clicked (Step 19), optionally, change hostnames and then click OK to return to Step 19.
 Note:
Note:- The hostname that is used must match the server name that is referenced in the certificate (Step 13).
- The hostnames in the screenshot examples will differ in your environment.
- If Edit Ports was clicked (Step 19), optionally, change ports, click OK, and return to Step 19.
 Note:
Note:- It is highly recommended to only change ports when there is a conflict in your environment.
- Due to the complexity of the software, ports can only be modified during the installation process.
- In the Database Server and Install-time Credentials menu:
- Populate a Database Server and, optionally, an Instance Name.
- Optionally, populate a Port.
- Select a Database catalog action.
- Select a SQL login action.
- Select either Windows authentication or SQL server authentication.
- If SQL server authentication was selected, populate a Login ID and Password.
- Click Next.
 Note:
Note:- If a port is not specified, the default SQL Server port of 1433 is used.
- Install-time credentials require the account that is chosen to have the sysadmin role assigned in SQL Server. For more information, reference How to Configure SQL for Dell Security Management Server.
- The database server will differ in your environment.
- In the Database and Service Runtime Information menu:
- Populate the name of the database catalog.
- Select Windows authentication or SQL server authentication.
- Populate a user name and password.
- Click Next.
 Note: If the database was created before the installation of Dell Security Management Server, the credentials that are populated here require
db_ownerrights. For more information, reference How to Configure SQL for Dell Security Management Server. - Click Install.
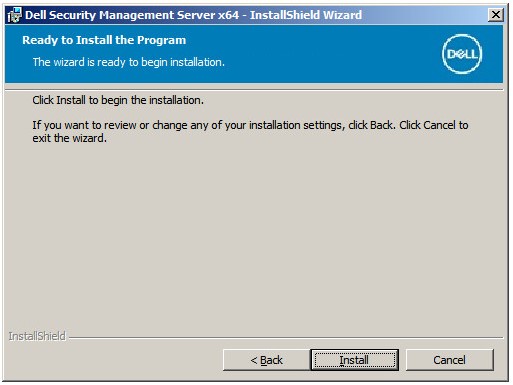
- Click Finish.
 Note: Upon completion, the Administration Console must be configured. For more information, reference How to Configure the Dell Data Security Server Administration Console.
- Right-click and Extract the server software.
 Note: For more information about how to download the server software, reference How to Download Dell Security Management Server.
 - From the extracted root folder, copy
EnterpriseServerInstallKey.initoC:\Windows. Note: Optionally, the product key may be populated manually in Step 8.
 - Go to
Security Management Server\x64and then double-click setup.exe.
- Select the language and then click OK.
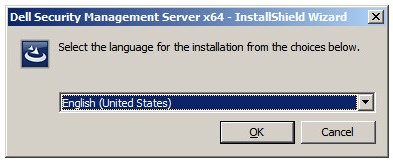
- If any missing requirements are detected, click Install. Otherwise, go to Step 6.
 Note: For more information about system requirements, reference Dell Security Management Server System Requirements.
 - Click Next.
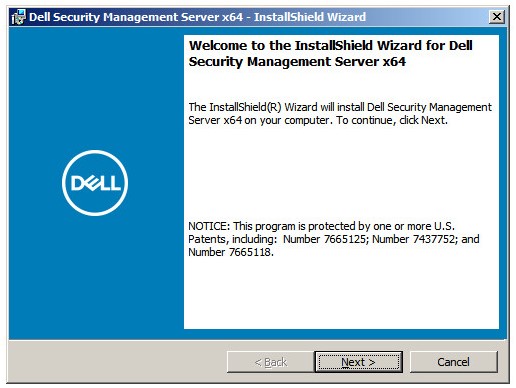
- Review the End User License Agreement (EULA). At the end of the EULA menu, select I accept the terms in the license agreement, and then click Next.
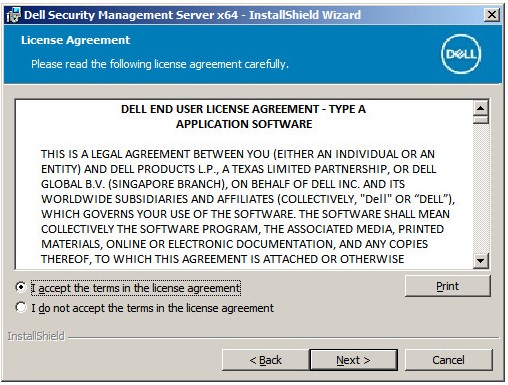
- Click Next.
 Note: The product key is autopopulated (Step 2).
 - Verify Back end Install (Full Dell Security Management Server Installation) is selected and then click Next.
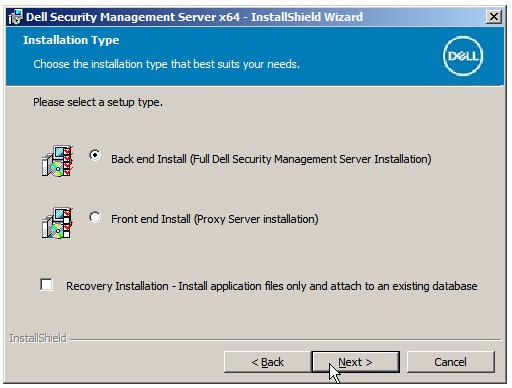
- Optionally, Change the install directory and then click Next.
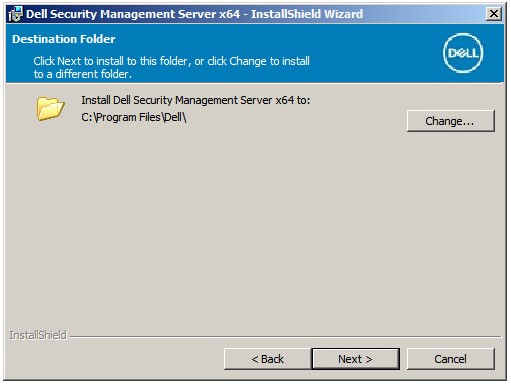
- If the UAC Enabled prompt does not appear, go to Step 12. If the UAC Enabled prompt appears:
- Click Yes to disable UAC.
- Reboot the server.
- Go to Step 3.
 Note: Clicking No stops setup to allow UAC to be disabled manually in Windows.
 - Optionally, Change the server configuration file backup location from the default and then click Next.
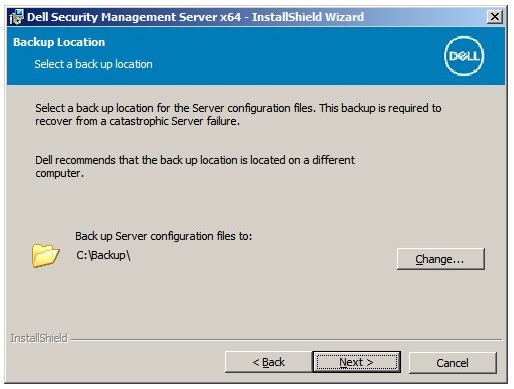
- Select either:
- Import an existing certificate and then go to Step 14.
- Create a self-signed certificate and import it to key store and then go to Step 15.
 Note: This certificate is used to securely communicate data from the endpoint software to the server.
 - Browse to the path of the certificate to import and populate the Password of the certificate. Once finished, click Next. Go to Step 16.
 Note:
Note:- The certificate path and name will differ in your environment.
- For more information, reference How to Create a Domain or Third-Party Certificate for Dell Data Security.
- In the Set up a Certificate Authority (CA) menu:
- Confirm the Fully-qualified Computer Name.
- Populate the Organization.
- Populate the Organizational Unit.
- Populate the City.
- Populate the State.
- Populate the Country as a two-letter abbreviation.
- Click Next and then go to Step 16.
 Note: The examples that are used in the screenshot will differ in your environment.
 - Select either:
- Import an existing certificate and then go to Step 17.
- Create a self-signed certificate and import it to key store and then go to Step 18.
 Note: This certificate is used for SSOS (Dell Encryption Enterprise for Server, formerly known as Dell Data Protection | Server Encryption).
 - Browse to the path of the certificate to import and populate the Password of the certificate. Once finished, click Next. Go to Step 19.
 Note: The certificate path and name will differ in your environment.
 - In the Set up a Certificate Authority (CA) menu:
- Confirm the Fully-qualified Computer Name.
- Populate the Organization.
- Populate the Organizational Unit.
- Populate the City.
- Populate the State.
- Populate the Country as a two-letter abbreviation.
- Click Next and then go to Step 19.
 Note: All fields that are populated in the example above may differ in your environment.
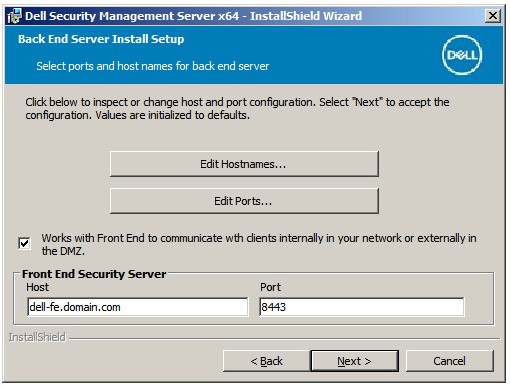
 - In the Back End Server Install Setup menu:
- Optionally, click Edit Hostnames go to Step 20.
- Optionally, click Edit Ports and go to Step 21.
- Optionally, check Works with Front End and then populate the Front End Security Server hostname and Port.
- Click Next and go to Step 22.
- If Edit Hostnames was clicked (Step 19), optionally, change hostnames and then click OK to return to Step 19.
 Note:
Note:- The hostname that is used must match the server name that is referenced in the certificate (Step 13).
- The hostnames in the screenshot examples will differ in your environment.
- If Edit Ports was clicked (Step 19), optionally, change ports, click OK, and return to Step 19.
 Note:
Note:- It is highly recommended to only change ports when there is a conflict in your environment.
- Due to the complexity of the software, ports can only be modified during the installation process.
- In the Database Server and Install-time Credentials menu:
- Populate a Database Server and, optionally, an Instance Name.
- Optionally, populate a Port.
- Select either Windows authentication or SQL server authentication.
- If SQL server authentication was selected, populate a Login ID and Password.
- Populate the database catalog name.
- Click Next.
 Note:
Note:- If a port is not specified, the default SQL Server port of 1433 is used.
- Install-time credentials require the account that is chosen to have the sysadmin role assigned in SQL Server. For more information, reference How to Configure SQL for Dell Security Management Server.
- If a database server and authentication is populated, but a database catalog name is given that does not exist, the Dell Enterprise Server installer will prompt to create that database for you. Click Yes to create the database or click No to return to Step 22.
- The database server and database catalog will differ in your environment.
- Populate a Username and Password for the service account Dell services will use to access SQL and then click Next.
 Note: If the database was created before the installation of Dell Security Management Server, the credentials that are populated here require
db_ownerrights. For more information, reference How to Configure SQL for Dell Security Management Server. - Click Install.
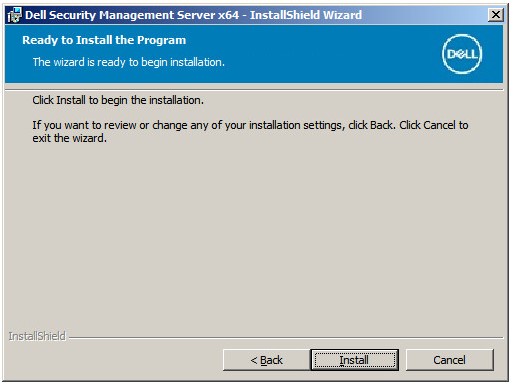
- Click Finish.
 Note: Upon completion, the Administration Console must be configured. For more information, reference How to Configure the Dell Data Security Server Administration Console.
Berörda produkter
Dell EncryptionArtikelegenskaper
Artikelnummer: 000124912
Artikeltyp: How To
Senast ändrad: 03 feb. 2025
Version: 15
Få svar på dina frågor från andra Dell-användare
Supporttjänster
Kontrollera om din enhet omfattas av supporttjänster.