Installation and Use of the Dell PowerVault RD1000 Removable Hard Disk Drive
Summary: This article explains how to set up and use a RD1000 to create working backups.
This article applies to
This article does not apply to
This article is not tied to any specific product.
Not all product versions are identified in this article.
Symptoms
This article explains how to setup and use a RD1000 to create working backups.
Drivers, software and manuals are available on the product support page: dell.com/support/home/product-support/product/powervault-rd1000/drivers
Q: How do I use my RD1000 removable hard disk drive on a Windows system?
The RD1000 USB and SATA drives work on Windows systems without any additional driver installation. It is necessary to install the RD1000 removable media storage host software if you want the eject button to work properly.USB
Simply plug the USB drive into any available USB port (preferably a USB 2.0 port for full performance). The Windows system automatically detects the removable media storage drive and assigns a drive letter to the device.
SATA
See the Quick Start Installation section of the RD1000 User's Guide for details about installing the SATA device in your system.
Q: How to install the RD1000 Unit Software for Windows?
The RD1000 Utility provides essential Windows® software for use with the RD1000 unit. The software utility installs a- A removable disk utility that provides basic diagnostic tests capabilities
- An application update that enables the eject button to operate correctly under the Windows operating system
- An application that allows the right-click eject to operate in user-mode under the Windows operating system
- An application that automatically sets the SATA connection to DMA mode for improved performance
The Dell PowerVault RD1000 User's Guide is provided in the same menu, after clicking on the "manual" tab.
 Note: If the RD1000 software is not installed the eject button and right-click eject method may not work properly.
Q: How do I use my RD1000 removable hard disk drive on a Linux system?
As long as your kernel new enought you should not need to modify drivers or kernel to use RD1000 in SATA or USB mode.
You can use the following command to list all scsi devices.
cat /proc/scsi/scsiYour RD1000 media storage drive should be displayed in this list.
A few useful Linux commands are listed below. Refer to the man pages for each command for more information.
- Use the mount command to mount the RD1000 removable hard disk drive.
- The fdisk -l command is useful for listing which devices are available for mounting.
- Use the umount command to un-mount a removable disk cartridge for removal
- Use the eject command with the device or partition handle to eject the cartridge.
Q: How do I manually eject an RD1000 removable disk cartridge?
If the removable disk cartridge does not eject using either the eject button or the right-click eject methods then use the following emergency eject hole method in front of the drive to recover the removable disk cartridge:- If using the RD1000 removable storage drive, turn off your computer. If using the RD1000 removable storage drive, unplug the power cable.
- Insert a large straightened paper clip (or similar object) into the Emergency Eject Hole (see the figure above.) Do not insert the object in the hole at an angle. Keep the object straight and apply some force to eject the cartridge.
- When the removable disk cartridge has been ejected by the unit, grasp the exposed sides of the cartridge and pull the cartridge straight out.
- Re-start your computer to reset the RD1000 unit. If using the RD1000 External device, re-plug in the power cable for the unit and then re-start your computer.
Q: How do I change the RD1000 drive letter?
To change the Drive letter used by your RD1000 media storage drive in Windows XP or 2003 follow the instructions below.- Right-click on the "My Computer" icon and select "Manage."
- Expand the "Storage" tab and select "Disk Management."

- Right click on the RD1000 drive letter and select "Change Drive Letter and Paths"

- Click on "Change" and assign a new drive letter from the drop-down box. Make sure no other device or network share is using the new drive letter.
Q: How do I install RD1000 host software?
Follow the instructions for installation from the RD1000 User's guide.
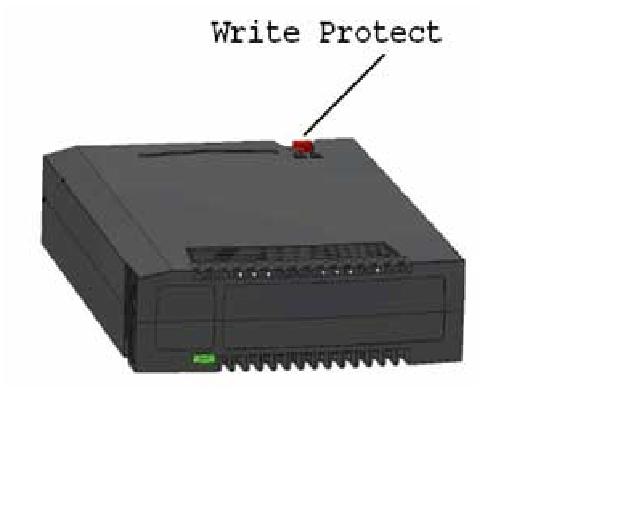
Q: How do I enable write protection on my RD1000 removable disk cartridge?
Cause
The write protect switch is the red tab on the top edge of the removable disk cartridge. To set the write protect tab, eject the cartridge and slide the red tab to the leftmost position. The removable disk cartridge will now be write-protected.
To remove the write protect, slide the red tab to the rightmost position. The cartridge will now allow write access.
To remove the write protect, slide the red tab to the rightmost position. The cartridge will now allow write access.
Resolution
-
Affected Products
Servers, PowerVault RD1000Article Properties
Article Number: 000134541
Article Type: Solution
Last Modified: 23 Sept 2021
Version: 6
Find answers to your questions from other Dell users
Support Services
Check if your device is covered by Support Services.