如何升級 Dell Security Management Server Virtual
Сводка: Dell Security Management Server Virtual 和 Dell Data Protection Virtual Edition 可依照以下指示進行升級。
Данная статья применяется к
Данная статья не применяется к
Эта статья не привязана к какому-либо конкретному продукту.
В этой статье указаны не все версии продуктов.
Симптомы
本文涵蓋如何升級 Dell Security Management Server Virtual (先前稱為 Dell Data Protection | Virtual Edition)。
受影響的產品:
- Dell Security Management Server Virtual
- Dell Data Protection | Virtual Edition
受影響的作業系統:
- Linux
Причина
不適用
Разрешение
注意:若要進行就地升級,將需要從 Dell Security Management Server Virtual 連線至 act.credant.com 的有效網際網路連線。
Dell Security Management Server Virtual 的升級會因版本而異。按一下在您環境中執行的 Dell Security Management Server Virtual 版本,以取得特定步驟。如需版本資訊,請參閱如何識別 Dell Data Security/Dell Data Protection 伺服器版本。
警告:
- 就地升級會使用支援的升級路徑,將 Dell Security Management Server Virtual 更新至最新版本。以下列出的版本僅用於顯示環境中執行之 Dell Security Management Server Virtual 版本的升級指示。這不代表支援的升級路徑。
- 如需支援的升級路徑,請參閱Dell Security Management Server Virtual System Requirements的升級資訊。
- 升級前,請確定環境符合 Dell 安全性管理伺服器虛擬系統需求。
版本 11.6.0 需要手動升級至 11.7.0 版或更新版本。
若要升級伺服器:
- 在您目前的 Dell Security Management Server Virtual 上:
- 停止服務。
- 建立備份。
- 將備份卸載至外部位置。
- 關閉 Dell Security Management Server Virtual 例項。
注意:
- 安裝 Dell Security Management Server Virtual v11.7.0 的新實例。
- 將備份 (步驟 1C) 上傳至 Dell Security Management Server Virtual 的新例項。
注意:必須啟用 SFTP 才能載入備份。如需更多資訊,請參閱如何在 Dell Security Management Server Virtual / Dell Data Protection Virtual Edition 內建立 FTP 使用者。
- 在 Dell Security Management Server Virtual 的新例項上,還原在步驟 3 建立的備份。
- 在測試與驗證新例項後,請解除步驟 1 的舊版 Dell Security Management Server Virtual。
注意:為獲得最佳效能,Dell Technologies 建議升級至最新相容的 Dell Security Management Server Virtual 版本。如需相容版本的詳細資訊,請參閱Dell Security Management Server Virtual System Requirements的升級資訊。
若要升級伺服器:
- 登入 Dell Enterprise Server Virtual 管理主控台。

注意:
- Dell Security Management Server Virtual 的預設登入資料為:
- 使用者名稱:
delluser - 密碼:
delluser
- 使用者名稱:
- 系統管理員可以變更在產品的虛擬裝置選單中的預設密碼。
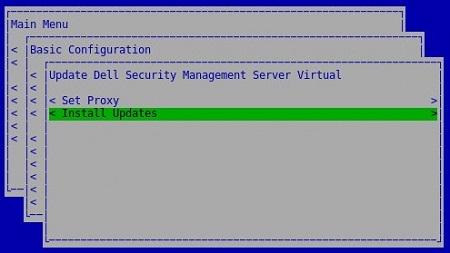
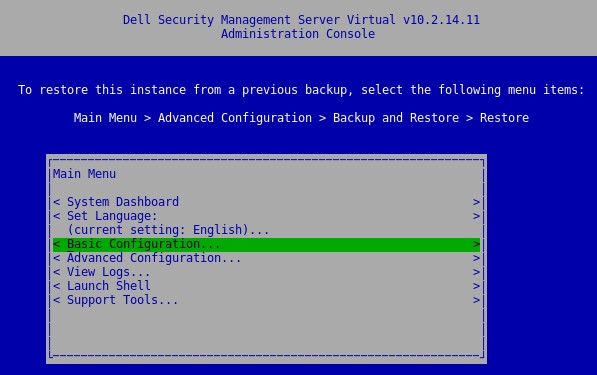
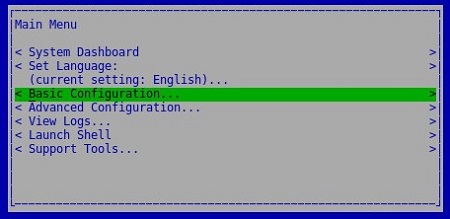
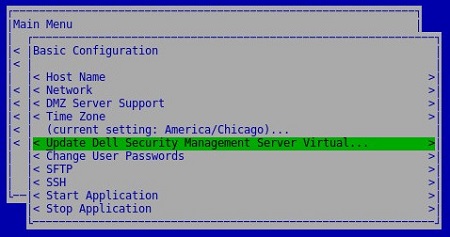
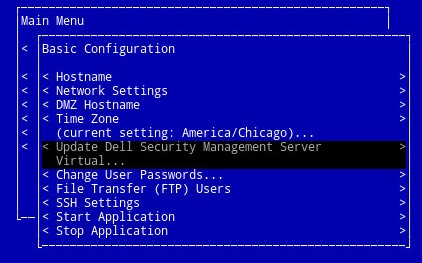
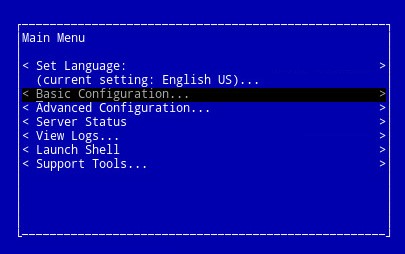
- 從主功能表中,選取基本組態,然後按下 Enter 鍵。

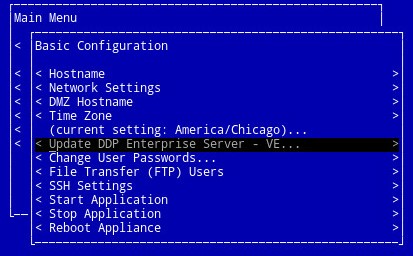
- 選取升級 Dell Security Management Server Virtual,然後按下 Enter 鍵。

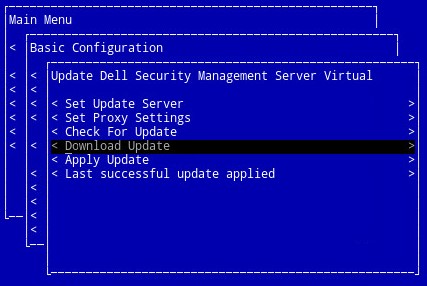
- 選取安裝更新,然後按下 Enter 鍵。
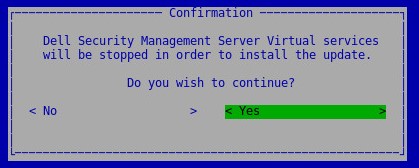
- 選取是,然後按下 Enter 鍵。
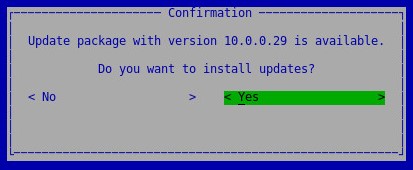
- 選取是,然後按下 Enter 鍵。

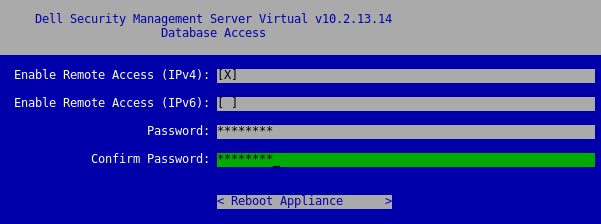
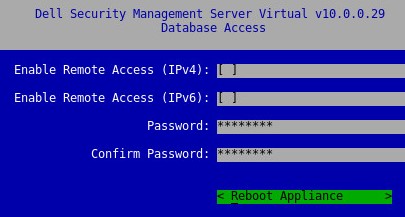
- 在「資料庫存取」功能表中:
- 可選擇啟用 IPv4 的遠端存取。
- 可選擇啟用 IPv6 的遠端存取。
- 輸入新的資料庫密碼。
- 確認新的資料庫密碼。
- 選取為裝置重新開機,然後按下 Enter 鍵。
- 若要確認伺服器升級,可在管理主控台頂端查看新版本。
注意:為獲得最佳效能,Dell Technologies 建議升級至最新相容的 Dell Security Management Server Virtual 版本。如需相容版本的詳細資訊,請參閱Dell Security Management Server Virtual System Requirements的升級資訊。
版本 10.2.13.13 需要手動升級至版本 10.2.13.14 或更新版本。
若要升級伺服器:
- 在您目前的 Dell Security Management Server Virtual 上:
- 停止服務。
- 建立備份。
- 將備份卸載至外部位置。
- 關閉 Dell Security Management Server Virtual 例項。
注意:
- 安裝 Dell Security Management Server Virtual v10.2.13.14 或更新版本的新例項。
- 將備份 (步驟 1C) 上傳至 Dell Security Management Server Virtual 的新例項。
注意:必須啟用 SFTP 才能載入備份。如需更多資訊,請參閱如何在 Dell Security Management Server Virtual / Dell Data Protection Virtual Edition 內建立 FTP 使用者。
- 在 Dell Security Management Server Virtual 的新例項上,還原在步驟 3 建立的備份。
- 在測試與驗證新例項後,請解除步驟 1 的舊版 Dell Security Management Server Virtual。
注意:為獲得最佳效能,Dell Technologies 建議升級至最新相容的 Dell Security Management Server Virtual 版本。如需相容版本的詳細資訊,請參閱Dell Security Management Server Virtual System Requirements的升級資訊。
若要升級伺服器:
- 登入 Dell Enterprise Server Virtual 管理主控台。

注意:
- Dell Security Management Server Virtual 的預設登入資料為:
- 使用者名稱:
delluser - 密碼:
delluser
- 使用者名稱:
- 系統管理員可以變更在產品的虛擬裝置選單中的預設密碼。
- 從主功能表中,選取基本組態,然後按下 Enter 鍵。
- 選取升級 Dell Security Management Server Virtual,然後按下 Enter 鍵。
- 選取安裝更新,然後按下 Enter 鍵。

- 選取是,然後按下 Enter 鍵。

- 選取是,然後按下 Enter 鍵。
- 如果安裝沒有回應,請按下 Enter 鍵。

注意:如需更多資訊,請參閱升級 Dell Security Management Server Virtual 顯示為停止回應。
- 在「資料庫存取」功能表中:
- 可選擇啟用 IPv4 的遠端存取。
- 可選擇啟用 IPv6 的遠端存取。
- 輸入新的資料庫密碼。
- 確認新的資料庫密碼。
- 選取為裝置重新開機,然後按下 Enter 鍵。
注意:為獲得最佳效能,Dell Technologies 建議升級至最新相容的 Dell Security Management Server Virtual 版本。如需相容版本的詳細資訊,請參閱Dell Security Management Server Virtual System Requirements的升級資訊。
版本 9.10.1 需要手動升級至版本 9.11 至 10.2.13.14。
Dell 資料安全性 - 安全性管理伺服器虛擬 9.10.1 升級至 9.11
持續時間:00:08:38 (hh:mm:ss)
關閉標題:無法使用
若要升級伺服器:
- 在您目前的 Dell Security Management Server Virtual 上:
- 停止服務。
- 建立備份。
- 將備份卸載至外部位置。
- 關閉 Dell Security Management Server Virtual 例項。
注意:
- 安裝 Dell Security Management Server Virtual v9.11 至 10.2.13.14 的新例項。
- 將備份 (步驟 1C) 上傳至 Dell Security Management Server Virtual 的新例項。
注意:必須啟用 SFTP 才能載入備份。如需更多資訊,請參閱如何在 Dell Security Management Server Virtual / Dell Data Protection Virtual Edition 內建立 FTP 使用者。
- 在 Dell Security Management Server Virtual 的新例項上,還原在步驟 3 建立的備份。
- 在測試與驗證新例項後,請解除步驟 1 的舊版 Dell Security Management Server Virtual。
注意:為獲得最佳效能,Dell Technologies 建議升級至最新相容的 Dell Security Management Server Virtual 版本。如需相容版本的詳細資訊,請參閱Dell Security Management Server Virtual System Requirements的升級資訊。
下載
若要下載升級:
- 登入 Dell Enterprise Server Virtual 管理主控台。

注意:
- Dell Data Protection Enterprise Server Virtual Edition 的預設登入資料為:
- 使用者名稱:
ddpuser - 密碼:
ddpuser
- 使用者名稱:
- 系統管理員可以變更在產品的虛擬裝置選單中的預設密碼。
- 從主功能表中,選取基本組態,然後按下 Enter 鍵。

- 選取升級 Dell Security Management Server Virtual,然後按下 Enter 鍵。

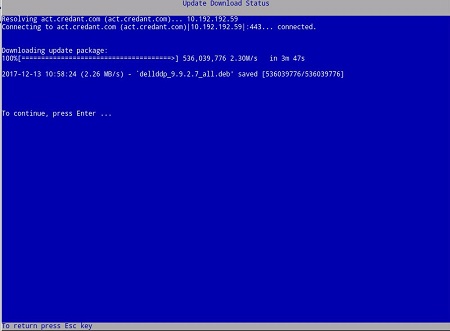
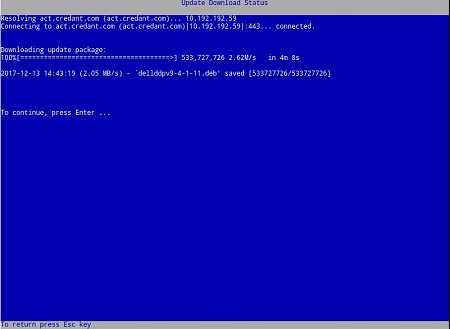
- 選取下載升級,然後按下 Enter 鍵。

- 下載完成後,按下 Enter 鍵以繼續。
安裝
若要升級伺服器:
- 登入 Dell Enterprise Server Virtual 管理主控台。

注意:
- Dell Data Protection Enterprise Server Virtual Edition 的預設登入資料為:
- 使用者名稱:
ddpuser - 密碼:
ddpuser
- 使用者名稱:
- 系統管理員可以變更在產品的虛擬裝置選單中的預設密碼。
- 從主功能表中,選取基本組態,然後按下 Enter 鍵。

- 選取升級 Dell Security Management Server Virtual,然後按下 Enter 鍵。
- 選取套用更新,然後按下 Enter 鍵。
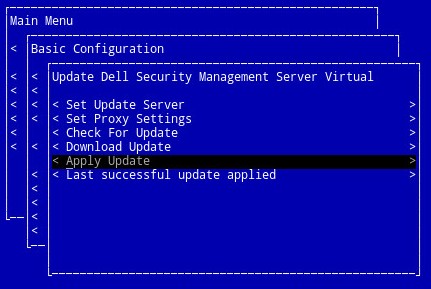
- 選取要安裝的更新檔案,然後按下 Enter 鍵。
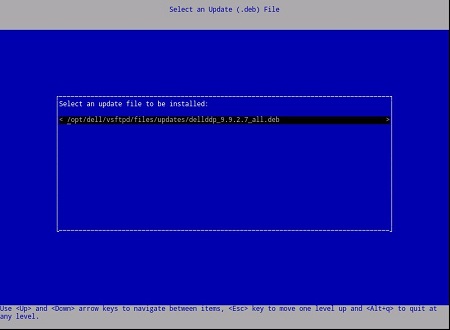
注意:
- 更新檔案可能會與上述範例不同。
- 選取更新檔案後,可能會發生「pending policy commit detected」錯誤。若要解決此問題,請參閱如何認可 Dell Data Security / Dell Data Protection 伺服器的原則。解決後,請重新開始更新安裝步驟。
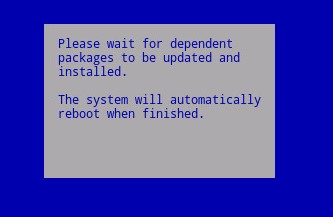
- 成功安裝後,伺服器會自動重新開機。
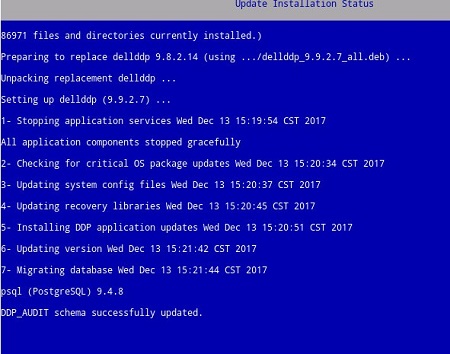
注意:根據您的版本,更新安裝狀態範例可能有所不同。
- 登入伺服器。

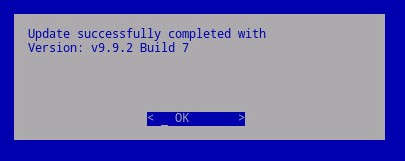
- 登入時,便可確認伺服器更新。在確定上按下 Enter 鍵,以返回管理主控台。
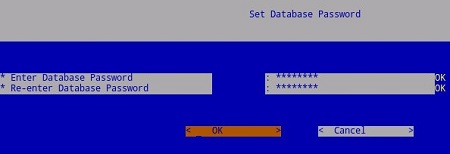
- 輸入並重新輸入新資料庫密碼。填入後,選取確定,然後按下 Enter 鍵。
注意:為獲得最佳效能,Dell Technologies 建議升級至最新相容的 Dell Security Management Server Virtual 版本。如需相容版本的詳細資訊,請參閱Dell Security Management Server Virtual System Requirements的升級資訊。
下載
若要下載升級:
- 登入 Dell Enterprise Server Virtual 管理主控台。

注意:
- Dell Data Protection Enterprise Server Virtual Edition 的預設登入資料為:
- 使用者名稱:
ddpuser - 密碼:
ddpuser
- 使用者名稱:
- 系統管理員可以變更在產品的虛擬裝置選單中的預設密碼。
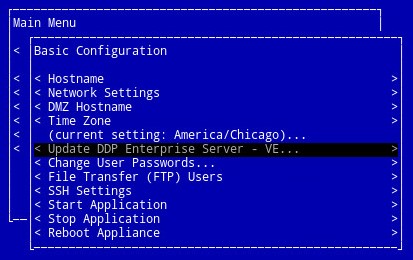
- 從主功能表中,選取基本組態,然後按下 Enter 鍵。
- 選取更新 DDP Enterprise Server - VE,然後按下 Enter 鍵。
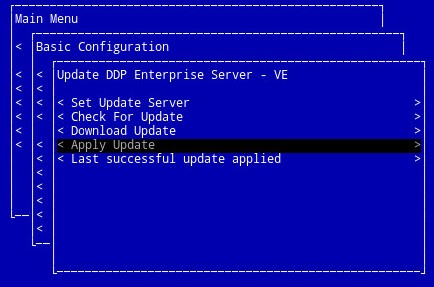
- 選取下載升級,然後按下 Enter 鍵。
- 下載完成後,按下 Enter 鍵以繼續。
安裝
若要升級伺服器:
- 登入 Dell Enterprise Server Virtual 管理主控台。

注意:
- Dell Data Protection Enterprise Server Virtual Edition 的預設登入資料為:
- 使用者名稱:
ddpuser - 密碼:
ddpuser
- 使用者名稱:
- 系統管理員可以變更在產品的虛擬裝置選單中的預設密碼。
- 從主功能表中,選取基本組態,然後按下 Enter 鍵。

- 選取更新 DDP Enterprise Server - VE,然後按下 Enter 鍵。
- 選取套用更新,然後按下 Enter 鍵。
- 選取要安裝的更新檔案,並按下 Enter 鍵。
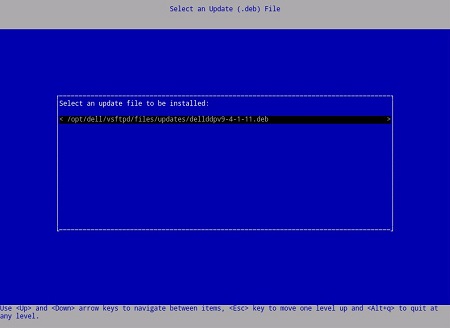
注意:
- 更新檔案可能會與上述範例不同。
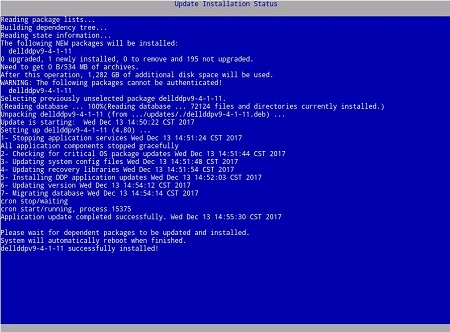
- 選取更新檔案後,可能會發生「pending policy commit detected」錯誤。若要解決此問題,請參閱如何認可 Dell Data Security / Dell Data Protection 伺服器的原則。解決後,請重新開始更新安裝步驟。
- 成功安裝後,伺服器會自動重新開機。
- 登入伺服器。

- 若要確認伺服器更新,可在管理主控台頂端查看新版本。

如要聯絡支援部門,請參閱 Dell Data Security 國際支援電話號碼。
請前往 TechDirect,以線上產生技術支援要求。
如需更多深入見解與資源,請加入 Dell 安全性社群論壇。
Дополнительная информация
Видео
Затронутые продукты
Dell EncryptionСвойства статьи
Номер статьи: 000178533
Тип статьи: Solution
Последнее изменение: 23 Mar 2023
Версия: 22
Получите ответы на свои вопросы от других пользователей Dell
Услуги технической поддержки
Проверьте, распространяются ли на ваше устройство услуги технической поддержки.