Número do artigo: 000149871
How to create a RAID 1 volume within Windows using the Intel Rapid Storage Technology utility
Resumo: Here you find a guide on how to create a raid 1 volume in Windows using the latest Intel Rapid Storage Technology Utility Software.
Conteúdo do artigo
Sintomas
- System requirements for RAID 1
- Steps to configure RAID 1 using the Intel Rapid Storage Technology software
This article provides information on how to create a RAID 1 configuration within Windows using the Intel Rapid Storage Technology utility software.
System requirements for RAID 1
Systems that include the onboard Intel Rapid Storage Technology and two hard drives will support a RAID 1 configuration. It is recommended the two hard drives share the same size and performance ratings to fully utilize drive space for the RAID volume. The RAID 1 setup will support drives of different sizes but the size of the RAID volume will revert to the smaller of the two hard drives in a mismatched configuration.
Steps to configure RAID 1 using the Intel Rapid Storage Technology software
You can use the Intel Rapid Storage Technology software utility to create a RAID 1 configuration within Windows by following the steps below.
NOTE: The steps below were utilized on a Optiplex 7040 Desktop with two 500 GB hard drives installed. Please refer to your system's hardware specifications at the Dell Support Website to ensure your system supports this RAID 1 configuration.
1. Open the Intel Rapid Storage Technology software, and choose Create from the list of options at the top:

2. Under Select Volume Type, choose RAID 1 and click Next:

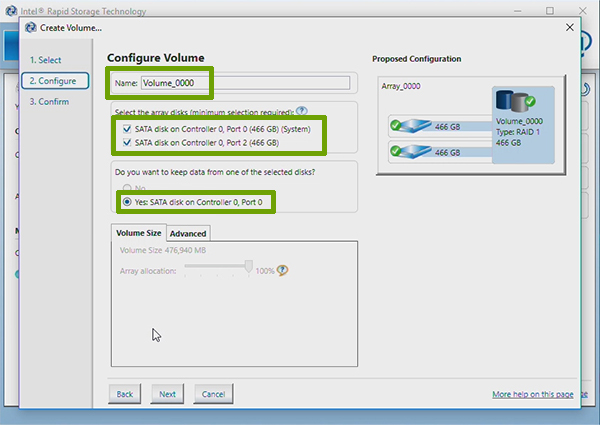
3. On the Configure Volume settings, input the name you wish to give the RAID volume. Make sure both disks are selected and choose which drive will be keeping the data:
4. On the Confirm Volume Creation screen select Create Volume:
NOTE: This process will take some time to finish. You may continue working on your system while the RAID volume is building but it is recommended you wait until it is finished.

5. A message box will appear to show the volume has been created. Click OK:

6. The Status screen then appears, showing the RAID volume and the status of the data migration. Once the data migration process ends, the RAID 1 volume will be completed:

Propriedades do artigo
Data da última publicação
21 fev. 2021
Versão
3
Tipo de artigo
Solution