NetWorker Virtual Edition (NVE): How to Install the Platform Security Rollup
Resumo: Dell EMC creates and distributes the Platform Security Rollups for the NVE appliance. The goal of this KB Article is to provide instructions for customers to download and install the latest Platform Security Roll-up on NetWorker Virtual Edition (NVE) systems using the Dell EMC NetWorker Installation Manager. Information in this KB is only applicable to the NetWorker Virtual Edition Appliance. ...
Instruções
See the latest EMC Security Advisory (ESA) under the advisories section of NetWorker Support pages: https://www.dell.com/support/home/product-support/product/networker/advisories
The NetWorker appliance and NetWorker software upgrade are performed separately, for instructions on this process see:
NetWorker Virtual Edition: How To Upgrade NetWorker Software and NVE System
a. Large .log files can be moved or purged, to identify large files: find / -name +1G
b. Use an SCP agent (WinSCP, FileZilla, and so forth) to copy logs off, or Linux mv command to move to another location with more space, optionally logs can be deleted with rm -rf /path/to/large/file
c. The /data01 partition can be expanded following:

The NetWorker appliance and NetWorker software upgrade are performed separately, for instructions on this process see:
NetWorker Virtual Edition: How To Upgrade NetWorker Software and NVE System
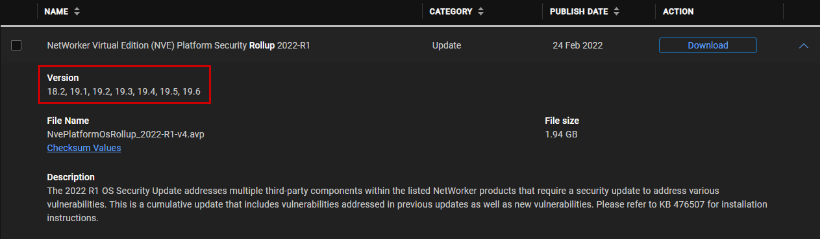
From the NetWorker downloads page, the expanded details for the platform rollup indicates which NetWorker Versions it is applicable to. https://www.dell.com/support/home/product-support/product/networker/drivers
e.g:
NOTE: This process is not intended or appropriate for standard technical support. If you require assistance, please reach out to your Dell Site Account Manager (SAM) or Dell Site Sales Rep to engage with our Global Professional Services (PS) team.
Pre-Upgrade Steps
1. Ensure you can log in to the NVE using both the admin and root credentials. Passwords can be changed by running:
sudo /usr/local/avamar/bin/change-passwords
2. Perform a "Server Protection" backup in NetWorker and collect bootstrap details with:
mminfo -B
3. Make note of the upgrade history on the NVE:
avi-cli --verbose localhost --password 'ROOT-PASSWORD' --listhistory
4. Create a VMware snapshot NVE VM.
5. Before copying any files to the NVE ensure that the NVE has enough space on the / (root) and /data01 partitions by running the following command:
df -h
a. Large .log files can be moved or purged, to identify large files: find / -name +1G
b. Use an SCP agent (WinSCP, FileZilla, and so forth) to copy logs off, or Linux mv command to move to another location with more space, optionally logs can be deleted with rm -rf /path/to/large/file
c. The /data01 partition can be expanded following:
- NetWorker Virtual Edition: How To Expand /data01 Partition (EXT3)
- NetWorker Virtual Edition: How to increase /data01 partition size (XFS)
Note: The NetWorker configuration-database (nsrdb), client file index, and media database (mm) are all stored on the /data01 partition by default.
Process
1. From a web browser, access the NVE's installation manager: https://NVE_hostname/avi
2. Log in with the root credentials.
3. Go to the Repository tab. Use the Browse.. button to browse and upload the platform rollup package.
2. Log in with the root credentials.
3. Go to the Repository tab. Use the Browse.. button to browse and upload the platform rollup package.
Optionally: you can use an SCP agent to copy the downloaded installation package to the NVE's /data01/avamar/repo/packages/ directory.
4. Once the NVE has scanned the files from the packages directory, the package can be installed from the Available Packages -> SW Updates tab.
4. Once the NVE has scanned the files from the packages directory, the package can be installed from the Available Packages -> SW Updates tab.
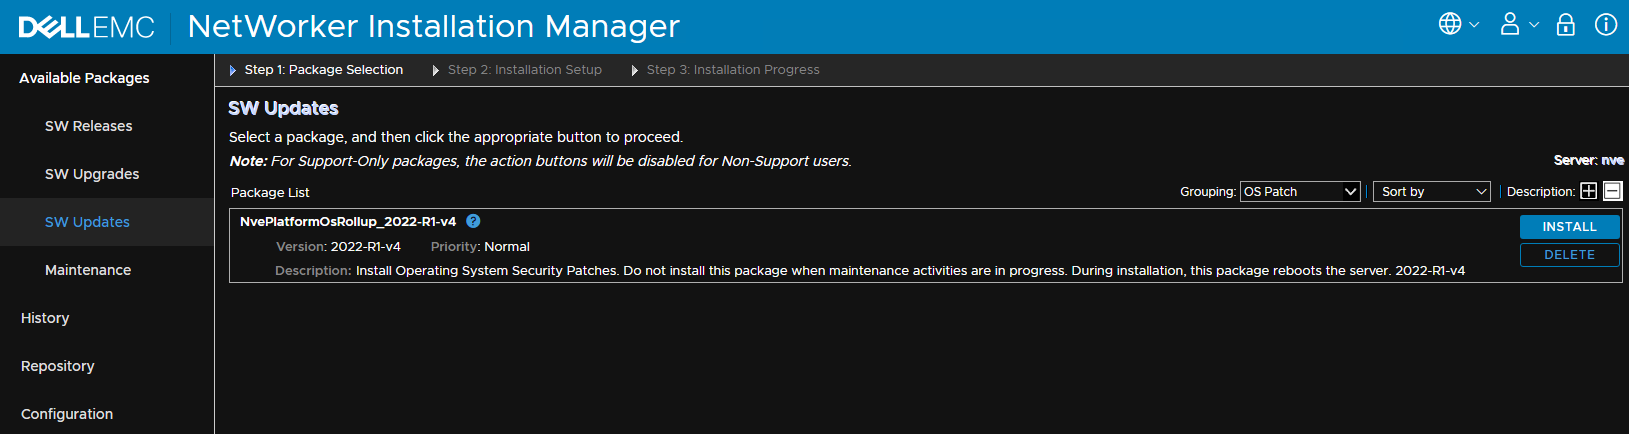
NOTE: If the package is not shown. Go to the Repository tab and confirm if the package is shown. The package must report a status of Accepted and state Package is Available.
5. From SW Updates click Install which will initiate the installation process.
6. You are prompted to enter the root password, once entered, click Continue.
The installation may take several minutes to run. The time may vary depending on the size or amount of data on the node. Monitor the installation and respond to any input. The Server is rebooted as part of the workflow. You may be logged out of the Installation Manager. If so log back into the installation manager to continue to monitor progress. Click the Monitor button to get back to the Installation Progress display. Once the Installation is 100% completed you may log out (Click the folder upper right next to the refresh icon). and disconnect.
Mais informações
Installation Failures:
- /space/avamar/var/avi/server_log/avinstaller.log.0
- /space/avamar/var/avi/server_log/aviserver.log.0
- /space/avamar/var/avi/server_log/avitask.log.0
When performing upgrades a temporary folder is created using the name of the upgrade package being installed. You can see the temp upgrade directory by running: ls -l /data01/avamar/repo/temp/. This folder will not exist post upgrade and may be deleted if the upgrade fails and the workflow is closed. To collect these logs, initiate the upgrade and before closing out the failure collect the logs.
- /data01/avamar/repo/temp/*/tmp/workflow.log
- /data01/avamar/repo/temp/*/tmp/err.log
- Get output-showing install/upgrade history: avi-cli --verbose localhost --password ROOT-PASSWORD --listhistory
- List packages currently in repository: avi-cli --verbose localhost --password ROOT-PASSWORD --listrepository
Produtos afetados
NetWorkerProdutos
NetWorkerPropriedades do artigo
Número do artigo: 000052627
Tipo de artigo: How To
Último modificado: 01 set. 2022
Versão: 5
Encontre as respostas de outros usuários da Dell para suas perguntas.
Serviços de suporte
Verifique se o dispositivo está coberto pelos serviços de suporte.
Propriedades do artigo
Número do artigo: 000052627
Tipo de artigo: How To
Último modificado: 01 set. 2022
Versão: 5
Encontre as respostas de outros usuários da Dell para suas perguntas.
Serviços de suporte
Verifique se o dispositivo está coberto pelos serviços de suporte.