Company Administration - Create and Manage Access Groups
Sammendrag: Company Administration - Create and Manage Access Groups
Denne artikkelen gjelder for
Denne artikkelen gjelder ikke for
Denne artikkelen er ikke knyttet til noe bestemt produkt.
Det er ikke produktversjonene som identifiseres i denne artikkelen.
Instruksjoner
Access Groups enables improved security. It provides additional control for Company Administrators on sites and assets that are visible to employees of their organization for use online. For example, an Access Group can be applied to restrict visibility to a subset of a company's total assets and sites while the user is creating and managing a service request, using applications like Live Chat, MyService360, CloudIQ, and/or accessing a serialized product page.
Company Administrators retain visibility to all sites and assets. Access Groups consists of the following:
To get started, you must first create Access Groups, which can then be applied to users. The required instructions are provided in the following sections. This functionality is available only to the company administrators.


Company Administrators retain visibility to all sites and assets. Access Groups consists of the following:
- Specific sites
- Specific product families
- Combination of site IDs and specific product families
- Specific assets
To get started, you must first create Access Groups, which can then be applied to users. The required instructions are provided in the following sections. This functionality is available only to the company administrators.


Create an Access Group of Specific Products
- Log in to Dell Support.
- On the upper right corner, hover over and click Dell Preferences. The Dell Preferences page is displayed.
- In the Company Administration box, click the Show company administration link.
- Select the "Manage Contacts" tab and then the Access Group sub-tab.
- Select Add Access Group.
- Select Create an access group by selecting individual products and click Next.
- Enter a Name (required) and Description (optional) for the access group.
- From the Search By dropdown, select the method wanted to find your products.
NOTE: You can find products by site (site name, site location, or site ID) or by product (serial number or service tag).
- If searching by product, enter the serial number or service tag you want to add into the Product search box (minimum of five characters required) and click Enter, or click the hourglass button to complete the search.
- From the search results, select the checkboxes beside the products that you want to add and click Add to Group.
- If finding products by site, click a site in the list of available sites to see the available products for that site.
- Select the checkboxes beside the products that you want to add and click Add to Group.
- To view the products added, select Show Selected Products at the bottom right-hand side of the screen.
- In the Company Administration box, click the Show company administration link once you are done adding products.
- Click Create Access Group. The product group is created, and the View Access Groups page is displayed.
Create an Access Group with Product Families
- Log in to Dell Support.
- On the upper right corner, hover over and click Dell Preferences. The Dell Preferences page is displayed.
- In the Company Administration box, click the Show company administration link.
- Select the Manage Contacts tab and then the Access Group sub-tab.
- Select Add Access Group.
- Select Create an access group by selecting sites or product families and click Next.
- Enter a name (required) and description (optional) for the group.
- Click on the Select Product Families tab.
- In the list of available product families, select the checkboxes beside one or more product families you want to add. The filter option can be used to narrow the list by entering a product family name or partial name and click Enter.
NOTE: You can click on a selected product family in the list to see more details.
- To view the product families added, select Show Selected Items at the bottom right-hand side of the screen.
- Once you are done adding product families, click Create Access Group. The product families group is created, and the View Access Groups page is displayed.
Create an Access Group with Both Sites and Product Families
- Log in to Dell Support.
- On the upper right corner, hover over and click Dell Preferences. The Dell Preferences page is displayed.
- In the Company Administration box, click the Show company administration link.
- Select the Manage Contacts tab and then the Access Group sub-tab.
- Select Add Access Group.
- Select Create an access group by selecting sites or product families and click Next.
- Enter a name (required) and description (optional) for the group.
- In the list of sites, select the checkboxes beside the sites you want to add. The filter option can be used to narrow the list by entering a site name, site location, or site ID (minimum four characters) and click Enter.
- Click on the Select Product Families tab.
- In the list of available product families, select the checkboxes beside the families to be added. The filter option can be used to narrow the list by entering a product family name or partial name (minimum five characters) and click Enter.
NOTE: A selected product family can be clicked in the list to see more details of products in the product family.
- To view the sites and product families added, select Show Selected Items at the bottom-right side of the screen.
- Once you are done adding sites and product families, click Create Access Group. The access group is created, and the View Access Groups page is displayed.
Create Site Access Group
- Log in to Dell Support.
- On the upper right corner, hover over and click Dell Preferences. The Dell Preferences page is displayed.
- In the Company Administration box, click the Show company administration link once you are done adding products.
- Select the Manage Contacts tab and then the Access Group sub-tab.
- Select Add Access Group.
- Select Create an access group by selecting sites or product families and click Next.
- Enter a name and description for the site group.
- In the list of available sites, select the checkboxes beside the sites you want to add. The filter option can be used to narrow the list by entering a site name, site location, or site ID minimum 4 characters) and click Enter.
- Once you are done adding sites, click Create Access Group. The site group is created, and the View Access Groups page is displayed.
Edit Product Access Group
- Log in to Dell Support.
- On the upper right corner, hover over and click Dell Preferences. The Dell Preferences page is displayed.
- In the Company Administration box, click Show company administration link.
- Select the Manage Contacts tab, and the Access Groups sub-tab.
- Click on a product group in the GROUP NAME column.
- Click Edit Selected Items.
- To edit the name or description of the group, enter the new names in the Custom Group Name and Custom Group Description boxes.
- To add products to the groups, select the method by which you want to find your products from the Search By dropdown.
NOTE: You can find products by site (site name, site location, or site ID) or by product (serial number or service tag).
- If searching by product, enter the serial number or service tag you want to add into the Product search box (minimum of five characters required) and click Enter, or click the hourglass button to complete the search.
- From the search results, select the checkboxes beside the products that you want to add and click Add to Group.
- If finding products by site, click a site in the list of available sites to see the available products for that site.
- Select the checkboxes beside the sites that you want to add and click Add to Group.
- To remove products from the group, perform the following:
- Select the Show Selected Items checkbox on the bottom left of your screen, the window expands showing your selected products.
- Select the checkbox beside the products that you want to remove.
- Click Remove from Group.
- Once all edits are complete, click Save Changes. The product group is updated, and a success message is displayed.
Edit Site Access Group
- Log in to Dell Support.
- On the upper right corner, hover over and click Dell Preferences. The Dell Preferences page is displayed.
- In the Company Administration box, click the Show company administration link.
- Select the Manage Contacts tab, and the Access Groups sub-tab.
- Click on a site group in the GROUP NAME column.
- Click Edit Selected Items.
- To edit the name or description of the group, enter the new names in the Access Group Name and Description boxes.
- To add sites to the group, select the checkboxes beside the sites you want to add in the list of available sites. The filter option can be used to narrow the list by entering a site name, site location, or site ID (minimum four characters) and clicking Enter.
NOTE: You can click Show Selected Sites on the bottom right of the screen and then select Custom Group Preview to preview the products in the site.
- To remove sites from the group, perform the following:
- Select the Show Selected Items checkbox on the bottom left of your screen, the window expands showing your selected sites.
- Click on the 'circle with minus' icon beside each site that you want to remove.
- Once all edits are complete, click Save Changes. The site group is updated, and you are taken to the View Access Groups screen.
Edit Access Group with Product Families
- Log in to Dell Support.
- On the upper right corner, hover over and click Dell Preferences. The Dell Preferences page is displayed.
- In the Company Administration box, click the Show company administration link.
- Select the Manage Contacts tab, and the Access Groups sub-tab.
- Click on a product family group in the GROUP NAME column.
- Click Edit Selected Items.
- To edit the name or description of the group, enter the new names in the Access Group Name and Description boxes.
- To add a product family to the group, perform the following:
- Click on Select Product Families.
- In the list of available product families, select the checkboxes beside the product families you want to add.
- To remove product families from the group, perform the following:
- Click on the Show Selected Items box on the bottom left of your screen, the window expands showing your selected product families.
- Click on the 'circle with minus' icon beside each product family that you want to remove.
- Once all edits are complete, click Save Changes. The product family group is updated, and you are taken to the View Access Groups screen.
Edit Access Group with Sites and Product Families
- Log in to Dell Support.
- On the upper right corner, hover over and click Dell Preferences. The Dell Preferences page is displayed.
- In the Company Administration box, click the Show company administration link.
- Select the Manage Contacts tab, and the Access Groups sub-tab.
- Click on a product family group in the GROUP NAME column.
- Click Edit Selected Items.
- To edit the name or description of the group, enter the new names in the Access Group Name and Description boxes.
- To add sites to the group, select the checkboxes beside the sites you want to add in the list of available sites. The filter option can be used to narrow the list by entering a site name, site location, or site ID (minimum four characters) and click Enter.
NOTE: Once you have added a new site, you may have to reselect product families.
- To add product families to the group, perform the following:
- Click on the Select Product Families tab.
- In the list of available product families, select the checkboxes beside the product families you want to add.
- To remove sites or product families from the group, perform the following:
- Click on the Show Selected Items box on the bottom left of your screen, the window expands showing your selected sites and product families.
- Select the sites or product families that you want to remove by selecting the 'circle with minus' icon beside each field.
- Click Remove from Group.
- Once all edits are complete, click Save Changes. The group is updated, and you are taken to the View Access Groups screen.
Download Access Group Data
- You can download the list of all the access groups in your account as a CSV file.
- Log in to Dell Support.
- On the upper right corner, hover over and click Dell Preferences. The Dell Preferences page is displayed.
- In the Company Administration box, click the Show company administration link.
- Select the Manage Contacts tab, and the Access Groups sub-tab.
- To download information about all the access groups in your account, perform the following:
- Click Download.
- In the Export and Download window, select the required file format, and click Download. The following information is downloaded:
- Group Name
- Description
- Items (Products, Sites, or Sites and Product Families)
- Modified Date
Show Access Group History
- You can view the list of all the access groups in your account you have created, modified, or deleted.
- Log in to Dell Support.
- On the upper right corner, hover over and click Dell Preferences. The Dell Preferences page is displayed.
- In the Company Administration box, click the Show company administration link.
- Select the Manage Contacts tab, and the Access Groups sub-tab.
- Click Show History.
- The history of your access groups is displayed with the following information:
- User
- Event (description of what you created, modified, or deleted)
- Date (date and time the change was made)
Apply Access Groups to a User (user association)
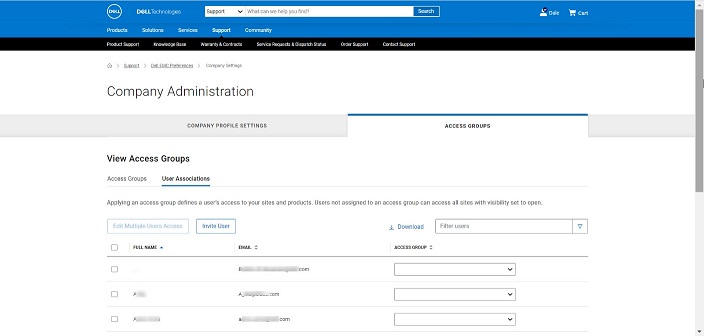
Once an Access Group is created, users can then be associated to the appropriate Access Group. Applying an access group defines a user’s access to your sites and products. Users not assigned to an access group can access all sites with visibility set to open.- Log in to Dell Support.
- On the upper right corner, hover over and click Dell Preferences. The Dell Preferences page is displayed.
- In the Company Administration box, click the Show company administration link.
- Select the Manage Contacts tab, and the Access Groups sub-tab.
- Select the User Associations tab.
- Click on the Access Group drop-down list next to a user’s name/email and select the group you would like to assign.
NOTE: Company Administrators are not shown in the user list as they have visibility to all sites and assets.
- A confirmation message appears.
NOTE: Use the Filter users option to filter the list of users.
- To apply a single Access Group to multiple users, first select the multiple checkboxes in the user list.
- Click the Edit Multiple Users Access button.
- Select an Access Group from the drop-down list.
- Click on the Assign Access Group button. A confirmation message is displayed.
Invite User
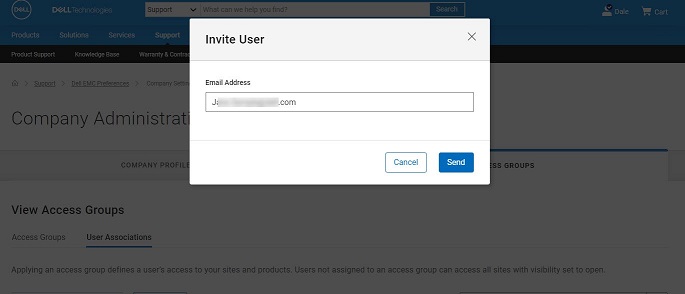
The Invite User option allows you to send an invitation to sign up for a Dell online account to a new co-worker. This streamlines their registration process. For companies that have chosen the Restricted company profile type, all users must be set up by using the Invite User feature; they cannot directly register for access.- Click Invite User and type in a user’s email address in the search box.

- Click the Send button.

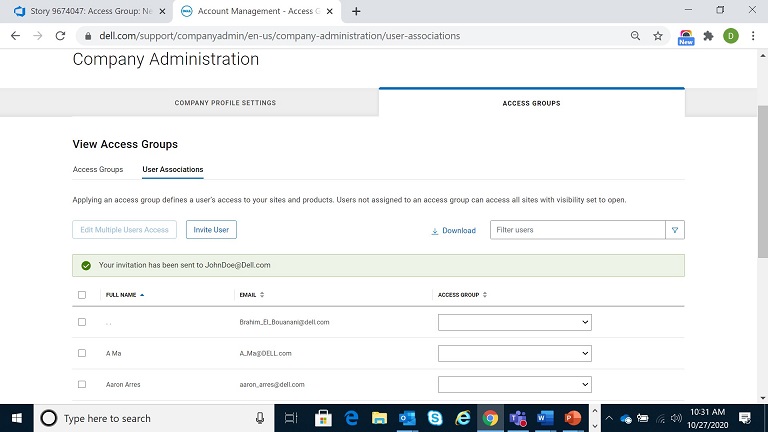
- A message appears confirming that your invitation has been sent.

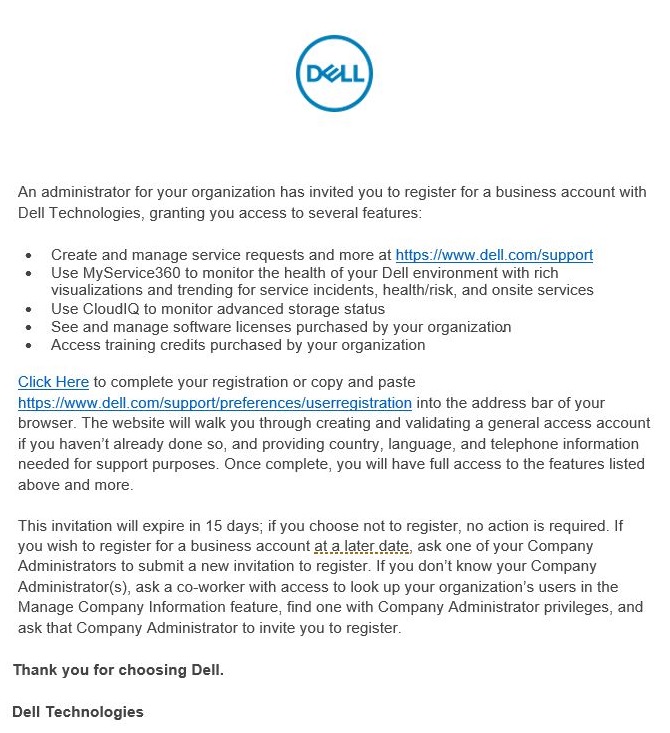
- The recipient receives the below email with instructions for accepting the invitation.


Berørte produkter
CloudIQArtikkelegenskaper
Artikkelnummer: 000179622
Artikkeltype: How To
Sist endret: 29 jul. 2024
Versjon: 8
Få svar på spørsmålene dine fra andre Dell-brukere
Støttetjenester
Sjekk om enheten din er dekket av støttetjenestene.