How to Use and Troubleshoot the Dell Scanner Module with USB for Dell Latitude 7220 Rugged Extreme Tablet
Samenvatting: This article provides information about how to use and troubleshoot the Dell Scanner Module with USB for Latitude 7220 Rugged Extreme Tablet.
Dit artikel is van toepassing op
Dit artikel is niet van toepassing op
Instructies
The Dell Rugged Barcode Scanner Module with USB for the Dell Rugged Extreme 7220 Tablet provides an enhanced scanning experience along with two extended USB ports. This product is used with Dell Rugged Control Center Software.
RCC User Guide for Barcode Scanner
Barcode Settings
You can use the barcode settings feature to capture and read information that is contained in a barcode.
In Rugged Control Center, you can connect an external scanner to your computer, or use the camera-based scanner to scan the barcode.
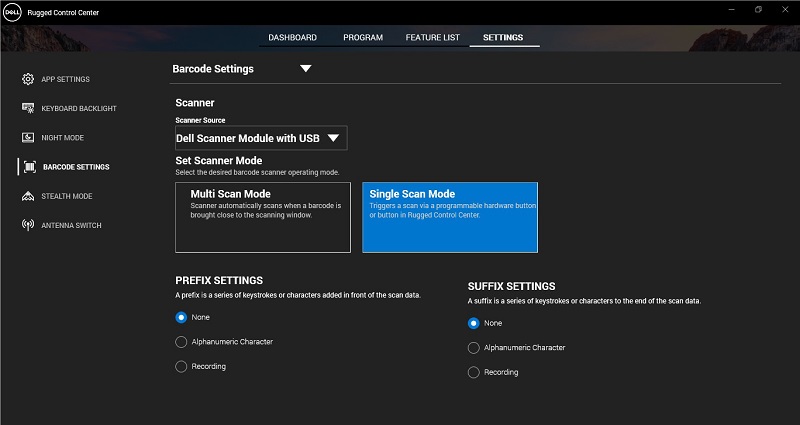
(Figure 1: Rugged Control Center)
Table of Contents:
- Download and install Dell Scanner Module with USB Driver.
- Set up Dell Scanner Module with USB
- Configure Barcode Scanner.
- Use barcode Scanner.
- Troubleshooting the External barcode Scanner
Download and install Dell Scanner Module with USB Driver.
Prerequisites:
Ensure that Rugged Control Center is updated to version 4.2 or later, and the scanner module is connected to the back of the rugged tablet.
- To download the Dell Scanner Module with a USB driver, go to our Drivers Download Site.
- In the Enter, a Service Tag, Serial Number, Service Request, Model, or Keyword search box, type the product name. For example: Latitude 7220 Rugged Extreme Tablet
- A list of matching products is displayed.
- Select your product from the list.
- Click DRIVERS & DOWNLOADS.
- Download the Dell Scanner Module with a USB driver.
- Double-click the downloaded file to start the installation wizard.
- Follow the on-screen instructions to complete the installation process.
The Dell Scanner Module with a USB driver is installed.
Set up Dell Scanner Module with USB
Dell scanner module with USB driver supports Serial Mode Communication mode interface communication with Rugged control center application. The Serial mode requires a driver that must be installed in your computer.
Prerequisites:
Ensure that you restart Rugged Control Center, if it is running in your computer after connecting the scanner or changing the communication mode.
To setup the scanner using serial mode communication, do the following Steps:
- By default, the scanner is set to the serial mode.
Note: If the scanner is not set to the serial mode, scan the barcode after installing the driver.
- In your computer, go to Device Manager and expand the Ports section.
- Search for HoneyWell Gen7DB(COM xx).
- Right-click HoneyWell Gen7DB(COM xx) and select Properties.
- In the Properties window, go to Power Management and clear the Allow the computer to turn off this device to save power checkbox.
- Click OK and close Device Manager.
Configure Barcode Scanner
- Restart your computer, and launch Dell Rugged Control Center.
- Go to Settings > Barcode Settings.
- Go to Scanner and select one of the following Scanner Sources from the drop-down menu:
- Dell Scanner Module—Uses the scanner with magnetic stripe reader that is connected to your computer.
- Dell Scanner Module with USB—Uses the scanner with USB.
- Rear Camera—Uses the computer rear camera, if applicable.
- Front Camera—Uses the computer front camera.
Note: To view the supported symbology of Dell Scanner Module, Dell Scanner Module with USB, and camera-based scanners, see Supported symbology. You can also view the symbology in the Settings section. - Select one of following scanner modes:
- Multi Scan Mode—Scans the barcode continuously one after another.
- Single Scan Mode—Scans only one barcode at a time and disconnects.
- None—Displays the scanned data without any settings.
- Alphanumeric Character—Specify an alphanumeric character to add with the scanned data.
- Recording—Record any key or key combination to add along with the scanned data. For example, Record Enter in the suffix settings to capture the scanned data as inline.
Use Barcode Scanner
- To use the barcode scanner, do one of the following:
- Go to FEATURE LIST > barcode and click.
- Go to Programmable Buttons or Edge Menus and select barcode Scanner.
The barcode Scanner is launched.
- Open any input source such as Notepad, Excel, Word, and so on, to capture the barcode.
Note: Ensure that the cursor is positioned in the input source.
- Place the barcode in front of the scanner. The barcode is captured in the input source.
Troubleshooting the External Barcode Scanner
After configuration, if the barcode scanner is not displayed in the Settings section, perform the following steps:
- Download and install any external scanner such as 123 Scan Utility.
- Open the scanner and wait for the drivers to update.
- After the drivers are updated, go to the Data view tab, and select the required scanner.
The detailed information about the scanner is displayed.
- To check if your scanner is working, click the Flash/Beep scanner.
You can hear a beep sound from the scanner.
- Go to Rugged Control Center, and check for the barcode scanner in the Settings section.