문서 번호: 000125291
How to Restore the BIOS or UEFI (System Setup) to Factory Defaults on a Dell Computer
요약: This article provides information about resetting the BIOS or UEFI to factory default settings. Resetting the BIOS or UEFI helps resolve many issues with your computer.
문서 콘텐츠
지침
The information that is stored in the BIOS or UEFI, known as Extended System Configuration Data (ESCD) can occasionally become corrupt due to various reasons such as power events, incorrect settings, and hardware incompatibility due to a specific setting. In these cases, it is sometimes necessary to reset the BIOS or UEFI to factory default settings.
WARNING: The BIOS interface is designed for advanced users. Be sure about what changes you are making in the BIOS. Accidentally changing an unknown setting can prevent the computer from turning on, booting into the operating, or can cause potential loss of data.
To access the BIOS or UEFI interface on your Dell computer:
- Turn on or restart the computer.
- At the Dell logo, press the F2 key several times until Entering System Setup appears.
NOTE: If the computer boots into the operating system, restart the computer and try again.
The BIOS or UEFI interface may vary across different Dell computers. See the images below and match the one on your Dell computer for information about how to reset the BIOS or UEFI to factory default settings. If the image does not match, see the user manual of your Dell computer for product-specific information.
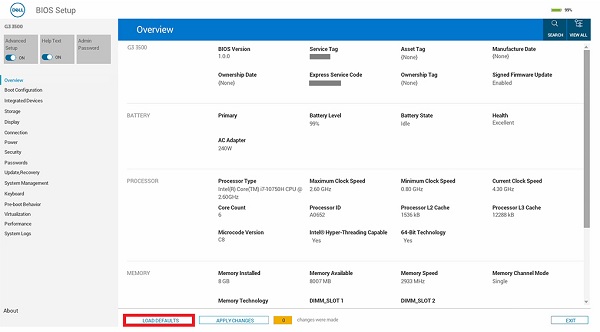
Figure 1: BIOS with UEFI support.
- On the BIOS (System Setup) screen, click Load Defaults.
- Ensure that BIOS Defaults is selected. Click OK (Figure 2).
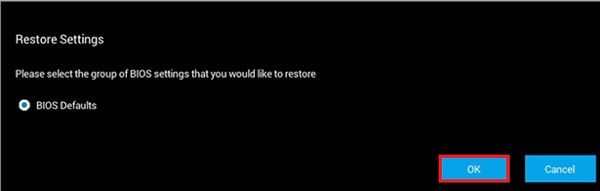
Figure 2. Ensure that BIOS Defaults is selected - A warning message appears. Click OK (Figure 3 and 4).
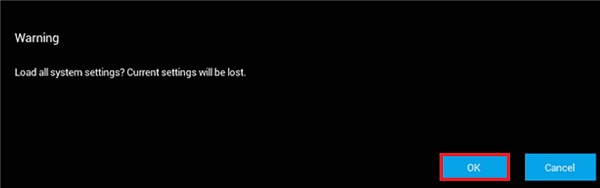
Figure 3. First warning message

Figure 4.; Second warning message
Restart the computer.
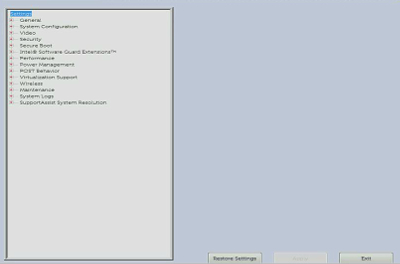
Figure 5. UEFI BIOS interface on a Dell computer.
- On the BIOS (System Setup) screen, click Restore Settings or Load Defaults (whichever is listed).
- Ensure that BIOS Defaults is selected, or confirm to load the defaults when offered. Click OK.
- Click Exit.
- Confirm to exit the BIOS (System Setup) screen, when offered.
Restart the computer.
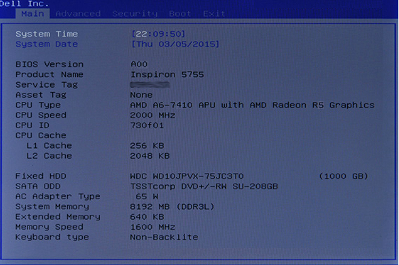
Figure 6. Legacy BIOS interface on a Dell computer.
- On the BIOS screen, press the Right Arrow key until the Exit option is highlighted.
- Press the Down Arrow key until Restore Defaults or Load Optimal Defaults is highlighted (whichever is listed), and then press the Enter key.
- Press the Enter key on Yes to Load Optimized Defaults or Load Optimal Defaults (whichever is listed).
Restart the computer.
추가 정보
Recommended Articles
Here are some recommended articles for you.
- How to Perform a BIOS or CMOS Reset and Clear the NVRAM on Dell Computers
- How to Access UEFI (BIOS) System Setup from Microsoft Windows on your Dell Computer
- Downgrading the System BIOS on a Dell System
- Resetting the BIOS to Default Configuration on a System May Not Match the BIOS Settings Configured from the Factory
- Drivers and Downloads FAQs
- Where Can I Download Drivers and Dell Installed Software for My Dell Computer?
- How to reset the BIOS of a Dell PowerEdge Server?
 Out of warranty? No problem. Browse to the Dell.com/support website and enter your Dell Service Tag and view our offers.
NOTE: Offers are only available for US, Canada, UK, France, Germany, and China personal computer customers. Server and Storage are not applicable.
문서 속성
영향을 받는 제품
Latitude
제품
Alienware, Inspiron, Legacy Desktop Models, OptiPlex, Vostro, XPS, G Series, G Series, Alienware, Inspiron, Vostro, XPS, Legacy Laptop Models, Fixed Workstations, Mobile Workstations
마지막 게시 날짜
13 6월 2024
버전
14
문서 유형
How To