文書番号: 000134997
Using the Dell BIOS Data Wipe function for OptiPlex, Precision and Latitude Systems
概要: This article provides the information on using the Dell BIOS Data Wipe function for select OptiPlex, Precision and Latitude systems manufactured after November 2015.
文書の内容
手順
Data Wipe
Data Wipe is a new functionality added to the most recent generations of Dell Business Class systems. Data Wipe allows for the erasure of all internal storage devices in the system using a single BIOS integrated function of the system. The Data Wipe process will delete all data from all internal SerialATA (SATA) drives on the system and the data will not be recoverable.
NOTE: M.2 NVMe PCIe Solid State Drives do not have Secure Erase nor Password capability on pre-Kaby Lake systems.
Depending on the size and type of storage devices, this process may take several hours.
Once the Data Wipe process is initiated, all data on the system will be unrecoverable. If the process is aborted during the Data Wipe process, the operating system and data will be corrupted and unrecoverable.
Data Wipe process
The Data Wipe process is initiated in the system BIOS.
NOTE: It is recommended that systems in an IT environment have an ADMINISTRATOR PASSWORD set in the BIOS on Data Wipe capable systems to prevent the unintended destruction of data on the system.
- Boot to the system BIOS by press the F2 at the Dell Splash screen during system startup.
- Once in the BIOS, select the Maintenance option, then Data Wipe option in the left pane of the BIOS using the mouse or the arrow keys on the keyboard (Figure 1).
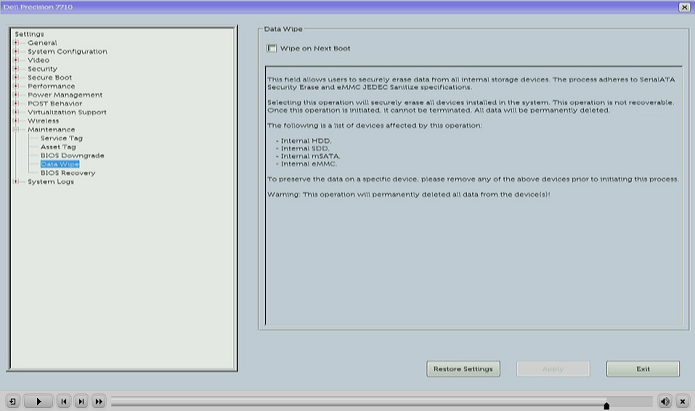
Figure 1: Select Maintenance then the Data Wipe option in the BIOS - Next, check the Wipe on Next Boot option in the Right Pane, This will generate a warning pop-up explaining what will occur and confirming you want to continue with the erase operation (Figure 2).
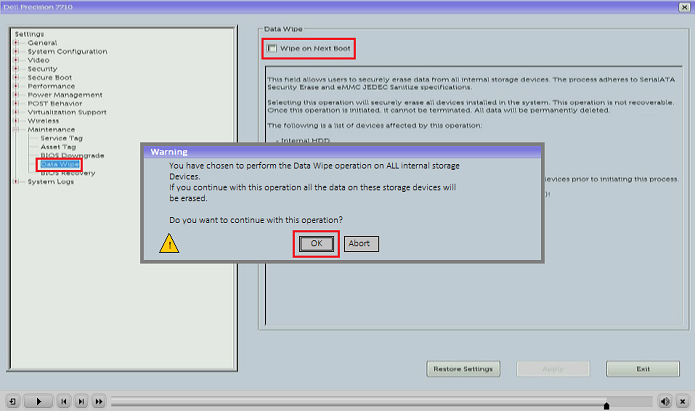
Figure 2: Select Wipe on Next Boot and confirm the selection on the warning message that appears by selecting OK - A second pop-up will appear for final confirmation of the Data Wipe operation. The default response on this pop-up is to cancel the process, click NO if you want to continue with the Data Wipe operation (Figure 3), then click Exit to leave the BIOS settings.
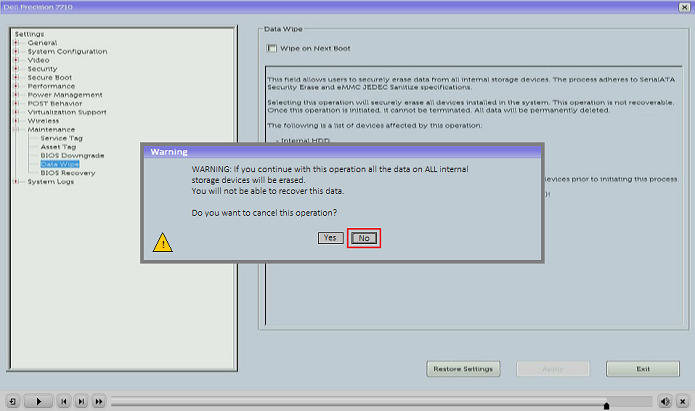
Figure 3: Select NO on the second confirmation screen that appears to continue the Data Wipe process - The system will now reboot and you will be presented with a Dell Security Manager screen for FINAL confirmation of the Data Wipe operation. At the point you can still cancel the operation and the Default choice will be Cancel. You have to manually select Continue to continue the Data Wipe Process (Figure 4).
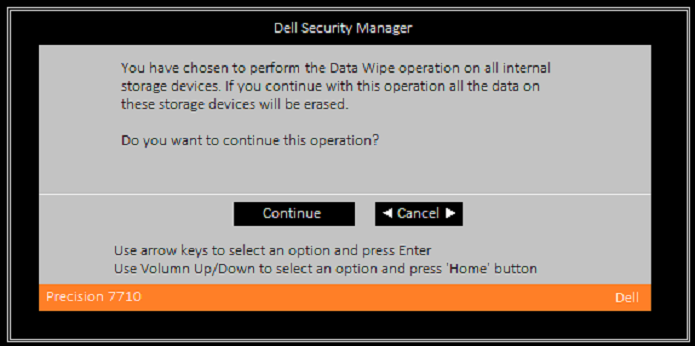
Figure 4: Select Continue to proceed with the Data Wipe process - If you decide to cancel, you will be presented with the following screen (Figure 5):

Figure 5: Click OK on the message that appears if you wish to fully cancel the Data Wipe process - If you decide to continue, you will see the progress screen. This process may take several hours depending on the number and size of connected SerialATA storage devices (Figure 6).
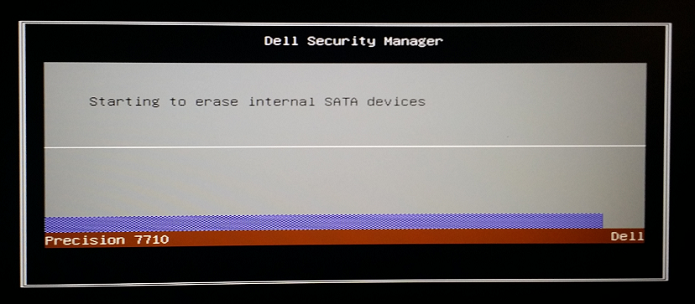
Figure 6: The process screen appears if you elect to continue with the Data Wipe - Once complete, you will be presented with this screen. Upon rebooting the system, no operating system will be found and you will need to reinstall the operating system and all drivers and applications (Figure 7).
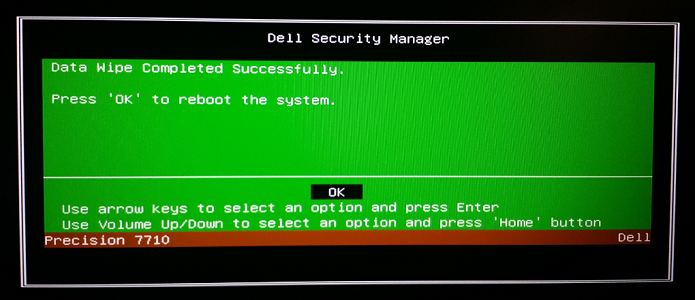
Figure 7: Click OK to reboot the computer once the Data Wipe process is complete
その他の情報
Recommended Articles
Here are some recommended articles related to this topic that might be of interest to you.
文書のプロパティ
影響を受ける製品
Latitude 5280/5288, Latitude 7280, Latitude 5480/5488, Latitude 7480, Latitude 5580, Latitude E5470, OptiPlex 3040 Micro, OptiPlex 3040 Small Form Factor, OptiPlex 3040 Tower, OptiPlex 3050 All-In-One, OptiPlex 3050 Tower, OptiPlex 3050 Micro
, OptiPlex 3050 Small Form Factor, OptiPlex 3240 All-in-One, OptiPlex 5040 Tower, OptiPlex 5040 Small Form Factor, OptiPlex 5050 Tower, OptiPlex 5050 Micro, OptiPlex 5050 Small Form Factor, OptiPlex 5250 All-In-One, OptiPlex 7040 Tower, OptiPlex 7040 Micro, OptiPlex 7040 Small Form Factor, OptiPlex 7050 Tower, OptiPlex 7050 Micro, OptiPlex 7050 Small Form Factor, OptiPlex 7450 All-In-One, Precision 3520, Precision 5520, Precision 7520, Precision 7720, Precision 7510, Precision 7710, Dell Precision Tower 3420, Dell Precision Tower 3620
...
最後に公開された日付
23 4月 2024
バージョン
6
文書の種類
How To