How to Use the Jumper to Reset the BIOS or UEFI Password on Your Dell Desktop
概要: This article provides information about how to reset the BIOS or UEFI password using the motherboard jumper on a Dell desktop.
手順
NOTE: This process will not clear a Windows Operating System password, nor will it clear passwords on a Dell portable computer. This is only to clear System BIOS passwords on Dell Desktop and Mini-Tower systems.
NOTE: The BIOS is the program that activates the hardware that is required to start your computer. The jumper is a small plastic covering that is found inside your computer.
If you are prompted for the Basic Input/Output System (BIOS) password at startup (before the operating system loads) or the BIOS or CMOS setup is locked, and you do not know or have forgotten the password, you cannot use your computer or change BIOS settings. Use these instructions to reset the BIOS password manually using the jumper.
Before you begin, perform the safety steps in the order below.
WARNING: These steps are for your personal safety and the protection of the equipment. Learn more about Safety Precautions When Working with Electronic and Electrical Equipment.
- Turn off the computer and unplug the power cable.
- Wait for 5 seconds.
- Disconnect all external devices.
- Disconnect any telephone or network cables from your computer.
- Press and hold the Power button for 10 seconds while your computer is unplugged to discharge static electricity from the system.
- Before touching anything inside your computer, ground yourself with a wrist-grounding strap or by touching an unpainted metal surface, such as the metal at the back of your computer. While you work, periodically touch an unpainted metal surface to dissipate static electricity.
To use the jumper to reset the BIOS password
NOTE: On the Dell Manuals website, download the product documentation or service manual for your computer. Refer to the System Board Components section for a labeled illustration of the jumpers on the system board.
- Ensure that your work surface is flat and clean to prevent scratching your computer's cover.
- With your computer still turned off and unplugged, remove your computer's cover.
- To locate the password jumper on the motherboard, look for the letters PWD, PSWD, or PSWDCLR.
- Choose an option:
If there are 2 metals pins under the jumper
- Remove the jumper from the pins, replace the computer cover, reconnect the power cable and monitor, and turn on the computer.
- After the Windows login screen appears, turn off the computer.
- Again, disconnect the power cable and monitor. Press and hold the power button for 10 seconds to release static electricity from the system.
- Remove your computer cover.
- Replace the jumper in its original position covering the 2 pins. This will enable password feature.
- Replace the computer cover.
- Reconnect the power cable and other connections and turn on the computer.
If there are 3 pins under the jumper, see Figure 1 below.
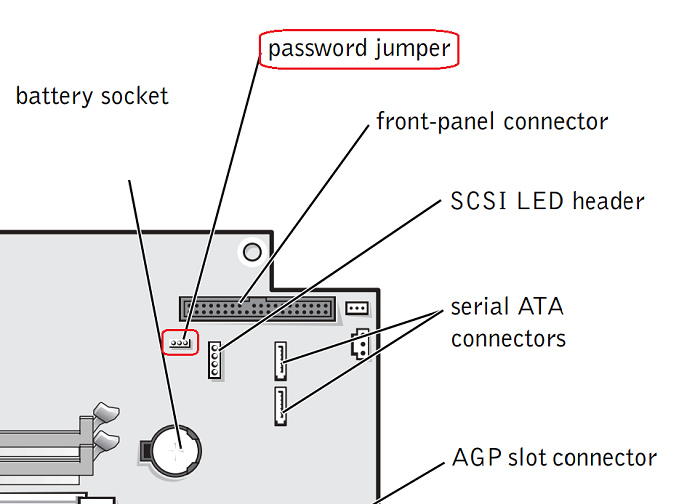
Figure 1 - Generic motherboard illustration showing a 3-pin password jumper, your motherboard may vary, see the product documentation for your system for specific instructions.
- Remembering which two pins are covered, remove the jumper from those pins.
- Reinstall the jumper in a different position. For example, if you removed the jumper from pins 2 and 3, reinstall the jumper over pins 1 and 2.
- Replace the computer cover and reconnect the power cable and monitor.
- Turn on the computer and wait 5 s. Then press and hold the Power button until the computer turns off again.
- Disconnect the power cable and monitor again. Press and hold the Power button for 10 s to release static electricity from the system.
- Replace the jumper over the original 2 pins.
- Replace the computer cover.
- Reconnect the power cable and other connections and turn on the computer.
You can now assign a new system and/or setup password. For more password information, refer to the Passwords section of your computer's service manual.
その他の情報
Recommended Articles
Here are some recommended articles related to this topic that might be of interest to you.
対象製品
Desktops & All-in-Ones文書のプロパティ
文書番号: 000126390
文書の種類: How To
最終更新: 27 5月 2024
バージョン: 5
質問に対する他のDellユーザーからの回答を見つける
サポート サービス
お使いのデバイスがサポート サービスの対象かどうかを確認してください。
文書のプロパティ
文書番号: 000126390
文書の種類: How To
最終更新: 27 5月 2024
バージョン: 5
質問に対する他のDellユーザーからの回答を見つける
サポート サービス
お使いのデバイスがサポート サービスの対象かどうかを確認してください。