How to Enable Secure Boot on Dell Devices for Windows 11
Riepilogo: Learn how to enable Secure Boot and boot in secure mode on your Dell device. This guide covers UEFI secure boot, how to check if secure boot is enabled in the BIOS, and how to turn on secure boot for Windows 10 and 11. ...
Istruzioni
What is Secure Boot?
Secure Boot protects the boot process against security attacks from malicious code like malware and ransomware. Secure Boot is firmware-dependent and requires that the computer BIOS is set to UEFI mode.
How to Verify that Secure Boot is Enabled.
- Click the Windows Button to the bottom left of the screen or press the Windows Key.
- In the Search Bar, type:
msinfo32 - Press Enter.
- System Information opens, and System Summary should be selected by default.
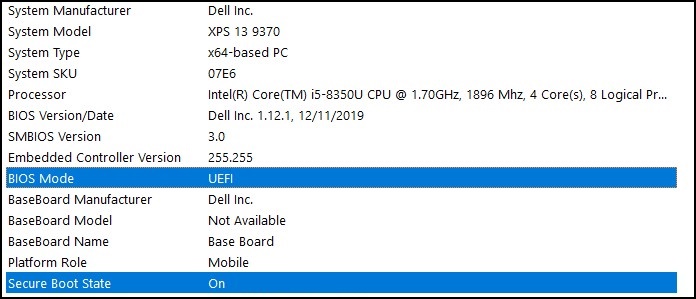
- On the right side of this screen, look for BIOS Mode and Secure Boot State.
- If Secure Boot is enabled, the BIOS Mode shows "UEFI," and Secure Boot state shows "On."

If the BIOS Mode shows "Legacy" in the Boot setting in the computer BIOS, it must be switched from Legacy to UEFI mode.
Verify that your computer was tested for the upgrade to Windows 11 before you continue as older computers may not meet the Windows 11 system requirements.
Dell computers tested for upgrade to Windows 11
Switching from Legacy to UEFI Mode
- Boot your computer.
- Tap the F2 key when the Dell logo appears to enter the BIOS.
- The following steps can vary based on your computer model:
Alienware, Inspiron, and Vostro
- Go to Boot > Change Secure Boot List Option to UEFI.
- Press the F10 key to Save and Exit.
OptiPlex, Precision, Wyse, and XPS
- Go to General > Boot Sequence > Boot List Option - Change to UEFI.
- Click Apply > click Exit - Save the Changes.
Enabling Secure Boot
Secure Boot is controlled by the computer firmware (BIOS) and can be enabled with a few simple steps:
- Boot your computer.
- Tap the F2 key when the Dell logo appears to enter the BIOS.
- The following steps can vary based on your computer model:
Alienware, Inspiron, and Vostro
- Go to Secure Boot > Change Secure Boot to Enabled.
- Press the F10 key to Save and Exit.
OptiPlex, Precision, Wyse, and XPS
- Go to Secure Boot > Secure Boot Enable > Check Secure Boot Enable.
- Click Apply > click Exit > Save the changes.
The computer restarts and boots back to the Windows desktop.
More Resources:
Informazioni aggiuntive
Recommended Articles
Here are some recommended articles related to this topic that might be of interest to you.