如何收集 Dell Security Management Server Virtual 的記錄
Riepilogo: 您可以依照以下指示收集 Dell Security Management Server Virtual 或 Dell Data Protection Virtual Edition 的記錄。
Questo articolo si applica a
Questo articolo non si applica a
Questo articolo non è legato a un prodotto specifico.
Non tutte le versioni del prodotto sono identificate in questo articolo.
Sintomi
本文涵蓋如何收集 Dell Security Management Server Virtual (先前稱為 Dell Data Protection | Virtual Edition) 的記錄。
受影響的產品:
- Dell Security Management Server Virtual
- Dell Data Protection | Virtual Edition
受影響的作業系統:
- Linux
Causa
不適用
Risoluzione
Dell Security Management Server Virtual 的記錄收集程序會因版本而異。如需詳細資訊,請針對 v9.11.0 及 更新版本或 8.2.0 至 9.10.1 選取適當的指示。如需版本資訊,請參閱如何識別 Dell Data Security/Dell Data Protection 伺服器版本。
v9.11.0 及更新版本
Dell Security Management Server Virtual 需要系統管理員在收集之前執行擷取記錄。如需詳細資訊,請選取適當的動作。
若要擷取記錄:
- 使用預設系統管理員 (
delluser) 登入資料登入 Dell Security Management Server Virtual 管理主控台。

注意:
- Dell Data Protection Enterprise Server Virtual Edition 的預設登入資料為:
- 使用者名稱:
delluser - 密碼:
delluser
- 使用者名稱:
- 系統管理員可以變更在產品的虛擬裝置選單中的預設密碼。
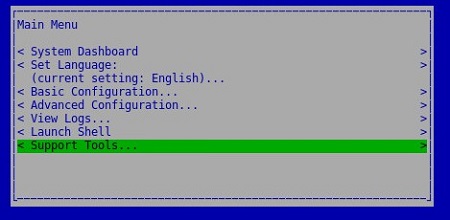
- 在主功能表上,選取支援工具,然後按下 Enter 鍵。
注意:
- 滑鼠無法在 Linux 虛擬裝置中運作。使用方向鍵瀏覽裝置。
- 虛擬裝置會限制滑鼠和鍵盤對外部視窗的存取。若要釋放滑鼠和鍵盤鎖定,請按下 CTRL + ALT。
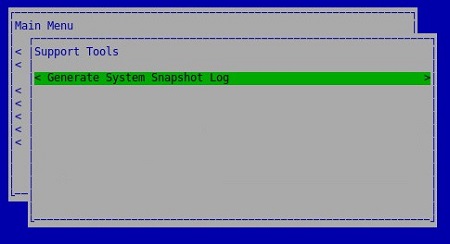
- 選取產生系統快照記錄,然後按下 Enter 鍵。
- 成功收集記錄時,選取確定,然後按下 Enter 鍵。
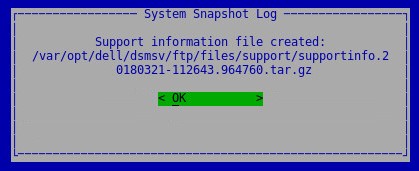
注意:記下檔案名 (根據時間戳記)。
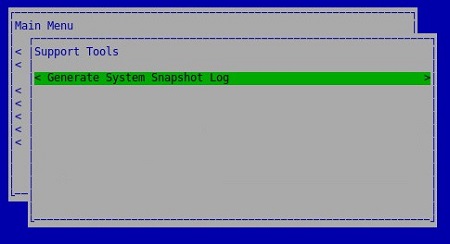
- 按下 ESC 鍵以返回主功能表。
若要收集記錄:
若要成功卸載記錄,Dell Security Management Server Virtual 需要:
- 第三方 FTP (檔案傳輸通訊協定) 用戶端
- FTP 用戶端的範例包括但不限於:
- Filezilla
- WinSCP
- CuteFTP
- FTP 用戶端的範例包括但不限於:
- 儲存裝置 (位於 Dell Security Management Server Virtual 之外)
- 在 FTP 用戶端中,使用 FTP 使用者登入 Dell Security Management Server Virtual
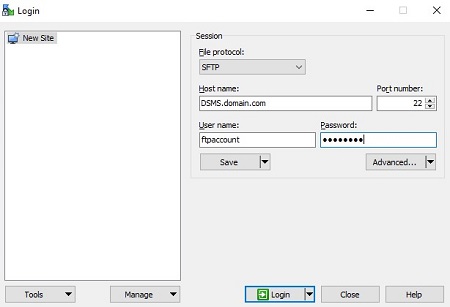
注意:
- 必須在 Dell Security Management Server 內建立 FTP 使用者。請參閱如何在 Dell Security Management Server Virtual/Dell Data Protection Virtual Edition 內建立 FTP 使用者,以獲得更多資訊。
- 針對列出的第三方產品,Dell 不會為其背書,亦不提供支援。列出以上用戶端的目的為提供客戶可使用的潛在產品範例。請聯絡產品製造商,以取得有關設定、組態及管理的相關資訊。
- 您的 FTP 用戶端 UI 可能與螢幕擷取畫面範例有所不同。
- SFTP 的預設連接埠號碼為 22。如果連線失敗,請確定防火牆沒有封鎖連接埠 22。
- 前往擷取的記錄 (
/var/opt/dell/dsmsv/ftp/files/support),並在本機儲存套裝。

注意:.tar 記錄套裝需要要讀取的檔案封存程式 (例如 WinZip、WinRAR、7-Zip)。
v8.2.0 至 9.10.1
Dell Security Management Server Virtual 需要系統管理員在收集之前執行擷取記錄。如需詳細資訊,請選取適當的動作。
若要擷取記錄:
- 使用預設系統管理員 (
ddpuser) 登入資料登入 Dell Enterprise Server Virtual 管理主控台。

注意:
- Dell Data Protection Enterprise Server Virtual Edition 的預設登入資料為:
- 使用者名稱:
ddpuser - 密碼:
ddpuser
- 使用者名稱:
- 系統管理員可以變更在產品的虛擬裝置選單中的預設密碼。
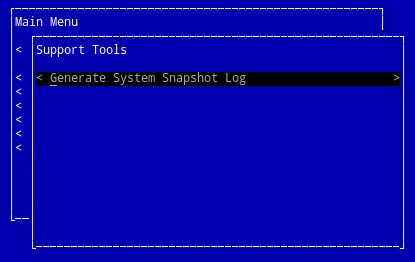
- 在主功能表上,選取支援工具,然後按下 Enter 鍵。
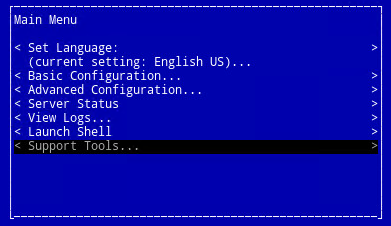
注意:
- 滑鼠無法在 Linux 虛擬裝置中運作。使用方向鍵瀏覽裝置。
- 虛擬裝置會限制滑鼠和鍵盤對外部視窗的存取。若要釋放滑鼠和鍵盤鎖定,請按下 CTRL + ALT。
- 選取產生系統快照記錄,然後按下 Enter 鍵。
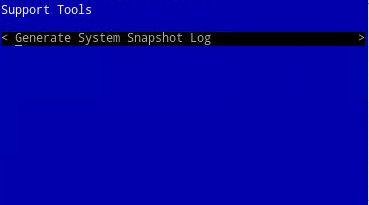
- 成功收集記錄時,選取確定,然後按下 Enter 鍵。
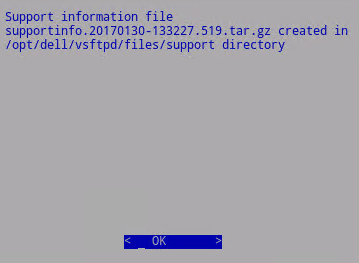
注意:記下檔案名 (根據時間戳記)。
- 按下 ESC
若要收集記錄:
若要成功卸載記錄,Dell Security Management Server Virtual 需要:
- 第三方 FTP (檔案傳輸通訊協定) 用戶端
- FTP 用戶端的範例包括但不限於:
- Filezilla
- WinSCP
- CuteFTP
- FTP 用戶端的範例包括但不限於:
- 儲存裝置 (位於 Dell Security Management Server Virtual 之外)
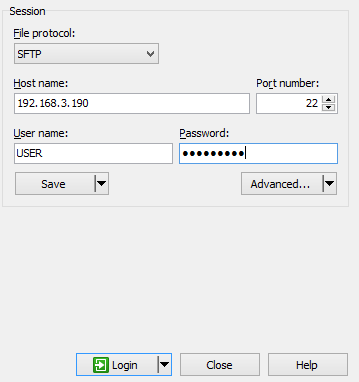
- 在 FTP 用戶端中,使用 FTP 使用者登入 Dell Security Management Server Virtual
注意:
- 必須在 Dell Security Management Server 內建立 FTP 使用者。請參閱如何在 Dell Security Management Server Virtual/Dell Data Protection Virtual Edition 內建立 FTP 使用者,以獲得更多資訊。
- 針對列出的第三方產品,Dell 不會為其背書,亦不提供支援。列出以上用戶端的目的為提供客戶可使用的潛在產品範例。請聯絡產品製造商,以取得有關設定、組態及管理的相關資訊。
- 您的 FTP 用戶端 UI 可能與螢幕擷取畫面範例有所不同。
- SFTP 的預設連接埠號碼為 22。如果連線失敗,請確定防火牆沒有封鎖連接埠 22。
- 前往擷取的記錄 (
/opt/dell/vsftpd/files/support),並在本機儲存套裝。

注意:.tar 記錄套裝需要要讀取的檔案封存程式 (例如 WinZip、WinRAR、7-Zip)。
如要聯絡支援部門,請參閱 Dell Data Security 國際支援電話號碼。
請前往 TechDirect,以線上產生技術支援要求。
如需更多深入見解與資源,請加入 Dell 安全性社群論壇。
Informazioni aggiuntive
Video
Prodotti interessati
Dell EncryptionProprietà dell'articolo
Numero articolo: 000126740
Tipo di articolo: Solution
Ultima modifica: 11 apr 2023
Versione: 15
Trova risposta alle tue domande dagli altri utenti Dell
Support Services
Verifica che il dispositivo sia coperto dai Servizi di supporto.