Bienvenue
Bienvenue dans l’univers Dell
- Passer des commandes rapidement et facilement
- Afficher les commandes et suivre l’état de votre expédition
- Créez et accédez à une liste de vos produits
- Gérer vos sites, vos produits et vos contacts au niveau des produits Dell EMC à l’aide de la rubrique Gestion des informations de l’entreprise.
Numéro d’article: 000149871
How to create a RAID 1 volume within Windows using the Intel Rapid Storage Technology utility
Résumé: Here you find a guide on how to create a raid 1 volume in Windows using the latest Intel Rapid Storage Technology Utility Software.
Contenu de l’article
Symptômes
- System requirements for RAID 1
- Steps to configure RAID 1 using the Intel Rapid Storage Technology software
This article provides information on how to create a RAID 1 configuration within Windows using the Intel Rapid Storage Technology utility software.
System requirements for RAID 1
Systems that include the onboard Intel Rapid Storage Technology and two hard drives will support a RAID 1 configuration. It is recommended the two hard drives share the same size and performance ratings to fully utilize drive space for the RAID volume. The RAID 1 setup will support drives of different sizes but the size of the RAID volume will revert to the smaller of the two hard drives in a mismatched configuration.
Steps to configure RAID 1 using the Intel Rapid Storage Technology software
You can use the Intel Rapid Storage Technology software utility to create a RAID 1 configuration within Windows by following the steps below.
1. Open the Intel Rapid Storage Technology software, and choose Create from the list of options at the top:

2. Under Select Volume Type, choose RAID 1 and click Next:

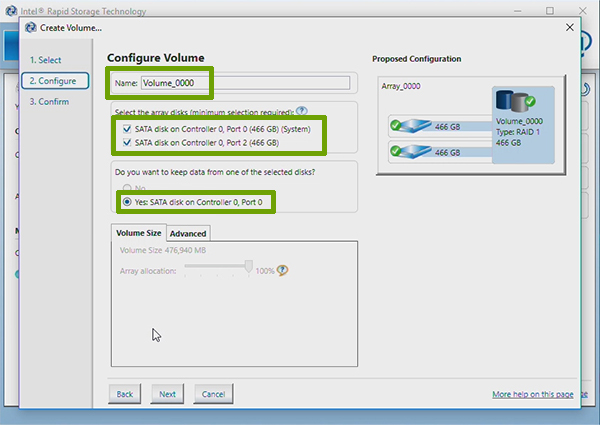
3. On the Configure Volume settings, input the name you wish to give the RAID volume. Make sure both disks are selected and choose which drive will be keeping the data:
4. On the Confirm Volume Creation screen select Create Volume:

5. A message box will appear to show the volume has been created. Click OK:

6. The Status screen then appears, showing the RAID volume and the status of the data migration. Once the data migration process ends, the RAID 1 volume will be completed:

Propriétés de l’article
Dernière date de publication
21 Feb 2021
Version
3
Type d’article
Solution