允许在戴尔 Latitude 笔记本电脑上进行 PXE 启动的 BIOS 设置
Résumé: 本文是关于在戴尔 Latitude 笔记本电脑上将 BIOS 设置配置为允许 PXE 启动的指南。
Cet article concerne
Cet article ne concerne pas
Cet article n’est associé à aucun produit spécifique.
Toutes les versions du produit ne sont pas identifiées dans cet article.
Symptômes
如何访问 BIOS 或 UEFI(也称为 System Setup)?
如需在戴尔计算机上访问 BIOS 或 UEFI,请在启动过程中出现戴尔标识屏幕时按 F2 键数次。
或者在启动过程中出现戴尔标识屏幕时按 F12 键数次,然后从菜单中选择 BIOS Setup 或 System Setup。
在 Latitude 笔记本电脑上进入 BIOS 屏幕后,应该有以下针对 PXE 启动的 BIOS 设置。Latitude 笔记本电脑上的 BIOS 用户界面因笔记本电脑型号而异。
提醒:确保您已从 Dell Support | Drivers and Downloads 网站上的 BIOS 类别中下载并安装最新的 BIOS 更新。
Cause
无可用的原因信息。
Résolution
在 Latitude 7x10 和 7x00 的 BIOS 中启用 PXE 启动
- 转至 General > Boot Sequence ,然后选择以启用 Windows Boot Manager (图 1)。

图 1:启用 Windows Boot Manager - 转至 General > Advanced Boot Options ,然后在 下选择 Enable UEFI Network Stack (启用 UEFI 网络堆栈 )(图 2):

图 2:启用 UEFI 网络堆栈 - 由于这些较新的 Latitude 笔记本电脑型号没有 NIC 连接,请检查以在 System Configuration >USB Configuration 下启用 Enable USB Boot Support (图 3):

图 3:启用 USB 启动支持 - 检查以在 System Configuration-Thunderbolt Adapter Configuration (System Configuration-Thunderbolt> Adapter Configuration) 下启用 Thunderbolt、Enable Thunderbolt Boot Support 和 Enable TBT(和 PCIE behind TBT)预引导模块(图 4),即使您未连接到 Thunderbolt 坞站:

图 4:启用 Thunderbolt 启动支持 - 根据 PXE 服务器的配置方式,可能需要暂时禁用 General-Secure Boot-Secure>> Boot Enable 下的安全引导启用,直至完成映像部署(图 5):

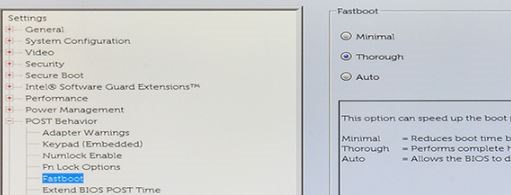
图 5:禁用安全启动 - 在 Post Behavior 下,Fastboot 需要设置为 Thorough(图 6):

图 6:将 Fastboot 设置为 Thorough
提醒:使用 Display-Link 驱动程序的戴尔坞站(例如 D6000 系列和 D3100)不允许 PXE 启动。这些坞站的驱动程序不会在 Windows 之前的环境中加载。戴尔不建议您通过坞站连接进行 PXE 启动,但您可以使用 USB Type-C 转以太网转换器(如戴尔 SKU# 470-ABND)完成 PXE 启动。
在 Latitude 7x20 和 7x30 的 BIOS 中启用 PXE 启动
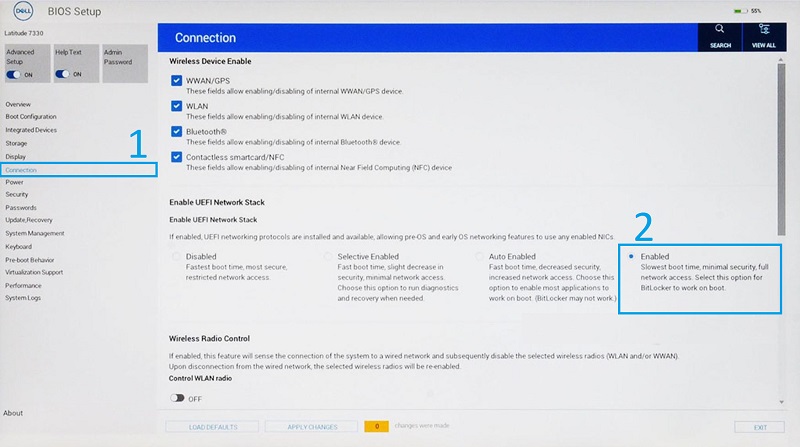
- 选择 Connection,然后确保 Enable UEFI Network Stack 设置为 Enabled。

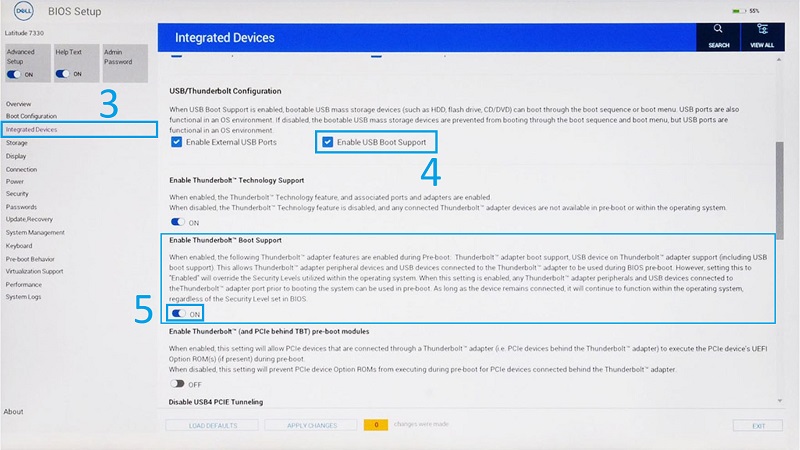
图 7:在 BIOS 中启用 UEFI 网络堆栈 - 选择 Integrated Devices。
- 向下滚动以查看 USB/Thunderbolt Configuration,然后选择 Enable USB Boot Support。

图 8:启用 USB 和 Thunderbolt 启动支持 - 确保 Enable Thunderbolt Boot Support 设置为 ON。
- 单击 Apply Changes 以保存更改。
Informations supplémentaires
推荐的文章
以下是您可能会感兴趣的与此主题相关的一些推荐文章。
Produits concernés
7000 Series, Latitude 5300 2-in-1, Latitude 5300, Latitude 7300, Latitude 7400 2-in-1, Latitude 7400Propriétés de l’article
Numéro d’article: 000131551
Type d’article: Solution
Dernière modification: 16 May 2023
Version: 5
Trouvez des réponses à vos questions auprès d’autres utilisateurs Dell
Services de support
Vérifiez si votre appareil est couvert par les services de support.