How to Enable or Disable BitLocker with TPM in Windows
Résumé: Windows BitLocker has become a solution for Windows users to encrypt and secure their data. The following is how to enable and disable BitLocker using the standard methods. This article does not discuss the utilization of a USB as a TPM replacement and does not discuss Group Policy changes for advanced features. Domain level Group Policy changes and network-managed BitLocker setups are Best Effort and are out of the scope of support. Supported configurations are limited to single computers and locally managed BitLocker setups. ...
Instructions
Table of Contents:
- Enabling the TPM
- Enabling BitLocker in the operating system
- Checking BitLocker status (Manage BitLocker Console)
- Checking BitLocker Status (Command Line)
- Suspending BitLocker
- Disabling BitLocker
- BitLocker Encryption Videos
Enabling and Disabling BitLocker in Windows 7, Windows 8, Windows 10 and Windows 11
Windows BitLocker has become a solution for users to secure their data. The following is how to enable and disable BitLocker using the standard methods.
This article does not discuss the utilization of a USB as a TPM replacement and does not discuss Group Policy changes for advanced features. Domain level Group Policy changes and network-managed BitLocker setups are Best Effort and are out of the scope of support. Supported configurations are limited to single computers and locally managed BitLocker setups.
- All Operating Systems that are configured in Legacy Boot Mode must use TPM 1.2. It is recommended that the BIOS be updated to the latest revision.
- All Operating Systems that are configured in UEFI Boot Mode can use either TPM 1.2, or TPM 2.0. It is recommended that the BIOS be updated to the latest revision.
- If a Windows 7 computer is configured for UEFI Boot Mode, this patch must be applied in order to use TPM 2.0: Microsoft TPM 2.0 Patch
- Exceptions to this are the Latitude 5175 and Latitude 7275, both of which only have TPM 2.0 and cannot downgrade to 1.2.

1. Enabling the TPM
- Turn the computer on.
- As the computer performs POST, press the hotkey (usually F2, or Delete) to enter the BIOS.
- Once in the BIOS, locate the section that configures Security.
- In the Security section, locate the TPM option.
- Select the TPM 2.0 or 1.2 section on the left.
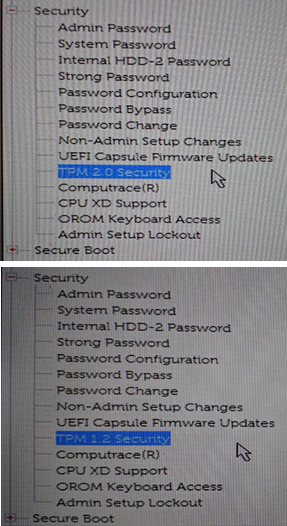
Figure 1: (English Only) Select the TPM 2.0 or 1.2 - Check the TPM box on the right to turn on the TPM.
- After switching the TPM on, select the option to Activate or Enable the TPM
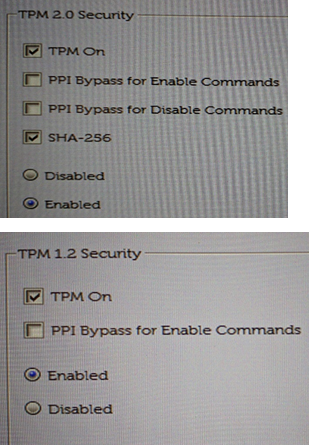
Figure 2: (English Only) Select the option to Activate or Enable the TPM -
After the TPM has been activated and enabled, click Save changes and Exit the BIOS.
2. Enabling BitLocker in the operating system
Windows BitLocker How to Enable & Disable
Watch this video to learn how to enable or disable BitLocker in Windows.
Duration: 01:39
When available, closed caption (subtitles) language settings can be chosen using the Settings or CC icon on this video player.
- Turn the computer on.
- Sign into the operating system as normal.
- Get to the BitLocker management section in one of the following ways:
Windows 7
Windows 8
Windows 10 and Windows 11
- Start Menu path.
- Click the Windows Start Menu button.
- In the search box,
Manage BitLocker. - Press Enter or click the Manage BitLocker icon in the list.
- Control Panel path
- Click the Windows Start Menu button.
- Click the Control Panel.
- Click System and Security.
- Click any option under BitLocker Drive Encryption.
- Hard drive path
- Open Computer or My Computer
- Alternatively, click the File Explorer icon and select your computer.
- Select the Encryption:\ (or Windows computer) drive.
- Right-click the drive that you selected.
- Click Turn on BitLocker.
Note: This skips the initial BitLocker screen.
- Open Computer or My Computer
- App Screen path
- Click the Windows Start Menu button.
- Open the search box,
Manage BitLocker. - Press Enter or click the Manage BitLocker icon in the list.
- Control Panel path
- Click the Windows Start Menu button.
- Open the search box, type
Control Panel. - Click System and Security or search BitLocker in the Control Panel window.
- Click any option under BitLocker Drive Encryption.
- Hard drive path
- Open Computer or My Computer
- Alternatively, click the File Explorer icon and select your computer.
- Select the C:\ (or Windows computer) drive.
- Right-click the drive that you selected.
- Click Turn on BitLocker.
Note: This skips the initial BitLocker screen.
- Open Computer or My Computer
- Start Menu path.
- Click the Windows Start Menu button.
- Windows 10: In the search box, type
Manage BitLocker.
Windows 11: In the search box, typeDevice Encryption. - Press Enter or click the Manage BitLocker icon in the list.
- Control Panel path
- Right-Click on the Windows Start Menu button.
- Click the Control Panel.
- Click System and Security.
- Click any option under BitLocker Drive Encryption.
- Settings path
- Click the Windows Start Menu button.
- Click the Settings icon.
- In the search box, type
Manage BitLocker. - Press Enter or click the Manage BitLocker icon in the list.
- Hard drive path
- Open Computer or My Computer
- Select the C:\ (or Windows computer) drive.
- Right-click the drive that you selected.
- Click Turn on BitLocker.
Note: This skips the initial BitLocker screen.
- Start Menu path.
- In the BitLocker Management screen, click Turn on BitLocker.

Figure 3: (English Only) Click Turn on BitLocker - BitLocker goes through a short initialization process.
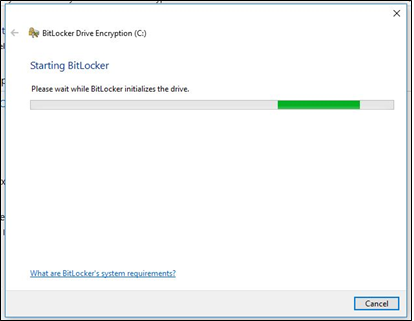
Figure 4: (English Only) Starting BitLocker - Choose one of three options for saving the recovery key.
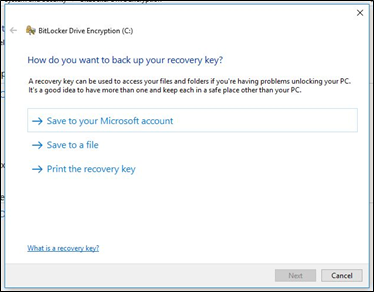
Figure 5: (English Only) Save the recovery key

Figure 6: (English Only) Save key in a safe location
- After saving the password file, click Next.
- Select one of the volume encryption options.
- Encrypt entire hard drive.
- This encrypts all space on the hard drive regardless of whether it is used. This takes longer to process the encryption.
- Encrypt on used space.
- This only encrypts space on the hard drive as it is filled with data and leave free space unencrypted. This is preferred for basic encryption as it is faster.

Figure 7: (English Only) Choose how much of your drive to encrypt
- This only encrypts space on the hard drive as it is filled with data and leave free space unencrypted. This is preferred for basic encryption as it is faster.
- Encrypt entire hard drive.
- After selecting encryption option, click Next.
- Choose the type of encryption to use if you get the encryption type selection.
- New mode is the preferred method of encryption for new computers.

Figure 8: (English Only) Choose the type of encryption to use
- New mode is the preferred method of encryption for new computers.
- Click Next
- Check that the box labeled "Run BitLocker system check."
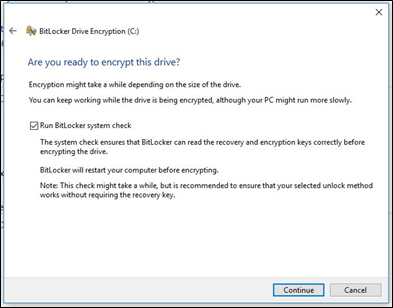
Figure 9: (English Only) Check Run BitLocker system check - Click Continue
- Restart the computer after verifying the settings to begin the encryption.
NOTE: Encryption can take anywhere from 20 minutes to a couple hours depending on the amount of data that has been encrypted, the speed of the computer, and whether the process is interrupted by the computer being turned off or going to sleep. The BitLocker encryption does not start until the computer is restarted. If work must be completed, it is safe to complete work and save it before restarting.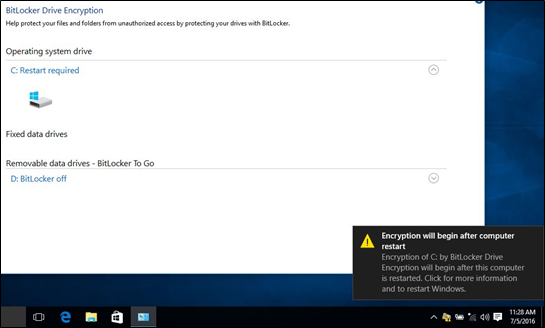
Figure 10: (English Only) Restart computer to begin encryption
3. Checking BitLocker status (Manage BitLocker Console)
- Open the Manage BitLocker console with one of the methods previously described.
- View the status that is reported in the console.
- If encrypting, the status shows that BitLocker is encrypting.
- If encrypted, the status shows that BitLocker is on and show a lock icon.

Figure 11: (English Only) Checking BitLocker status using BitLocker Console
4. Checking BitLocker Status (Command Line)
- Open a command prompt window.
- Click the Windows Start button, type
cmdand press Enter. - Press and hold the Windows button on the keyboard and R, type
cmdand press Enter. - Right-click Command Prompt and select "Run as Administrator."
- In the command prompt, type
manage-bde -statusand press Enter. - View the status of BitLocker on the drives in the computer.
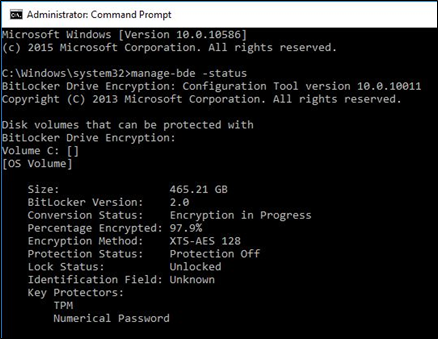
Figure 12: (English Only) Checking BitLocker Status using Command Line
5. Suspending BitLocker
- Start the computer.
- Boot into the Windows operating system.
- Open the Manage BitLocker windows with one of the above methods.
- Click Suspend Protection for the wanted drive.
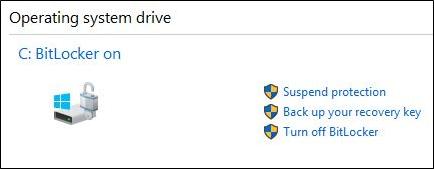
Figure 13: (English Only) Suspending BitLocker - Review the warning prompt and click Yes to suspend BitLocker.
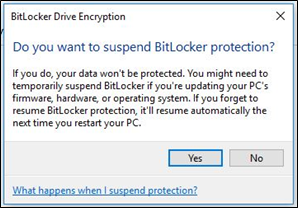
Figure 14: (English Only) Review the warning and click Yes to suspend BitLocker - Return to the Manage BitLocker window to Resume Protection.
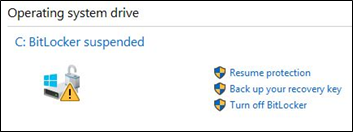
Figure 15: (English Only) Click Resume protection to Resume BitLocker protection
6. Disabling BitLocker
- Start the computer.
- Boot into the Windows operating system
- Open the Manage BitLocker windows with one of the above methods.
- Click Turn off BitLocker.
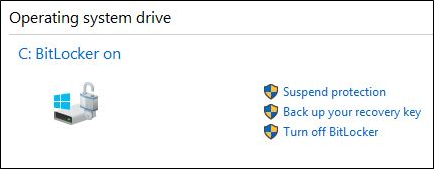
Figure 16: (English Only) Click turn off BitLocker to disable BitLocker - Confirm the decision to turn off BitLocker.
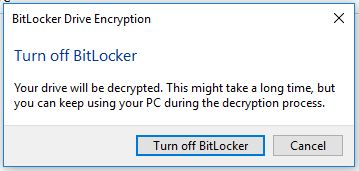
Figure 17: (English Only) Confirm the decision to turn off BitLocker - Allow the computer to decrypt.
7. BitLocker Encryption Videos
Encrypt Your Drive With BitLocker
Watch this video to learn how to encrypt your device with BitLocker.
Duration: 02:57
When available, closed caption (subtitles) language settings can be chosen using the Settings or CC icon on this video player.
Resolve BitLocker Recovery Key Prompts
Watch this video to learn how to fix issues with BitLocker prompting for recovery key.
Duration: 01:07
When available, closed caption (subtitles) language settings can be chosen using the Settings or CC icon on this video player.
Informations supplémentaires
Recommended Articles
Here are some recommended articles related to this topic that might be of interest to you.
- How to Retrieve a BitLocker Recovery Password or Key Package Using the Dell Data Security Recovery Portal
- Updating the BIOS on Dell Systems With BitLocker Enabled
- BitLocker fails to turn on or prompts for the Recovery Key rebooting with Windows 10, UEFI, and the TPM 1.2 Firmware
- How to Use BitLocker with PIN
- How to Locate the BitLocker Key Identifier for a BitLocker Protected Drive
- Resolving a TPM Error Seen During BitLocker Encryption on a Dell PC
- How to Troubleshoot and Resolve Common Issues with Trusted Platform Module (TPM) and BitLocker
- BitLocker is Prompting for a Recovery Key, and You Cannot Locate the Key
- BitLocker Asks for a Recovery Key Every Boot on USB-C/Thunderbolt Computers When Docked or Undocked
- Automatic Windows Device Encryption or BitLocker on Dell Computers
- Dell BIOS Updates

More information and support for your Windows operating systems can be found on our Windows Support webpage.
 Out of warranty? No problem. Browse to the Dell.com/support website and enter your Dell Service Tag and view our offers.