Bienvenue
Bienvenue chez Dell
Mon compte
- Passer des commandes rapidement et facilement
- Voir les commandes et de suivre l'état de votre expédition
- Profitez membres seulement récompenses et des remises
- Créez et accédez à une liste de vos produits
- Gérez vos sites Dell EMC, vos produits et vos personnes-ressources pour les produits dans Administration de l’entreprise.
Numéro d’article: 000103410
How to Use the Xbox Game Bar to Capture Video From Applications
Sommaire: This article provides information about how to use the Xbox Game Bar in Windows 11 or Windows 10 to capture video from applications.
Contenu de l’article
Instructions
Using the Xbox Game Bar to capture video from applications in Windows 11 or Windows 10
Use the Xbox Game Bar with your keyboard and a screen reader to record a video clip of your favorite game or application. This video clip can be used as a troubleshooting tool, recording the specific steps taken to reproduce an issue within the game or application. The file can be saved and shared to help diagnose the issue. Follow the steps below to use the Game Bar to record and save a video capture:
NOTE: Not all applications in Windows 11 or Windows 10 may be compatible with the Game Bar. For instance, this feature will not work in applications such as File Explorer or Notepad. The Game Bar will also not open on the desktop screen. On tablets or when using Tablet Mode on a computer, a keyboard must be attached to take advantage of the Game Bar feature.
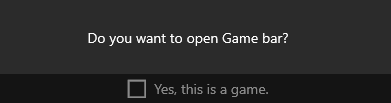
- While you are playing a game, press the Windows logo key + G on the keyboard to open Xbox Game Bar. A message appears asking if you want to open the Game Bar. Check the box labeled as Yes, this is a game to open the Game Bar.
 NOTE: Instead of using the Windows logo key + G, you can also press the Windows logo key + Alt + R to immediately begin the recording when you are playing a game in full-screen (or full-screen exclusive) mode.
 - Select Record from now (the circle) to start recording a clip, then Stop recording (the square) to end it.
- Select Take screenshot (the camera icon) to take a picture of what is happening in the game.
- For full-screen computer games, use Windows logo key + Alt + G to start or stop recording. For games in full-screen (or full-screen exclusive) mode, you will not see the Game Bar, but you can use the Windows logo key + Alt + R to start or stop recordings.
- To edit a clip, select the Xbox button to open the Xbox app, and then select Captures.
- Perform the troubleshooting steps or actions that you want to record within the application.
NOTE: Your selections on the screen are highlighted as they are chosen, but you may not be able to see the mouse pointer or movement during the playback of the recording.
- The video capture file is saved by default within your user folder under Video > Captures. The recorded video file is saved by default as an MP4 File (.mp4) file type.
For the latest information about using the Xbox Game Bar to record or capture your screen, go to Record a game clip on your PC with Xbox Game Bar.
Propriétés de l’article
Produit touché
Alienware, XPS, G Series, G Series, Alienware, XPS
Dernière date de publication
21 juin 2023
Version
5
Type d’article
How To