C8618QT and C5518QT Monitor Troubleshooting Guide
Resumen: This article provides the information about the troubleshooting procedures for your C8618QT or C5518QT Touch Screen Monitor.
Síntomas
Not Applicable
Causa
Not Applicable
Resolución
Table of Contents:
- Accessing the Touch On-Screen Display (OSD) Menu
- The Wake on Touch (Default OFF) - Standby power
- The Touch OSD Menu is Locked
- Input Sources and USB Pairing
- No response from remote control
- Locating Service Tag for the monitor
- Integrated Diagnostics
- Sparkle effect on screen
- Dell Web Management
- FlatFrog Software for Whiteboarding
- Handling the monitor.
Accessing the Touch On-Screen Display (OSD) Menu
The C5518QT and C8618QT monitor comes with Touch On-Screen Display (OSD). To access the OSD Menu, press the OSD Touch key - Located above the Dell logo.
Press the OSD Touch key - located above the Dell logo. (See Figure 1.)

Figure 1. - Accessing the touch key on the On-Screen Display Menu (OSD)
The Wake on Touch (Default OFF) - Standby power
When the monitor is in Sleep mode, touching the monitor screen does not wake the monitor.
Wake On Touch feature on the monitor is OFF by default. To enable this feature: (See Figure 2.)
- On the OSD Menu, go to Personalize
- Select and Enable Wake On Touch
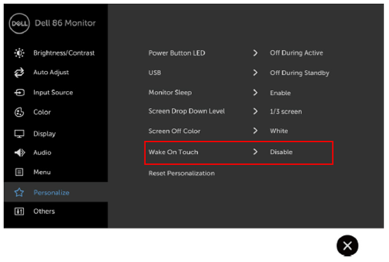
Figure 2. - Wake on Touch feature is OFF by default.
The Touch OSD Menu is Locked
The monitor comes with an OSD Lock function that prevents unintentional triggering of the OSD Menu.
To lock or unlock Touch OSD, press and hold the "Menu" touch key (key #6) for 4 seconds. (See Figure 3.)

Figure 3. - How to unlock the On-Screen Display (OSD) menu
Input Sources and USB Pairing
To ensure that your Input Source is correctly paired to the right USB Upstream port. If the Input-USB pairing is not done properly (for example HDMI 1 with USB Upstream 2), you cannot access your USB port.
See the following Input Source and USB Upstream pairing table for proper pairing. (See Figure 4.)
Touch functionality follows the Input source and USB Pairing. That is if using HDMI 1 as Input the USB 1 has to be used as upstream port to achieve touch screen functionality, USB 2 for HDMI 2, and so forth.
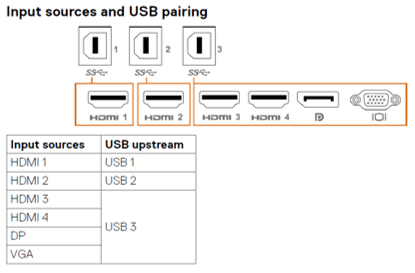
Figure 4. - Input sources and USB pairing
No response from the remote control
The remote control does not work.
- Check to ensure that that batteries are properly installed.
- The remote control sensor is located on the lower left corner of the display. Point your remote control to the sensor during use.
- Use the remote control within a distance of 8 m from the remote control sensor or at a horizontal and vertical angle of within 15 degrees with a distance of 5.6 m. (Figure 5.)
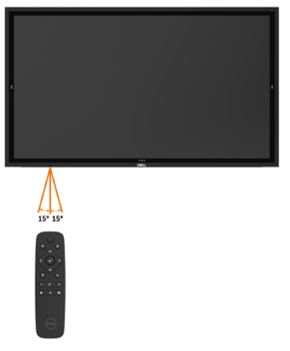
Figure 5. Using the remote control
Locating Service Tag for the monitor
The monitor Service Tag can be found in the following:
- Printed on the label at the rear of the monitor (Near the power input).
- On the OSD Menu, go to Others (Figure 6.).
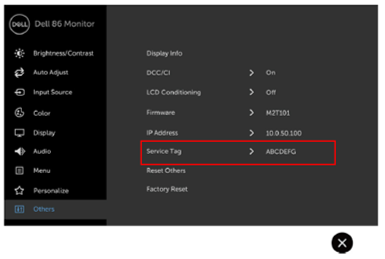
Figure 6. - Service tag location in the OSD
Integrated Diagnostics
The monitor has an integrated diagnostic tool that helps you determine if the screen abnormality you are experiencing is an inherent problem with your display, or with your computer and video card.
To run the integrated diagnostics:
- Ensure that the screen is clean (no dust particles on the surface of the screen).
- On the OSD Menu, touch and hold "X" (key #7) for 5 seconds. A gray screen appears (Figure 7).

Figure 7. - Built in Diagnostics - Carefully inspect the screen for abnormalities.
- Touch the front panel again. The color of the screen changes to red.
- Inspect the display for any abnormalities.
- Repeat steps 5 and 6 to inspect the display in green, blue, black, white, and text screens.
The test is completed when the text screen appears. To exit, touch the panel again. If you do not detect any screen abnormalities upon using the integrated diagnostic tool, the display is functioning properly. Check the video card and computer.
Sparkle effect on screen
The monitor screen is coated with anti-glare, and anti-finger print to provide the user with the best possible screen performance.
Due to this coating, the screen may appear to have some sparkle effect. This is normal behavior.
This is not a defect of the monitor.
Dell Web Management
The Dell Web Management function is OFF by default.
To access Dell Web Manager:
- Ensure that the Ethernet is working.
- On the OSD menu, touch and hold key #5 for 4 seconds to enable Web Management on the monitor. A network icon appears on the Top-Left corner for 4 seconds. (See Figure 8.)

Figure 8. - Enabling Dell Web Management - To access the Dell Web Management tool, you must set the IP address for your computer and the display.
- On the OSD menu, go to Others and look for IP Address. (Figure 9.)
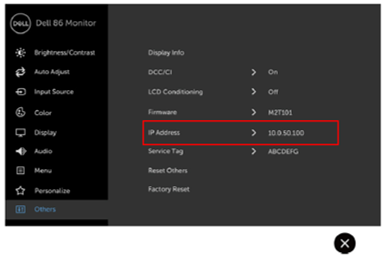
Figure 9. - Dell Web Manager IP Address
FlatFrog Software for Whiteboarding
The C5518QT and C8618QT monitors support the FlatFrog Whiteboard software (Windows 10 only) at no additional cost.
To get the FlatFrog Whiteboard Software for Windows 10:
- Go to: www.Flatfrog.com/Dell
- Press: "Get Whiteboard" to start Windows Store
- In Windows Store Get and Launch: "FlatFrog Whiteboard Bundle Edition"
- To activate FlatFrog Whiteboard: Connect your PC to the Dell InGlass™ touch monitor (C5518QT, C8618QT)
- Connect display cable
- Connect touch USB cable
For support questions, contact support@flatfrog.com.
Handling the monitor
The C5518QT and C8618QT are high precision touch enabled monitors. Follow these instructions when handling and using these monitors.
Before the monitor is mounted or installed, always keep the monitor standing upright in the original packaging.
To avoid damage to the monitor screen, do not rest or mount the monitor with the screen facing down.
- Always handle and use your monitor in an upright position. (Figure 11.)
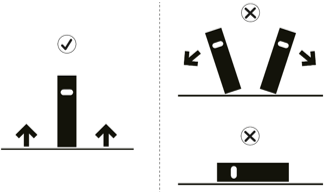
Figure 11. - Keeping the display in an upright position
- Always set up the mounting brackets using the original carton base to hold the monitor upright. (Figure 12.)
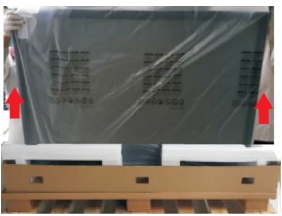
Figure 12. - Display in original packaging