Dell Backup and Recovery (DBaR) and Windows 10
Resumen: Dell Backup and Recovery (DBaR) version 1.9 is only available on computers that upgrade to Windows 10.
Instrucciones
Follow the guidelines below for using the Dell Backup and Recovery (DBaR) application with Windows 10.
Dell Backup and Recovery (DBaR) version 1.9 is only available for computers that upgrade to Windows 10.
The Dell Backup and Recovery (DBaR) Update to version 1.9 is only available to computers that upgrade to Windows 10. This is to maintain compatibility for the DBaR application.
DBAR means Dell Backup and Recovery Application, a secure, easy, and reliable backup and recovery solution that protects your computer (operating system, applications, drivers, settings) and data (music, photos, videos, file, and other important files), to prevent data loss. Used to replace the previous DataSafe Local 2.x and DBRM.
There are, currently two versions of DBAR:
- Basic: Preinstalled in the machine with the Windows operating system at the factory, you can build a computer recovery disk and back up preinstalled applications and software from the factory.
- Premium: An additional customer is required to upgrade the service.
Dell systems that ship with Windows 10 preinstalled do not have Dell Backup and Recovery (DBaR) preinstalled. Refer to Dell article Windows 10 Backup and Restore: A Comprehensive Guide for more information about Windows 10 backup tools.
Update notification
Dell computers that have Dell Backup and Recovery (DBaR) and have upgraded to the Windows 10 operating system will notice a Dell Recommended Update on the Dell Backup and Recovery dashboard. This Windows 10 Updates DBaR to version 1.9 which is fully compatible with Windows 10.
If a download link is needed for DBaR 1.9, it can be downloaded from the following link: Dell Backup and Recovery (DBaR) Version 1.9 (Figure 1.)
Systems that ship with Windows 10 installed from the factory use the Windows 10 native Backup and Restore. Windows Backup and Restore can be found by Clicking Start, Settings, Update & Security then Back up.
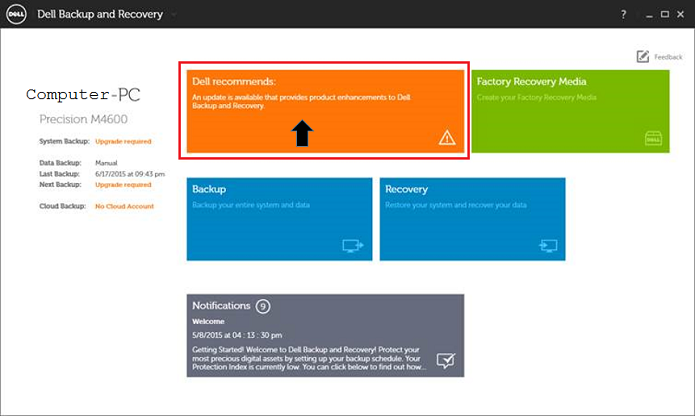
Figure 1: DBaR Dell Recommendation for update
Click the Install Upgrade Button to start the upgrade process. (Figure 2)
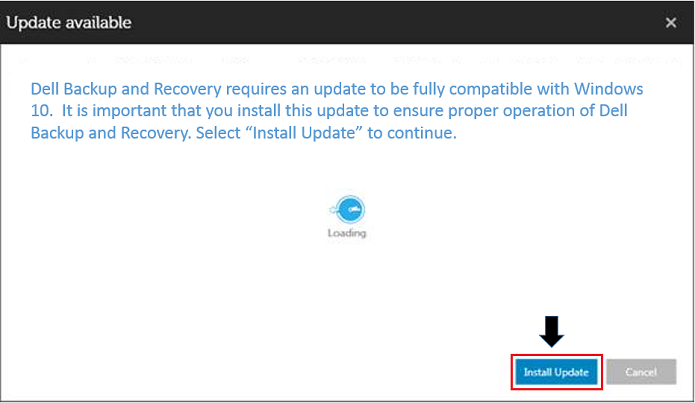
Figure 2: DBaR install update
Then click the Start Button. (Figure 3)
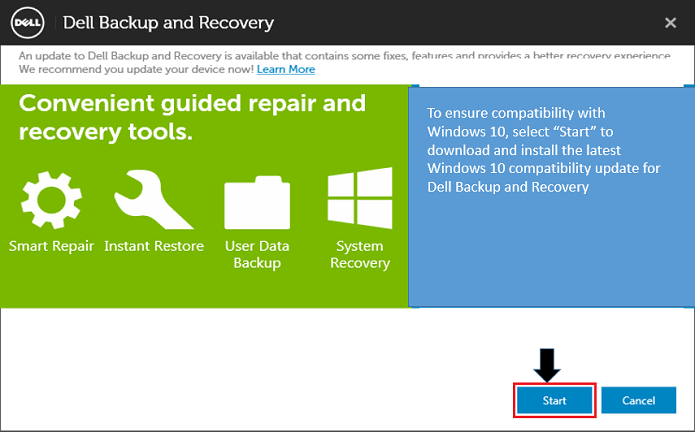
Figure 3: DBaR Start button
If you check for a web update on DBaR while in Windows 8.1, then you are shown the message below: (Figure 4)
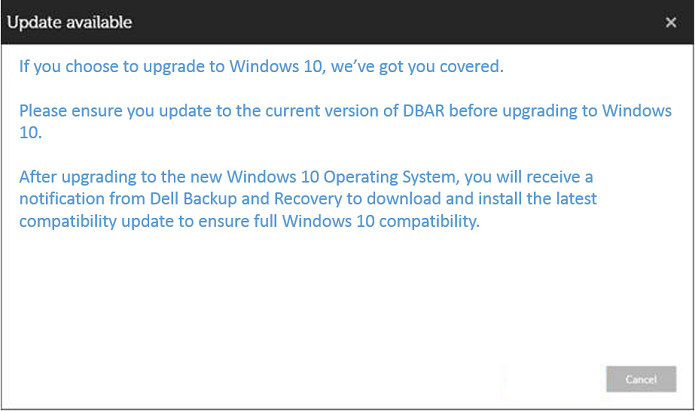
Figure 4: DBaR Update available
Other Resources
How to recover a computer with DBAR
Dell Backup and Recovery Manager (DBAR) computer recovery can be done in three ways:
- Run DBAR on the computer, select Recovery, select System Recovery.
- Call the recovery partition for computer recovery. Move the mouse to the right side of the screen, select Settings when the charm bar appears, press, and hold Shift Restart simultaneously, select Troubleshoot (Diagnostics) and DBAR.
- System recovery with recovery media: The machine is plugged into an external power supply, the F12 key is continuously tapped after power-up enters the boot menu, and selects to start from the recovery media.
Steps to computer recovery with DBAR
- Run DBAR, select Recovery, select System Recovery.
- Select Factory Image, click confirm. The computer restarts and enters the recovery interface.
Steps to computer recovery by recovery media
- Start the machine, continuously press the F12 key in the Dell interface to select start-up from the recovery media (laptop must be plugged into external power).
NOTE: When your laptop is restored using Factory Backup, you must connect the charger, or you are prompted for an error:
Please connect the AC adapter to continue. Your computer cannot be restored while it is powered by the battery
. - For a brief description, mirror integrity checks and all available images are displayed.
- Select Factory Image.
- Select the recovery type (Factor Recovery is recommended).
NOTE: Factory Recovery erases all data that is not backed up on your computer. It is important to perform the computer recovery steps with this option if you want to save your datafiles on the hard drive.
- Choose whether to back up some of the data for the original computer.
- Select YES, and go to the file selection interface.
- Select NO, and enter the recovery interface, when the restart button becomes operational, complete the restore operation, restart the computer, enter the factory operating system configuration.
How to use Dell Backup and Restore(DBAR) to make a factory image
Preparation: One 8G or more blank USB stick
Steps:
- Open Dell Backup and Restore.
- Select Recovery Media. The display varies depending on the language version of your operating system. (Figure 5)
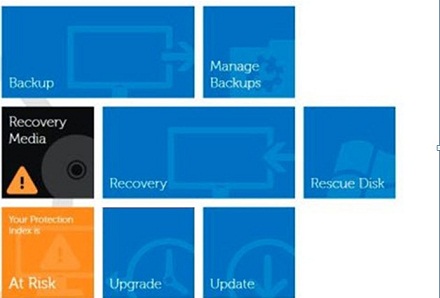
Figure 5: Main Menu - Insert the USB stick, select the media that you inserted, click Continue. (Figure 6)
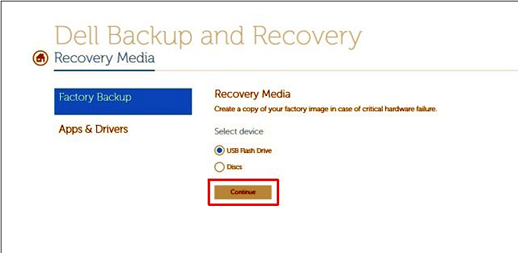
Figure 6: Factory Media - Click Start. (Figure 7)
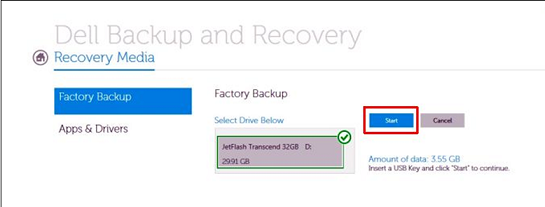
Figure 7: StartNote: When you make a factory mirror backup, the data in the USB stick is formatted. If important data is in the USB stick, back up first. - Click OK, factory media backup completes. (Figure 8)
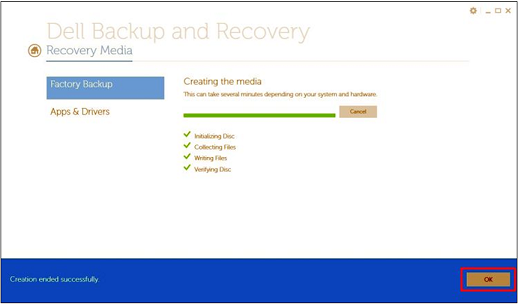
Figure 8: Complete
 Out of warranty? No problem. Browse to the Dell.com/support website and enter your Dell Service Tag and view our offers.