How to Enable or Disable USB Boot Support for a Dell OptiPlex 3000 Thin Client
Summary: This article provides instructions to enable or disable USB boot support for OptiPlex 3000 thin clients.
This article applies to
This article does not apply to
This article is not tied to any specific product.
Not all product versions are identified in this article.
Instructions
Note:
- Ensure that the thin client is running the latest BIOS. Contact technical support if you have any issues. For more information about how to update the BIOS, reference the Upgrade BIOS section of the Dell ThinOS 2306 and 2303 Administrator’s Guide from Support for OptiPlex 3000 Thin Client Documentation.
- The process to enable or disable USB boot support for other Dell thin clients may differ. For more information about enabling and disabling USB boot support for Wyse thin clients, reference How to Enable or Disable USB Boot Support in the Wyse BIOS.
An administrator may either Enable or Disable USB boot support for an OptiPlex 3000 from the one-time boot settings. For more information, select Enable or Disable.
Enable
- Turn on the OptiPlex 3000 thin client and then press F12 when prompted to access the one-time boot settings.
- Select BIOS SETUP.

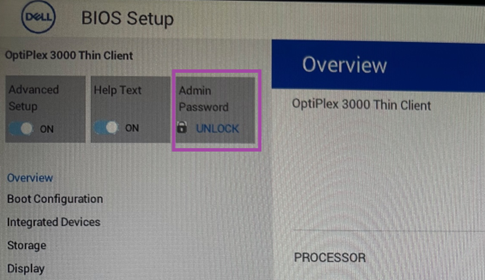
- Click Admin Password UNLOCK.

- Populate the BIOS administrative Password and then click OK.
 Note: The default BIOS administrative password is
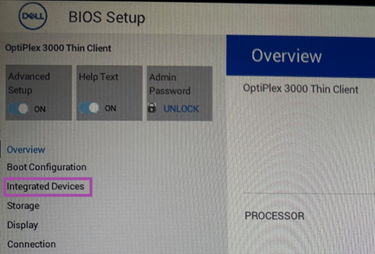
Fireport. The BIOS administrative password in your environment may differ. - Click Integrated Devices.
- Verify that the Enable USB Boot Support is selected.

- Select APPLY CHANGES.
- Click EXIT in the lower right corner.

- To boot a bootable USB, turn on the OptiPlex 3000 thin client and then press F12 when prompted to access the one-time boot settings. Select the bootable USB device to boot.
Disable
- Turn on the OptiPlex 3000 thin client and then press F12 when prompted to access the one-time boot settings.
- Select BIOS SETUP.

- Click Admin Password UNLOCK.
- Populate the BIOS administrative Password and then select OK.
 Note: The default BIOS administrative password is
Fireport. The BIOS administrative password in your environment may differ. - Click Integrated Devices.

- Verify that the Enable USB Boot Support selection is cleared.

- Select APPLY CHANGES.
- Select EXIT.

Affected Products
OptiPlex 3000 Thin ClientArticle Properties
Article Number: 000216658
Article Type: How To
Last Modified: 06 Oct 2025
Version: 2
Find answers to your questions from other Dell users
Support Services
Check if your device is covered by Support Services.