PowerEdge: MX7000 - Defining VLANs using SmartFabric in OpenManage Enterprise Modular
Summary: How to define VLANs to your SmartFabric network, and associate the VLAN to a server template to put them in use through OpenManage Enterprise Modular (OME-M).
This article applies to
This article does not apply to
This article is not tied to any specific product.
Not all product versions are identified in this article.
Instructions
Define VLANs in OpenManage Enterprise Modular (OME-M)
Duration: 00:05:20
When available, closed caption (subtitles) language settings can be chosen using the Settings or CC icon on this video player.
This action requires logging into an account with chassis administrator privileges.
VLAN Definition:
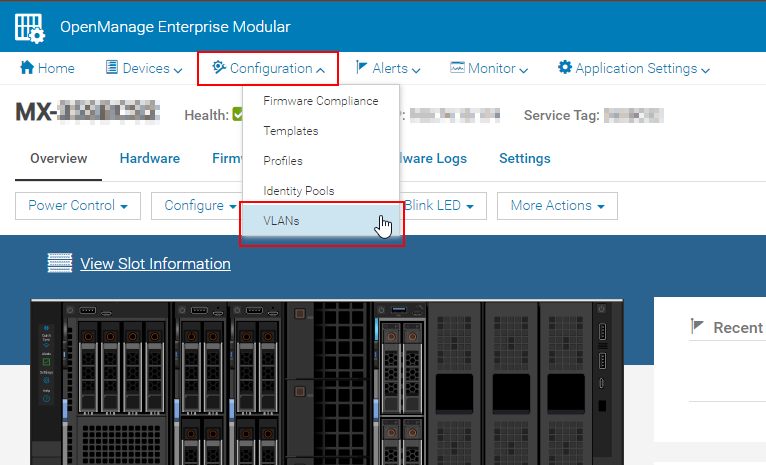
- First we navigate to Configuration > VLANs and click Define to specify the VLAN we want to add.

- Name the VLAN and give it a description, if wanted.
- Input a range of VLAN separated by a single dash with no space between. Currently, using commas to separate and add multiple VLANs is not supported. If we must add multiple VLANs to the SmartFabric that are non-sequential, then multiple entries are required to create them.
Note: VLAN 4001 - 4020 are reserved for inter-chassis communications, and SmartFabric communication.
- Last, select your Network Type to configure Quality of Service (QoS) to the wanted configuration.
If more description is needed regarding the QoS levels, click the? In the upper right corner to open the embedded user manual as showed below. This information can also be found on support.dell.com in the online User Guide for OpenManage Enterprise Modular in the section titled "SmartFabric VLAN management and automated QoS."


- Select Finish, and in a few seconds you see the new VLAN definition appear in the VLAN section.
Template Network Editing:
- Now we pivot over to the Templates page for our next step. Here, we associate our newly created VLANs to a server template.
Note: This tutorial assumes we already have a template created, so we will only cover editing an existing template.
- Select the template in which we want to assign the VLAN, and click Edit Network.

- The first section is on IO Pool Assignment. The second section is for configuring Bandwidth settings when using NIC Partitioning (NPAR) usage. These are covered in another tutorial.
- The third section is for VLANs. Here we see a dropdown for Untagged Network in which we can select a single untagged network VLAN, and a Tagged Network where we can assign multiple VLANs at once.

- Click Select VLANs on either option to define the network as wanted. Scroll through the list on the left and select the VLANs you want to assign to the template and click the chevrons (>>) to move it from Available VLANs to Selected VLANs.

- Click Finish, then click Finish again on the template edit to complete the process.
Note: If we do not want for the VLAN configurations to propagate immediately, uncheck the Propagated VLAN settings immediately box, which is highlighted in the screenshot below. If this is unchecked, any profiles associated with the VLAN-edited template must be re-deployed in order to apply the new VLANs. This option is not available prior to OME-M version 1.20.00.

- When the template edit is completed, you will see a popup in the right corner telling you the Network details updated successfully.

Deployment with Profile:
- The last step is to deploy the template either to a server profile or a chassis slot profile, if it has not already been deployed. This topic is covered in a separate tutorial.
- Also editing the VLANs within the Fabric section of OME-M will not save these configurations to the server template and profile. For more information about that topic, go to MX7000 - Editing VLANs in a Template vs. in the SmartFabric Configuration using the link below.
Affected Products
OpenManage Enterprise Integration for VMware vCenter, Dell OpenManage Enterprise-Modular, PowerEdge MX5016s, PowerEdge MX7000, PowerEdge MX740C, PowerEdge MX750c, PowerEdge MX760c, PowerEdge MX840CArticle Properties
Article Number: 000213684
Article Type: How To
Last Modified: 11 Feb 2025
Version: 4
Find answers to your questions from other Dell users
Support Services
Check if your device is covered by Support Services.