Dell Networking S-serien: Grundlæggende interfacekonfiguration – SONIC 4.0
Summary: Sådan konfigureres grundlæggende SONIC 4.0-grænseflader.
Instructions
Dell Networking S-serien: Grundlæggende interfacekonfiguration – SONIC 4.0
Opsummering: Sådan konfigureres grundlæggende SONIC 4.0-grænseflader.
Instruktioner
Disse trin forudsætter, at switchen konfigureres startende med fabriksindstillingerne som en selvstændig enhed. Se den tilknyttede Knowledge Base-artikel for at se de skriftlige eksempler.
I standardformat navngives SONIC-frontpanelgrænseflader fra Ethernet 0 til Ethernet X, hvor X er den sidste frontpanelport. Standardnavngivning bruger Ethernet x/y/z-tilstand, hvor x/y er stik/port #s og z bruges til breakout-porte.
Ændring af navngivningsformat for grænseflade: Ændring af standardgrænsefladens navngivningstilstand fra Oprindelig til Standard.
- Fra Linux-prompten skal du starte den SONIC CLI med "sonic-cli":
admin@sonic:~$ sonic-cli
sonic#
- Vis den tilstand for grænsefladestatus, der aktuelt er konfigureret med "show interface-naming"
sonic# show interface-naming
Interface naming mode is native
sonic#
- Vis grænsefladestatus, og se standardkonventionen for navngivning af grænseflade (oprindelig navngivning) "show interface status" (vis grænsefladestatus) (Figur 1):
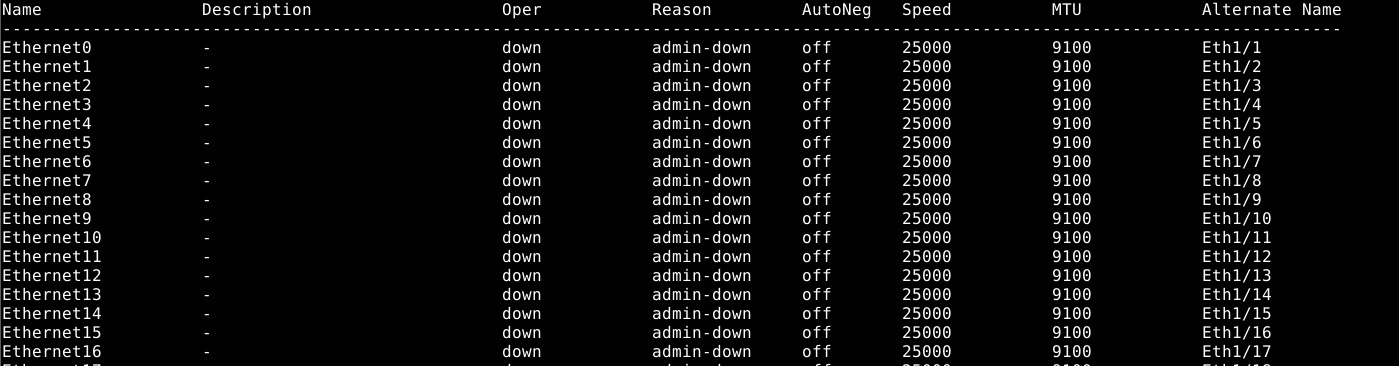
Figur 1: Vis eksempel på grænsefladestatus.
- Hvis du vil ændre switchkonfigurationen, skal du køre kommandoen "konfigurer terminal".
sonic# configure terminal
sonic(config)#
- Hvis du vil ændre grænsefladens navngivningstilstand til standardtilstand, skal du bruge kommandoen "grænsefladenavngivningsstandard":
sonic(config)# interface-naming standard
Broadcast message: Interface naming mode has changed. Users running 'sonic-cli' are required to restart your session.

sonic(config)#
BEMÆRK: SONIC CLI skal afsluttes og indtastes igen af alle brugere, for at tilstandsændringen kan træde i kraft. .
- Afslut konfigurationstilstand med "exit":
sonic(config)# exit
sonic#
- Afslut SONIC CLI med "exit":
sonic# exit
admin@sonic:~$
- Genindtast SONIC CLI med "sonic-cli":
admin@sonic:~$ sonic-cli
sonic#
- Vis grænsefladestatus med "vis grænsefladestatus":
sonic# show interface status
Bemærk ændringen i grænsefladenavne fra Ethernet X til Eth x/y (Figur 2).
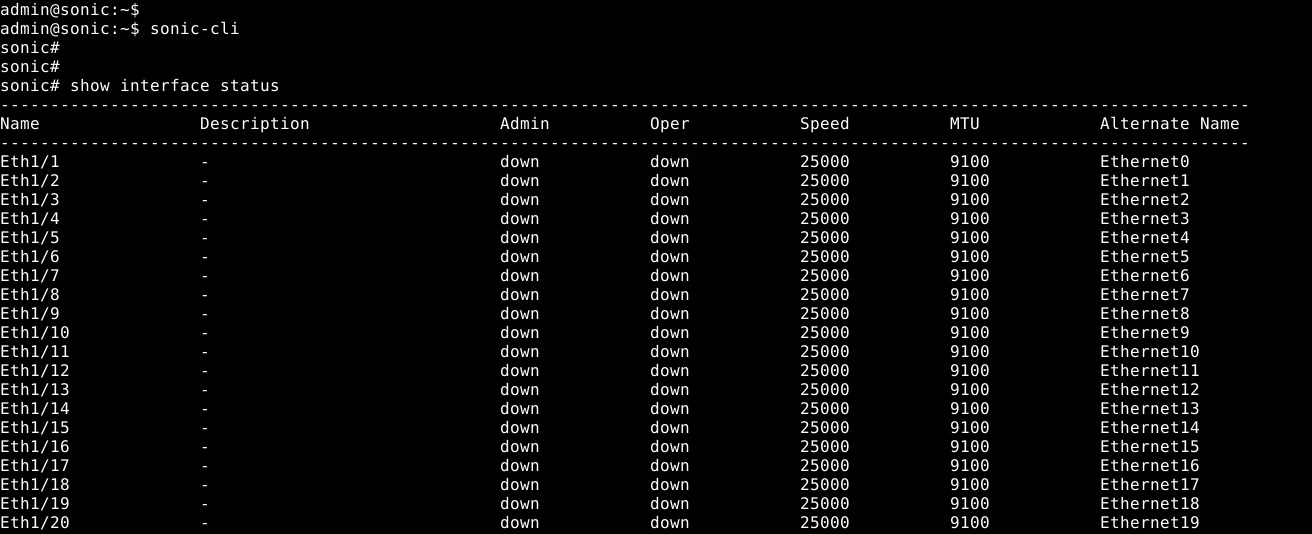
Figur 2: Standardtilstand: Vis grænsefladestatuseksempel
- Gem den kørende konfiguration til startkonfigurationen med "skrivehukommelse":
sonic# write memory
sonic#
Individuel grænsefladekonfiguration: Gå til konfigurationstilstand, og åbn derefter grænsefladens konfigurationstilstand.
- Start SONiC CLI med "sonic-cli":
admin@sonic:~$ sonic-cli
sonic#
- Vis grænsefladekonfigurationen med "show running-configuration interface Eth 1/30":
sonic# show running-configuration interface Eth 1/30
!
interface Eth1/30
 mtu 9100
 speed 25000
 fec none
 shutdown
- Gå i konfigurationstilstand med "konfigurer terminal":
sonic# configure terminal
sonic(config)#
- Gå til grænsefladens Eth 1/30-konfigurationstilstand med "Interface Eth 1/30":
sonic(config)# interface Eth 1/30
sonic(conf-if-Eth1/30)#
- Ingen lukket grænseflade Eth 1/30 med "ingen nedlukning":
sonic(conf-if-Eth1/30)# no shutdown
sonic(conf-if-Eth1/30)#
- Konfigurer en IP-adresse på grænsefladen Eth 1/30 med "IP-adresse 10.1.1.2/24":
sonic(conf-if-Eth1/30)# ip address 10.1.1.2/24
sonic(conf-if-Eth1/30)#
- Afslut konfigurationstilstand med "end":
sonic(conf-if-Eth1/30)# end
sonic#
- Vis grænsefladekonfigurationen med "show running-configuration interface Eth 1/30":
sonic# show running-configuration interface eth 1/30
!
interface Eth1/30
 mtu 9100
 speed 25000
 fec none
 no shutdown
 ip address 10.1.1.2/24
- Vis IP-grænseflader med "show ip interfaces":
sonic# show ip interfaces
Flags: U-Unnumbered interface, A-Anycast IP
-----------------------------------------------------------------------------------------------
Interface            IP address/mask                    VRF            Admin/Oper     Flags
-----------------------------------------------------------------------------------------------
Eth1/30              10.1.1.2/24                                           up/up
sonic#
- Vis grænsefladestatus for Eth 1/30 "show interface eth 1/30":
(output truncated for brevity)

sonic# show interface eth 1/30

Eth1/30 is up, line protocol is up
Hardware is Eth
IPV4 address is 10.1.1.2/24
Mode of IPV4 address assignment: MANUAL
Mode of IPV6 address assignment: not-set
Interface IPv6 oper status: Disabled
IP MTU 9100 bytes
LineSpeed 25GB, Auto-negotiation off
FEC: DISABLED
Last clearing of "show interface" counters: never
…
- Gem den kørende konfiguration til startkonfigurationen med "skrivehukommelse":
sonic# write memory
sonic#
Konfiguration af flere grænseflader: Hvis du vil konfigurere flere grænseflader samtidigt, skal du bruge "grænsefladeinterval". For at se en række grænseflader med en vis kommando er "område" nøgleordet ikke nødvendigt.
Eksempel:
- Hvis du vil konfigurere fortløbende interval af porte 14 til 15, ville det være "interface range ethernet 1/1/14-1/1/15".
- Hvis du vil konfigurere et ikke-isoleret område af portene 3.10.19, vil det være "interface range ethernet 3,10,19".
- Hvis du vil konfigurere en blanding af fortløbende og ikke-sammenhængende, vil det være "interface range ethernet 1/1/3, 1/1/14-1/1/15".
- For at få vist flere grænseflader er valgmuligheden "interval" ikke nødvendig. Hvis du vil vise Ethernet 1/1-1/3,1/5, skal du bruge kommandoen "show interface Eth 1/1-1/3,1/5":
(output truncated for brevity)
sonic# show interface Eth 1/1-1/3,1/5

Eth1/1 is down, line protocol is down, reason admin-down
Hardware is Eth, address is 0c:02:22:c7:00:08
Mode of IPV4 address assignment: not-set
...
Output statistics:
        0 packets, 0 octets
        0 Multicasts, 0 Broadcasts, 0 Unicasts
        0 error, 0 discarded, 0 Oversize

Eth1/2 is down, line protocol is down, reason admin-down
Hardware is Eth, address is 0c:02:22:c7:00:08
Mode of IPV4 address assignment: not-set
...
Output statistics:
        0 packets, 0 octets
        0 Multicasts, 0 Broadcasts, 0 Unicasts
        0 error, 0 discarded, 0 Oversize

Eth1/3 is down, line protocol is down, reason admin-down
Hardware is Eth, address is 0c:02:22:c7:00:08
Mode of IPV4 address assignment: not-set
...
Output statistics:
        0 packets, 0 octets
        0 Multicasts, 0 Broadcasts, 0 Unicasts
        0 error, 0 discarded, 0 Oversize

Eth1/5 is down, line protocol is down, reason admin-down
Hardware is Eth, address is 0c:02:22:c7:00:08
Mode of IPV4 address assignment: not-set
...
Output statistics:
        0 packets, 0 octets
        0 Multicasts, 0 Broadcasts, 0 Unicasts
        0 error, 0 discarded, 0 Oversize
sonic(config)# end
- Kør kommandoen "konfigurer terminal".
sonic# configure terminal
sonic(config)#
- Konfigurer grænseflader Ethernet 1/1-1/3,1/5,/1/7-1/9 ved brug af "grænsefladeinterval eth1/1-1/3,1/5,1/7-1/9":
sonic(config)# interface range eth 1/1-1/3,1/5,1/7-1/9
%Info: Configuring only existing interfaces in range
sonic(conf-if-range-eth**)#
- Konfigurer grænseflader ingen nedlukning uden "ingen nedlukning":
sonic(conf-if-range-eth**)# no shutdown
sonic(conf-if-range-eth**)#
- Konfigurer grænseflader for adgangstilstand vlan 1 med "switchport access vlan 1":
sonic(conf-if-range-eth**)# switchport access vlan 1
sonic(conf-if-range-eth**)#
- Kontroller brugerkonfigurationen vha. "Vis grænsefladestatus" (Figur 3):
BEMÆRK: Kolonnerne Oper og Årsag har ændret status for intervallet af konfigurerede grænseflader.

Figur 3: Vis eksempel på grænsefladestatus
- Kontroller VLAN 1-grænsefladetildelinger med "vis vlan 1" (Figur 4):

Figur 4: Vis vlan 1 eksempel
- Gem den kørende konfiguration til startkonfigurationen med "skrivehukommelse":
sonic# write memory
sonic#
Du kan finde yderligere hjælp i udgivelsesdokumentationen til Dell Technologies Enterprise SONiC SONiC eller ved at kontakte Dell Technologies teknisk support.