Dell Networking S-Series: Basic Interface Configuration – SONIC 4.0
Summary: How to configure SONIC 4.0 interface basics.
This article applies to
This article does not apply to
This article is not tied to any specific product.
Not all product versions are identified in this article.
Instructions
Dell Networking S-Series: Basic Interface Configuration - SONIC 4.0
Summary: How to configure SONIC 4.0 interface basics.
Instructions
These steps assume that the switch is being configured starting with factory-default settings as a stand-alone unit. Please see the linked Knowledge Base article for the written examples.
In Native format, SONIC front panel interfaces are named from Ethernet 0 to Ethernet X, with X being the last front panel port. Standard naming uses the Ethernet x/y/z mode, where x/y are the slot/port #s and z is used for breakout ports.
Interface Naming Format Change: Changing the default interface naming mode from Native to Standard.
- From the Linux prompt, start the SONIC CLI with "sonic-cli":
admin@sonic:~$ sonic-cli
sonic#
- Show the interface status mode currently configured with "show interface-naming"
sonic# show interface-naming
Interface naming mode is native
sonic#
- Show the interface status and see the default interface naming convention (Native naming) "show interface status"(Figure 1):
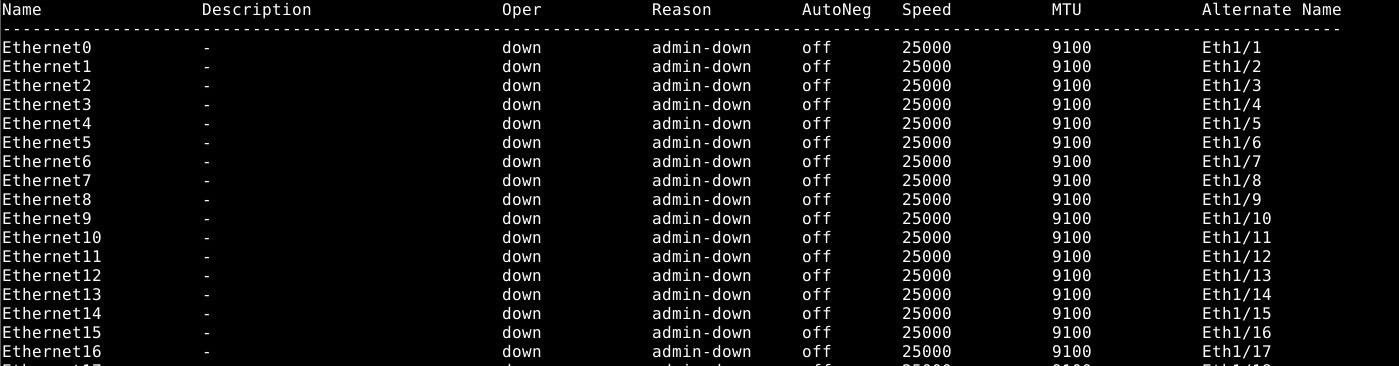
Figure 1: show interface status example.
- To modify the switch configuration, run the "configure terminal" command.
sonic# configure terminal
sonic(config)#
- To change the interface naming mode to Standard mode, use the command “interface-naming standard”:
sonic(config)# interface-naming standard
Broadcast message: Interface naming mode has changed. Users running 'sonic-cli' are required to restart your session.

sonic(config)#
NOTE: SONIC CLI must be exited and re-entered by all users for the mode change to take effect. .
- Exit configuration mode with "exit":
sonic(config)# exit
sonic#
- Exit SONIC CLI with “exit”:
sonic# exit
admin@sonic:~$
- Re-enter SONIC CLI with "sonic-cli":
admin@sonic:~$ sonic-cli
sonic#
- Show interface status with "show interface status":
sonic# show interface status
Notice the change in interface names from Ethernet X to Eth x/y(Figure 2).
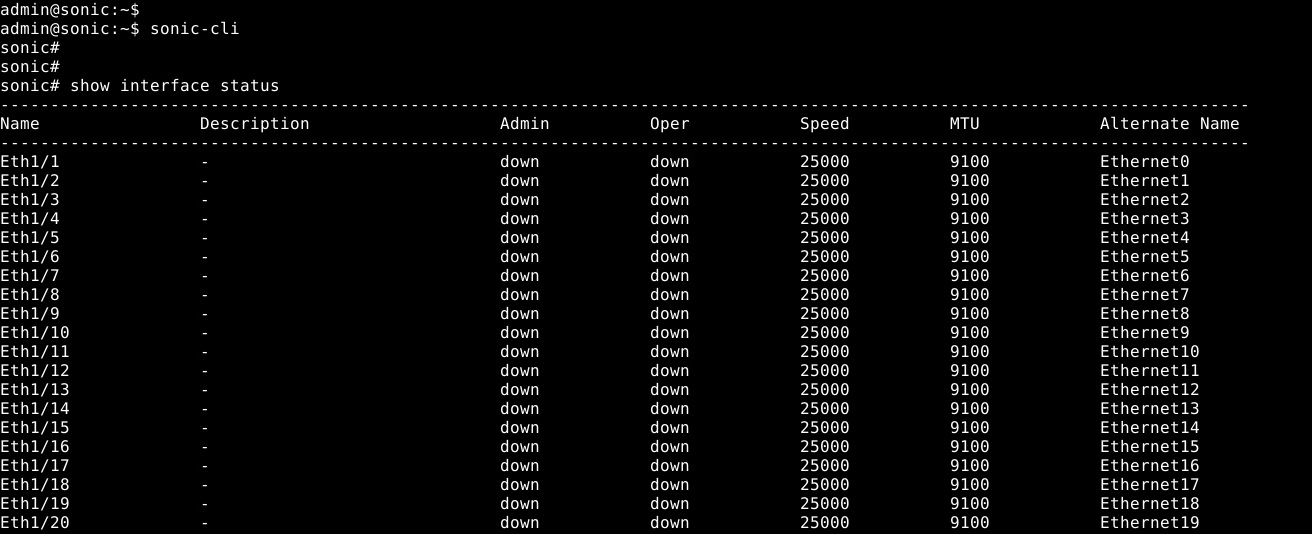
Figure 2: Standard mode: show interface status example
- Save the running configuration to startup configuration with "write memory":
sonic# write memory
sonic#
Individual interface configuration: Enter configuration mode, then enter the interface configuration mode.
- Start SONiC CLI with "sonic-cli":
admin@sonic:~$ sonic-cli
sonic#
- Show the interface configuration with "show running-configuration interface Eth 1/30":
sonic# show running-configuration interface Eth 1/30
!
interface Eth1/30
 mtu 9100
 speed 25000
 fec none
 shutdown
- Enter configuration mode with "configure terminal":
sonic# configure terminal
sonic(config)#
- Enter interface Eth 1/30 configuration mode with "interface Eth 1/30":
sonic(config)# interface Eth 1/30
sonic(conf-if-Eth1/30)#
- No shut interface Eth 1/30 with "no shutdown":
sonic(conf-if-Eth1/30)# no shutdown
sonic(conf-if-Eth1/30)#
- Configure an IP address on interface Eth 1/30 with “IP address 10.1.1.2/24”:
sonic(conf-if-Eth1/30)# ip address 10.1.1.2/24
sonic(conf-if-Eth1/30)#
- Exit configuration mode with "end":
sonic(conf-if-Eth1/30)# end
sonic#
- Show the interface configuration with "show running-configuration interface Eth 1/30":
sonic# show running-configuration interface eth 1/30
!
interface Eth1/30
 mtu 9100
 speed 25000
 fec none
 no shutdown
 ip address 10.1.1.2/24
- Show IP interfaces with "show ip interfaces":
sonic# show ip interfaces
Flags: U-Unnumbered interface, A-Anycast IP
-----------------------------------------------------------------------------------------------
Interface            IP address/mask                    VRF            Admin/Oper     Flags
-----------------------------------------------------------------------------------------------
Eth1/30              10.1.1.2/24                                           up/up
sonic#
- Show interface status for Eth 1/30 "show interface eth 1/30":
(output truncated for brevity)

sonic# show interface eth 1/30

Eth1/30 is up, line protocol is up
Hardware is Eth
IPV4 address is 10.1.1.2/24
Mode of IPV4 address assignment: MANUAL
Mode of IPV6 address assignment: not-set
Interface IPv6 oper status: Disabled
IP MTU 9100 bytes
LineSpeed 25GB, Auto-negotiation off
FEC: DISABLED
Last clearing of "show interface" counters: never
…
- Save the running configuration to startup configuration with "write memory":
sonic# write memory
sonic#
Mutliple Interface Configuration: To configure multiple interfaces simultaneously, use the 'interface range' option. To view a range of interfaces with a show command, the ‘range’ keyword is not needed.
Example:
- To configure consecutive range of ports 14 through 15 would be "interface range ethernet 1/1/14-1/1/15".
- To configure nonconsecutive range of ports 3,10,19 would be "interface range ethernet 3,10,19".
- To configure a mix of consecutive and nonconsecutive would be "interface range ethernet 1/1/3, 1/1/14-1/1/15".
- To show multiple interfaces, the 'range' option is not necessary. To show Ethernet 1/1-1/3,1/5 use the command "show interface Eth 1/1-1/3,1/5":
(output truncated for brevity)
sonic# show interface Eth 1/1-1/3,1/5

Eth1/1 is down, line protocol is down, reason admin-down
Hardware is Eth, address is 0c:02:22:c7:00:08
Mode of IPV4 address assignment: not-set
...
Output statistics:
        0 packets, 0 octets
        0 Multicasts, 0 Broadcasts, 0 Unicasts
        0 error, 0 discarded, 0 Oversize

Eth1/2 is down, line protocol is down, reason admin-down
Hardware is Eth, address is 0c:02:22:c7:00:08
Mode of IPV4 address assignment: not-set
...
Output statistics:
        0 packets, 0 octets
        0 Multicasts, 0 Broadcasts, 0 Unicasts
        0 error, 0 discarded, 0 Oversize

Eth1/3 is down, line protocol is down, reason admin-down
Hardware is Eth, address is 0c:02:22:c7:00:08
Mode of IPV4 address assignment: not-set
...
Output statistics:
        0 packets, 0 octets
        0 Multicasts, 0 Broadcasts, 0 Unicasts
        0 error, 0 discarded, 0 Oversize

Eth1/5 is down, line protocol is down, reason admin-down
Hardware is Eth, address is 0c:02:22:c7:00:08
Mode of IPV4 address assignment: not-set
...
Output statistics:
        0 packets, 0 octets
        0 Multicasts, 0 Broadcasts, 0 Unicasts
        0 error, 0 discarded, 0 Oversize
sonic(config)# end
- Run the "configure terminal" command.
sonic# configure terminal
sonic(config)#
- Configure interfaces Ethernet 1/1-1/3,1/5,/1/7-1/9 using “interface range Eth1/1-1/3,1/5,1/7-1/9”:
sonic(config)# interface range eth 1/1-1/3,1/5,1/7-1/9
%Info: Configuring only existing interfaces in range
sonic(conf-if-range-eth**)#
- Configure interfaces no shut with “no shut”:
sonic(conf-if-range-eth**)# no shutdown
sonic(conf-if-range-eth**)#
- Configure interfaces for access mode vlan 1 with "switchport access vlan 1":
sonic(conf-if-range-eth**)# switchport access vlan 1
sonic(conf-if-range-eth**)#
- Verify the user configuration using "show interface status"(Figure 3):
NOTE: The Oper and Reason columns have changed status for the range of configured interfaces.

Figure 3: Show interface status example
- Check VLAN 1 interface assignments with "show vlan 1" (Figure 4):

Figure 4: Show vlan 1 example
- Save the running configuration to startup configuration with "write memory":
sonic# write memory
sonic#
For further assistance, see the Dell Technologies Enterprise SONiC User Guide Release Documentation or reach out to Dell Technologies Technical Support.
Additional Information
Affected Products
Networking, Enterprise SONiC DistributionArticle Properties
Article Number: 000202172
Article Type: How To
Last Modified: 23 May 2024
Version: 5
Find answers to your questions from other Dell users
Support Services
Check if your device is covered by Support Services.