New Chromebook RMA Shim Process for 5190 2-in-1 Chromebooks
Summary: Steps for the RMA Shim process on the 5190 2-in-1 Chromebook.
This article applies to
This article does not apply to
Symptoms
Caution: It is necessary to use the Original AC Adapter to avoid having the Chromebook from shutting down when connecting or disconnecting the Battery.
Cause
Chromebook RMA Shim
The Dell Chromebooks use a unique service tool that is known as an RMA Shim.
In the event of a System Board replacement, it is important that the RMA Shim tool is run to write the Chromebook Service Tag and reload ChromeOS.
RMA Shim USB Key
The RMA Shim USB Key is sent together with a replacement System Board. The RMA Shim software on the USB Key is the Service/Lite version which contains only the Shop Floor and Google Required Tests Module:
- Shop Floor:
- Shop Floor is required to write VPD (Vendor Product Data) info to the System Board. (Service Tag, Model Name, Regional Settings, so forth)
- Google Required Tests:
- The Google Required Test reboots the Chromebook, wipe all content on the embedded Solid-State Hard Drive (SSD), reloads the base version of ChromeOS and will put the Chromebook into "Shipping Mode."
- Shipping mode means, the Chromebook can only be turned on by connecting it to the Power Adapter. You will also be presented with the Out Of Box (OOB) welcome screen.
Resolution
Install and Running the RMA Shim for System Board Replacement(s):
Note: Service replacement System Boards are shipped in Developer Mode and with Write-Protect (WP) disabled.
Follow the steps listed in the Owner’s Manual to remove the following components:
Owner’s Manual: Chromebook 5190 2-in-1 Documentation
- Remove the back cover of the Chromebook [Pages 9-11].
- Remove the battery bracket closest to the System Board connection, do not remove the battery connection, only the bracket holding the cable [Pages 12-13].
Note: The bracket holding the battery cable to the System Board, and back cover screws are being removed to ease the next steps for Write-Protect and running the RMA Shim in later steps.
- Insert the RMA Shim USB Key into a USB port. Connect AC power and press <Esc> + Refresh + Power buttons.
Note: The power button can be on the keyboard, or it can be on the left side of the Chromebook near the LED.
- The following screen with the main menu appears (Figure 1). Write-Protect is already disabled, however the battery must be removed (Figure 2). Once the battery is removed, Press <I> and press <Enter> key to start installing the RMA Shim file from the Main Menu (Figure 1).
Note: If the Chromebook shuts down when the battery is removed, the battery has to be added back in to get back to the main menu (Figure 1). Restart the Chromebook using the power button (AC Adapter must be connected). Follow the previous steps to get back to the main menu (Figure 1) and proceed with the steps for removing the battery.

Figure 1

Figure 2
- The Chromebook will then load all necessary files to start the RMA Shim process, taking approximately 7 minutes (Figure 3).

Figure 3
- Once the installation is complete, the Chromebook reboots to the following screen (Figure 4).

Figure 4
- Upon completion, the Chromebook boots into RMA Shim. At this point, remove the RMA Shim USB drive. Go to the Shop Floor Tests section.
Install and Running the RMA Shim for Corruption in ChromeOS or Other Needs (System Board Not Being Replaced):
Note: In order to run the RMA SHIM on a Chromebook when not replacing the System Board, the Chromebook has to be put into Developer Mode (Follow the steps below).
This will also require the Chromebook to be Unenrolled/De-Provisioned prior to putting in Dev Mode. This is done using the Google Admin Console. Reference Issues at the Depot and with Returns caused by Chromebook when Enrolled/Provision and/or Development Mode is Disabled for this procedure.
This will also require the Chromebook to be Unenrolled/De-Provisioned prior to putting in Dev Mode. This is done using the Google Admin Console. Reference Issues at the Depot and with Returns caused by Chromebook when Enrolled/Provision and/or Development Mode is Disabled for this procedure.
- Follow the steps listed in the Owner’s Manual to remove the following components:
Owner’s Manual: Chromebook 5190 2-in-1 Documentation- Remove the back cover of the Chromebook [Pages 9-11].
- Remove the battery bracket closest to the System Board connection, do not remove the battery connection, only the bracket holding the cable. [Pages 12-13]
- Insert the RMA Shim USB Key into a USB port. Connect AC power and press <Esc> + Refresh + Power buttons.
Note: The power button can be on the keyboard, or it can be on the left side of the Chromebook near the LED.
- The Chromebook powers on and display the message below (Figure 5).
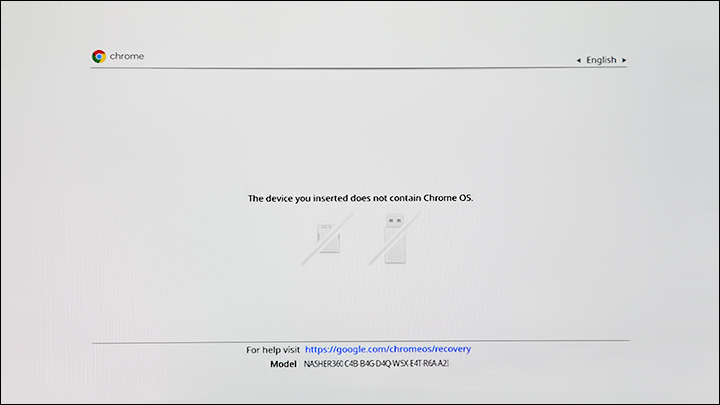
Figure 5
- Press <Ctrl> + <D>. The following screen appears (Figure 6).
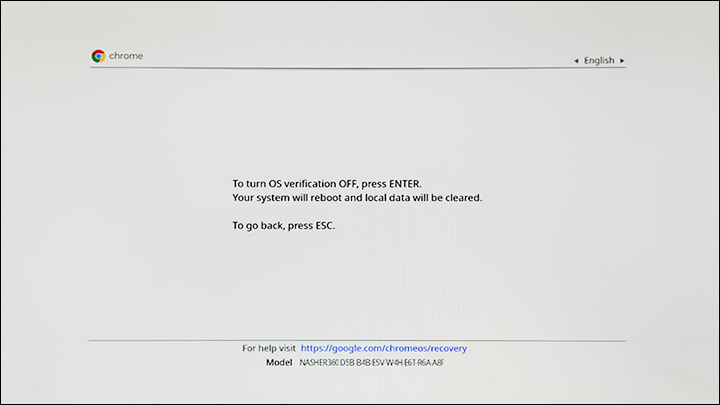
Figure 6
- Press Enter to confirm that you would like to turn the OS verification off. The Chromebook will then reboot, and upon reaching the below screen, press <ESC> + Refresh + Power Button (within 30 seconds) to reboot the Chromebook and load the RMA Shim Installer before the wiping process starts (Figure 7).

Figure 7Note: If the Chromebook fails or gets an error, while trying to enter DEV Mode, please have customer ensure Dev Mode is enabled in the Admin. This is done using the Google Admin Console. Reference Issues at the Depot and with Returns caused by Chromebook when Enrolled/Provision and/or Development Mode is Disabled for this procedure.
- Once you reach this screen, please wait until the Chromebook reboots. You hear two beeps from the Chromebook before it reboots. Once it reboots, it puts the Chromebook into Developer Mode (Figure 8).
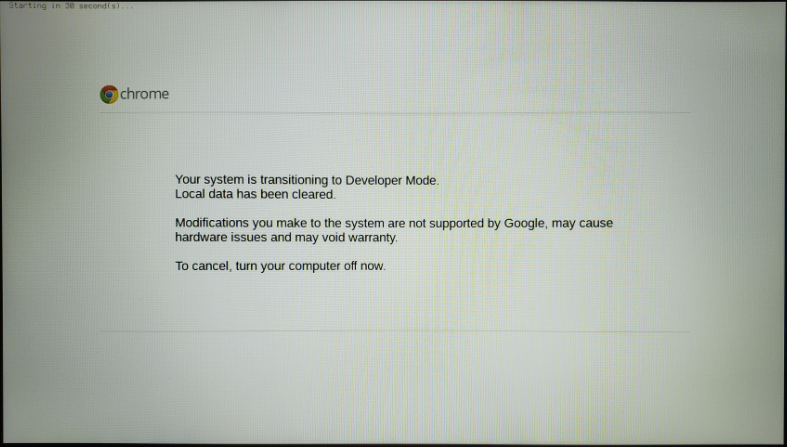
Figure 8
- Chromebook will boot into Developer Mode (Figure 9). Ensure that the RMA Shim USB Key remains plugged in and connect AC power. Press <Esc> + Refresh + Power buttons to boot to the RMA Shim.
Note: The power button can be on the keyboard, or it can be on the left side of the Chromebook near the LED.
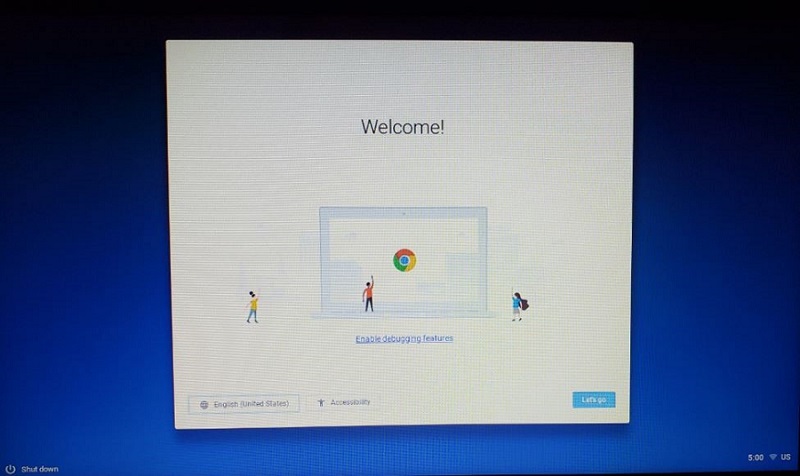
Figure 9
- The following screen with the main menu appears (Figure 10). Before proceeding, the Write Protection (WP) must be disabled. To do this, disconnect the battery from the System Board (Figure 11). Once the battery is removed, Press <P> and press <Enter> key to Prepare the Chromebook for Install. The Chromebook shuts down once this is completed.
Note: If the Chromebook shuts down when the battery is removed for WP disabling, the battery has to be added back in to get back to the main menu (Figure 10). Restart the Chromebook using the power button (AC Adapter must be connected). Follow the previous steps to get back to the main menu (Figure 10) and proceed with the steps for removing the battery and Preparing the Chromebook for Install.

Figure 10
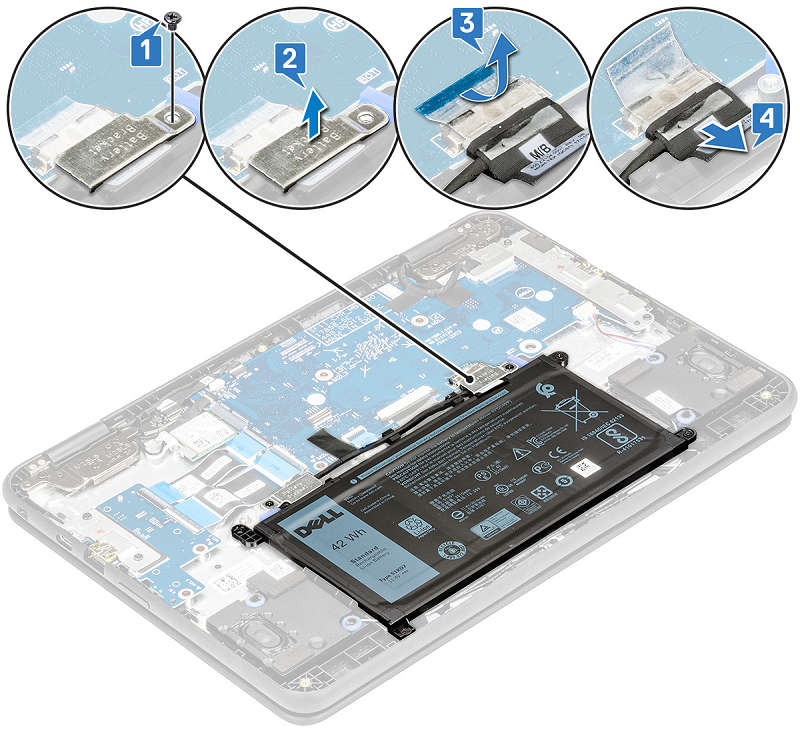
Figure 11
- Ensure that the RMA Shim is connected to the Chromebook. Reconnect the battery back into the Chromebooks System Board connection. Connect AC power and press <Esc> + Refresh + Power buttons to boot back to the RMA Shim.
- Once back at the Main Menu screen (Figure 12), remove the battery connection to the System Board. Press <I> and press <Enter> key to start installing the RMA Shim file.
Note: If the Chromebook shuts down when the battery is removed, the battery has to be added back in to get back to the main menu (Figure 12). Restart the Chromebook using the power button (AC Adapter must be connected). Follow the previous steps to get back to the main menu (Figure 12) and proceed with the steps for removing the battery.
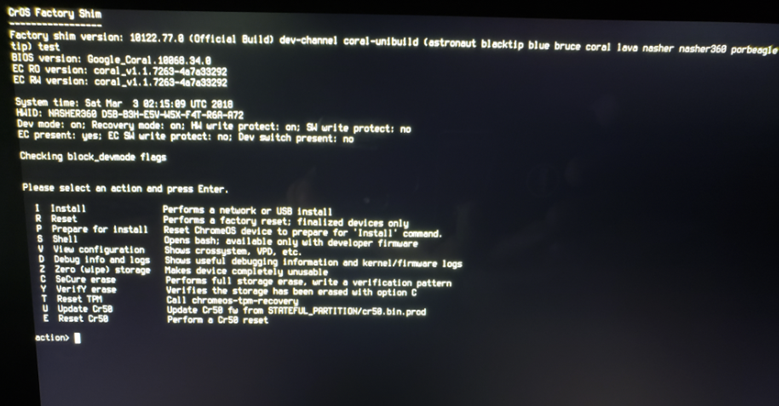
Figure 12
- The Chromebook will then load all necessary files to start the RMA Shim process, taking approximately 7 minutes (Figure 13).
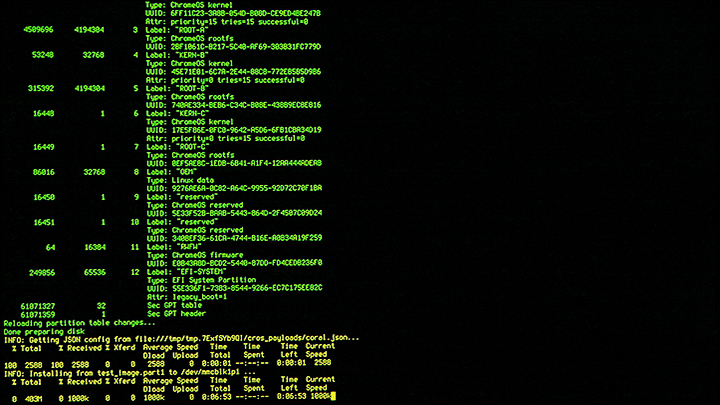
Figure 13
- Once the installation is complete, the Chromebook reboots to the following screen (Figure 14).

Figure 14
- Upon completion, the Chromebook boots into RMA Shim. At this point, remove the RMA Shim USB drive. Go to the Shop Floor Tests section.
Running an RMA Shim (System Board Replacement and Re-SHIM of corrupt ChromeOS)
Shop Floor Tests
Note: Replacement Chromebook System Boards are shipped with Write-Protect (WP) disabled in order for the RMA Shim to successfully write VPD (Vital Product Data).
- The RMA Shim will start with the component selection screen. Reconnect the battery to the Chromebooks System Board before proceeding to select the appropriate values based on the Chromebook configuration. Press <Enter> to continue (Figure 15).
Note: If the battery is not reconnected before inputting Chromebook configuration details, the Chromebook will not complete this test. A Hardware ID (HWID) error presents itself. In order to bypass this error, connect the battery to the motherboard and select Prepare than "Clear status of 4 tests in Prepare" on the test list (Figure 16). This restarts the Prepare tests automatically. Proceed with selecting the appropriate values based on the Chromebook configuration. Press <Enter> to continue (Figure 15).
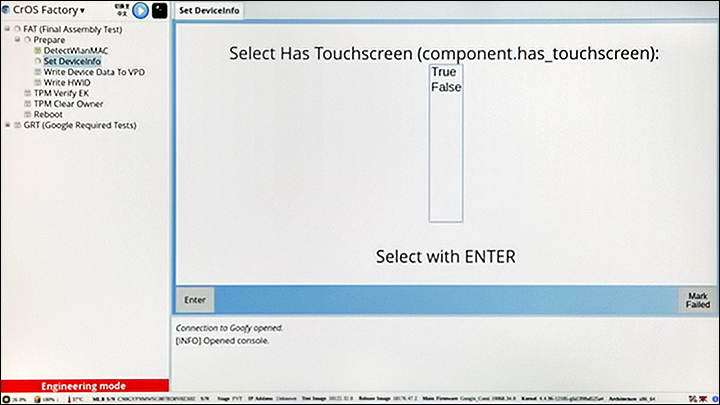
Figure 15
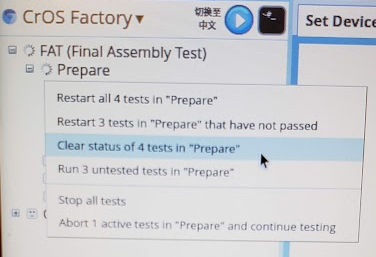
Figure 16
- The shop floor section allows you to customize the unique Chromebook fields. For Service Tag, enter the valid Service Tag from the label on the chassis (Figure 17).
Note: Ensure that the Service Tag is entered in upper case only. For example: ABC1234
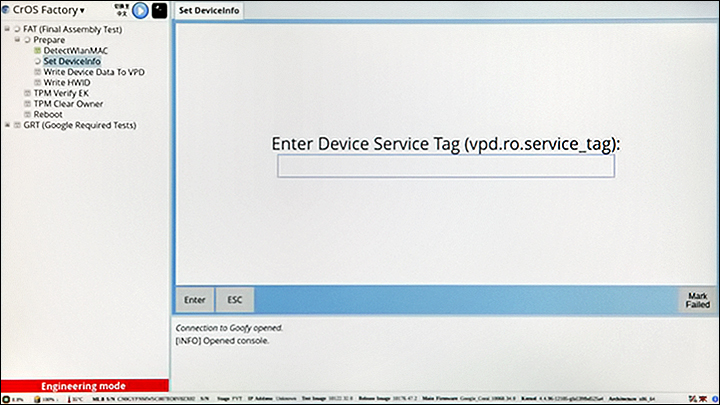
Figure 17
- Select the correct model (see the Model Name on the bottom cover or the work order ticket Chromebook description) and press <Enter> to continue (Figure 18).
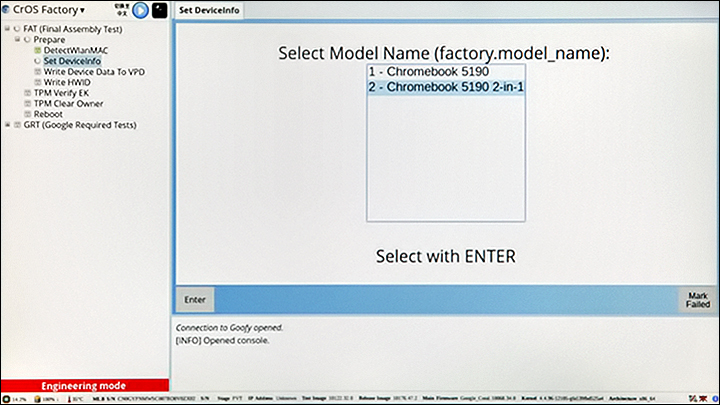
Figure 18
- Select the correct region and press <Enter> to continue (Figure 19).
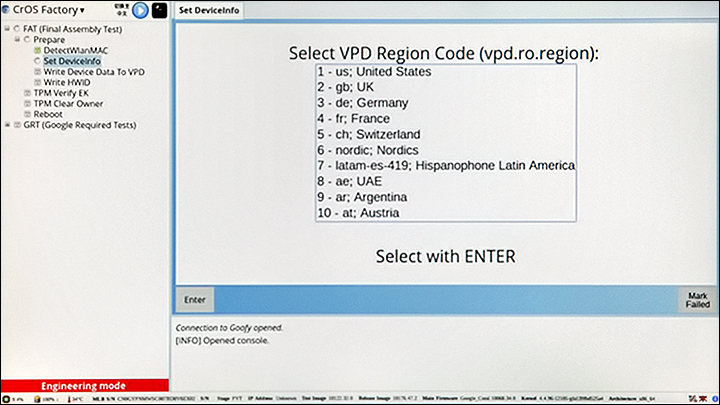
Figure 19
- RMA Shim writes the VPD information into the Chromebook's firmware (Figure 20).

Figure 20
- After successfully writing the VPD information, writing the HWID, and checking the TPM, the Shop Floor will finalize by shutting down the Chromebook (Figure 21). Press Space to shut down.
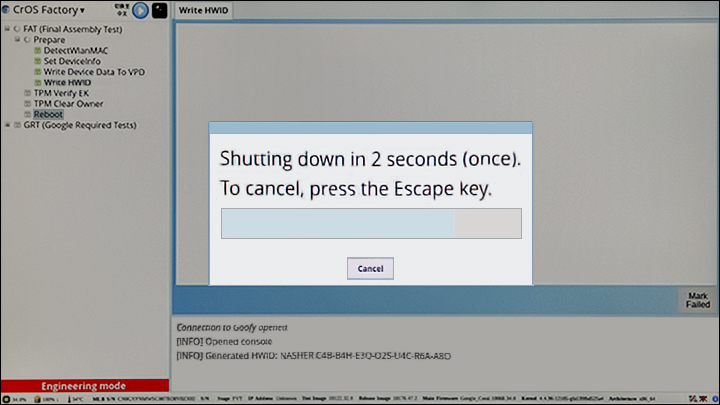
Figure 21
Google Required Test
Note: Write-Protect (WP) will be enabled during the finalizing step.
- Power the Chromebook back on by pressing the Power button. RMA Shim will start automatically.
- Google Required Test resumes and the Chromebook reboot itself to finalize the process (Figure 22).

Figure 22
- Do not shut down or reboot the Chromebook during the finalizing process. The Chromebook finalizes the Google Required Tests (Figure 23).
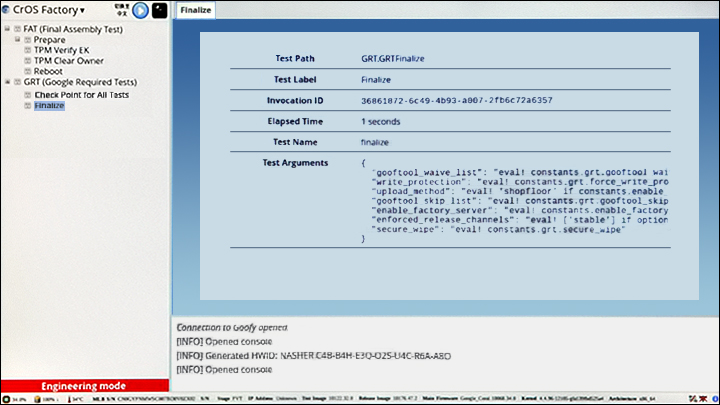
Figure 23
- Upon completion of the finalizing step, the following screen appears as the Chromebook starts the wiping process (Figure 24).
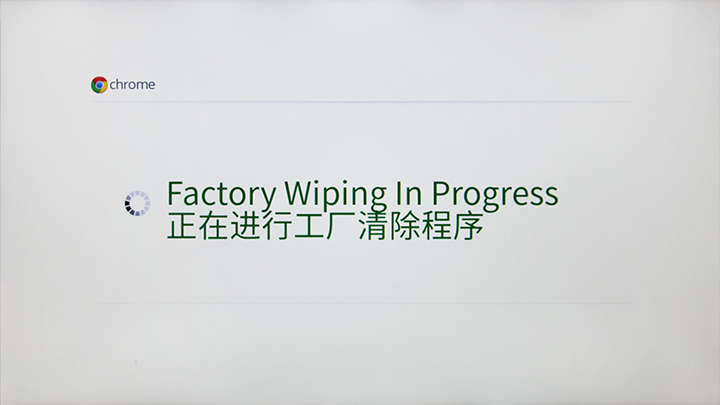
Figure 24
- Upon the completion of the RMA Shim, the last step puts the Chromebook in shipping mode. Remove the AC Adapter when prompted (Figure 25).
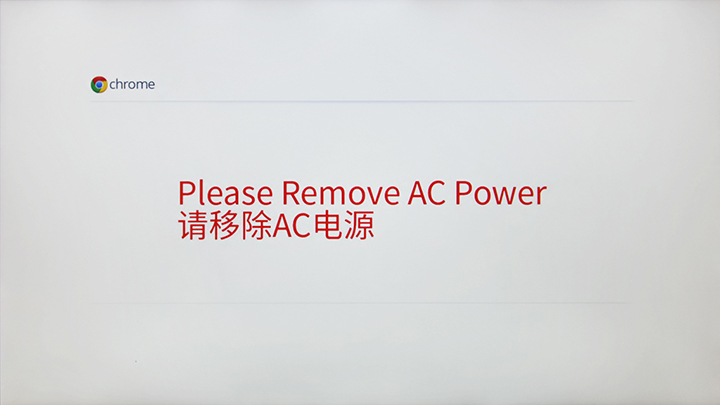
Figure 25
Caution: Wait at least 10 seconds before closing the lid as doing so will interrupt the ship mode process and corrupt the OS.
- The battery is locked in the last step. This puts the Chromebook in Ship Mode. The Chromebook will require AC power to be connected the next time that the Chromebook must be turned on. It will not turn on without the power supply even if the battery has a charge (Figure 26).

Figure 26
Note: Connect the AC power and turn on the Chromebook. The Chromebook should boot back into the Google OS welcome screen.
- Once the RMA Shim process is completed, follow the steps that are listed in the Owner’s Manual to install the following components:
Owner’s Manual: Chromebook 5190 2-in-1 Documentation- Install the battery bracket(s) [Page 15].
- Install the back cover of the Chromebook [Page 12].
Warning: The RMA Shim USB drive is dispatched together with the replacement Chromebook board. The RMA Shim USB software on the USB Key is the service/lite version which contains only the Shop Floor and Google Required Tests Module. After completing the break-fix event, always return the RMA Shim USB drive together with the faulty Chromebook board.