Air Temperature Sensor
Summary: Guide to the air temperature sensor on Dell systems
This article applies to
This article does not apply to
This article is not tied to any specific product.
Not all product versions are identified in this article.
Symptoms
| Article Summary: | This article provides information on Air Temperature Sensor. |
Table of Contents:
- What is an Air Temperature Sensor?
- How Does the Air Temperature Sensor Work?
- How Do I Know the Sensor is Working?
- What if My System Seems to Run Loud All the Time?
- Dell Desktop System May Halt With an "Alert! Air Temperature sensor not detected" Message During Startup
| Issue 1. | What is an Air Temperature Sensor? |
The air temperature sensor that Dell began installing on systems in August of 2006 is designed to monitor the temperature of the air in the room where the system is being used.
The sensor works with the system's fans to maintain an optimal running temperature. By doing this the system is able to reduce stress on heat-sensitive components.
Besides compensating for warmer than normal temperatures, the system is able to reduce fan noise in cooler environments by allowing the system to run quietly when the fans are not as critical.
| Issue 2. | How Does the Air Temperature Sensor Work? |
The air temperature sensor is located just behind the air intake vent in the front of the system. As air from the room is pulled into the system, the temperature sensor measures its temperature and adjusts the fan speed for optimal performance.

Figure 1 - Cold Air Being Pulled Into the System
If the temperature of the incoming air is below 95 degrees Fahrenheit, the temperature sensor allows the system fans to run slower. As a result the system runs more quietly.

Figure 2 - Hot Air Being Pulled Into The System
If the room temperature of the incoming air is above 95 degrees Fahrenheit, the temperature sensor increases the fan speed to maintain optimal running conditions.
| Issue 3. | How Do I Know the Sensor is Working? |
The best part of the air temperature sensor that Dell installs on systems is that it works without any user interaction. There is no need to turn it on or off or to configure any settings. The sensor comes configured for optimal running configurations no matter what climate you use your computer in.
Performance In Cooler Conditions:
In cooler conditions when the system is under normal stress there will be only minimal noise generated by the system fans.
Performance In Warmer Conditions:
In warmer conditions, the fan speed will be increased to compensate for the room temperature. As with any fan, as the speed is increased, so will the noise created by the system. A system that seems to run loud all the time might indicate a problem with the environment the system is being used in.
| Issue 4. | What if My System Seems to Run Loud All the Time? |
If the fans in your system seem to run loud all the time, it may indicate a problem with the environment where the system is used. To reduce the noise caused by the system fans, attempt the following:
- Clear all possible obstructions from in front of the system (where the air intake is located) and the back of the system (where the air exhaust is located).
- If the system is in a cabinet or other enclosure, try moving it out of the enclosure to see if the problem is caused by warm air from the exhaust circulating around the enclosure and back into the intake.
- If the system sits on the floor, try elevating it by placing it on a desk or table to see if the performance is affected.
| Issue 5. | Dell Desktop System May Halt With an "Alert! Air Temperature sensor not detected" Message During Startup |
If the desktop halts with an "Alert! Air Temperature sensor not detected" Message During Startup one of the solution is to "Reseat the Thermal Diode Power Cable".
Steps on How to Reseat the Thermal Diode Power Cable
 |
Warning: | |
| Before working inside your computer, read the safety information, to see the Regulatory Compliance Homepage click here. |
- Power off the system and unplug AC power.
- Hold down the power button for 10 seconds to drain residual power.
- Remove the system cover.
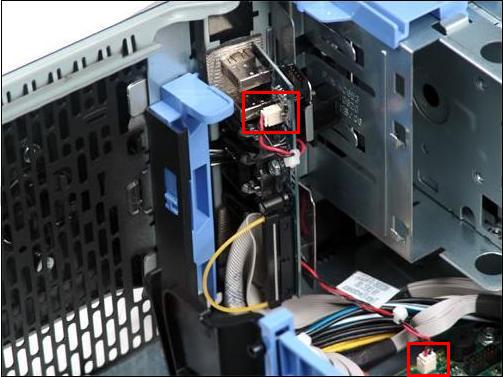
- Locate the thermal diode power cable connectors on the I/O panel and the system board (Figure 3).

Note: For information about how to open the chassis and remove, reseat, and replace components, please refer to your Online User's Guide and browse to the Replacing and Removing Parts section.

Figure 3: Thermal Diode Power Cable - Reseat the thermal diode power cable.
- Ensure that the thermal diode power cable is firmly seated in the connector on the motherboard and the input/output (I/O) panel. The cable is needed to power the thermal diode located on the I/O panel.
- Replace the system cover and power on the computer.
Affected Products
Desktops & All-in-OnesArticle Properties
Article Number: 000136592
Article Type: Solution
Last Modified: 10 Apr 2021
Version: 3
Find answers to your questions from other Dell users
Support Services
Check if your device is covered by Support Services.