How to Create Windows Installation Media for Windows 11 and Windows 10 using the Media Creation Tool
Summary: Create Windows installation media for Windows 11 and 10 with Media Creation Tool. Choose your media type (USB or DVD) and follow easy steps for OS upgrades or reinstalls.
Instructions
Table of Contents
The media Creation Tool can be downloaded directly from Microsoft and is especially useful if you must create installation software for the operating system. This is best used when you have Windows on one computer and want to upgrade additional devices that you own as well. Similarly, if you are making hardware upgrades to your computer and must reinstall Windows, having a physical copy of the software can be incredibly useful.
Before You Begin
You can download the Media Creation Tool directly from Microsoft (Relevant links are below depending on Version). This tool works on Windows 11 and Windows 10. It is not necessary to enter your Windows product key when creating the Install Media or ISO File.
Before you start, here is what you may need:
- You need a computer with a stable Internet connection. The download is roughly 4 GB and the time that it takes to download varies based on your connection speed and other factors.
- You need a USB flash drive with at least 4 GB of space. Microsoft recommends using an empty drive as any existing content will be deleted.
- You need a blank DVD with a DVD writer. This requires a DVD writer on the computer that you are using to create the media, and a DVD player on the computer that you want to install on.
Creating a Windows 11 Installation Media
If you must install or reinstall Windows 11, you can use the Windows 11 media creation tool to create your own installation media using either a USB flash drive or a DVD.
- Open the Microsoft support website: https://www.microsoft.com/software-download/windows11
.
- Under the Create Windows 11 installation media section, click Download Now.
- Double-click the MediaCrationToolW11.exe file to launch the tool.
- Click Accept to agree to the terms.
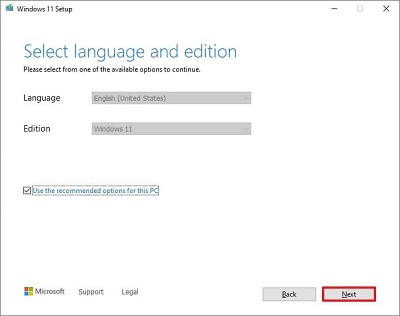
- (Optional) Clear the Use the recommended options for this PC option.

- Click Next.
Note: If you are creating a Windows 11 USB for another device, you can also clear the Use the recommended options for this PC option to select the correct language, architecture, and edition.
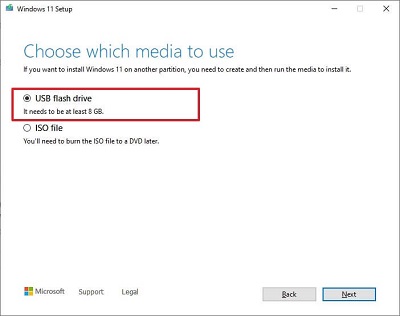
- Select the USB flash drive option.

- Click Next.
- Select the USB flash drive from the list.
Note: Ensure that it does not have any important files as this process erases everything on it.
- Click Next.
- Click Finish.
- Once you complete the steps, you can start a device using UEFI with the USB drive to install Windows 11.
Creating a Windows 10 Installation Media
If you must install or reinstall Windows 10, you can use the Windows 10 media creation tool to create your own installation media using either a USB flash drive or a DVD.
- Download the relevant version from www.microsoft.com/software-download/windows10
.
- Select the appropriate version for the computer that you are running the tool on, either a 32-bit or 64-bit computer.
Note: Either version of the tool allows you to create a 32-bit or 64-bit image.
- Locate the downloaded file, right-click the .exe file, and select Run as administrator.
- If you are upgrading your computer, select Upgrade this PC now, and follow the instructions to complete the upgrade.
- If you want to create media for a different computer, select Create installation media for another PC, and click Next.
- Select the Language, Edition (Pro, Home, and so on) and Architecture (32 or 64-bit) and click Next.
- Select either USB flash drive or ISO file (This must be burned to a DVD after the ISO file is created).
Note: If a USB flash drive is selected, ALL data will be wiped, and the drive should be at least 4 Gb in size.Note: If an ISO is created, then this will either be mounted, or burned onto a DVD.
- After the image is downloaded and the media is created, select Finish.
- The tool cleans up any temporary files and exit.
Additional Information
Recommended Articles
Here are some recommended articles related to this topic that might be of interest to you.
- Create Windows Recovery Media for Your Dell Computer
- How to Install Windows from the Dell ISO
- How To Install Windows 11 or Windows 10 From a Dell Windows Recovery DVD
 Out of warranty? No problem. Browse to the Dell.com/support website and enter your Dell Service Tag and view our offers.