允许在戴尔 Latitude 笔记本电脑上进行 PXE 启动的 BIOS 设置
Summary: 本文是关于在戴尔 Latitude 笔记本电脑上将 BIOS 设置配置为允许 PXE 启动的指南。
This article applies to
This article does not apply to
This article is not tied to any specific product.
Not all product versions are identified in this article.
Symptoms
如何访问 BIOS 或 UEFI(也称为 System Setup)?
如需在戴尔计算机上访问 BIOS 或 UEFI,请在启动过程中出现戴尔标识屏幕时按 F2 键数次。
或者在启动过程中出现戴尔标识屏幕时按 F12 键数次,然后从菜单中选择 BIOS Setup 或 System Setup。
在 Latitude 笔记本电脑上进入 BIOS 屏幕后,应该有以下针对 PXE 启动的 BIOS 设置。Latitude 笔记本电脑上的 BIOS 用户界面因笔记本电脑型号而异。
提醒:确保您已从 Dell Support | Drivers and Downloads 网站上的 BIOS 类别中下载并安装最新的 BIOS 更新。
Cause
无可用的原因信息。
Resolution
在 Latitude 7x10 和 7x00 的 BIOS 中启用 PXE 启动
- 转至 General > Boot Sequence ,然后选择以启用 Windows Boot Manager (图 1)。

图 1:启用 Windows Boot Manager - 转至 General > Advanced Boot Options ,然后在 下选择 Enable UEFI Network Stack (启用 UEFI 网络堆栈 )(图 2):

图 2:启用 UEFI 网络堆栈 - 由于这些较新的 Latitude 笔记本电脑型号没有 NIC 连接,请检查以在 System Configuration >USB Configuration 下启用 Enable USB Boot Support (图 3):

图 3:启用 USB 启动支持 - 检查以在 System Configuration-Thunderbolt Adapter Configuration (System Configuration-Thunderbolt> Adapter Configuration) 下启用 Thunderbolt、Enable Thunderbolt Boot Support 和 Enable TBT(和 PCIE behind TBT)预引导模块(图 4),即使您未连接到 Thunderbolt 坞站:

图 4:启用 Thunderbolt 启动支持 - 根据 PXE 服务器的配置方式,可能需要暂时禁用 General-Secure Boot-Secure>> Boot Enable 下的安全引导启用,直至完成映像部署(图 5):

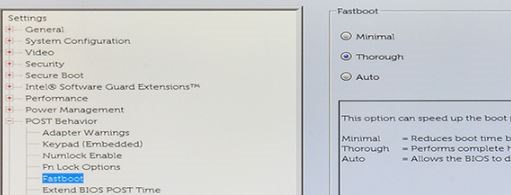
图 5:禁用安全启动 - 在 Post Behavior 下,Fastboot 需要设置为 Thorough(图 6):

图 6:将 Fastboot 设置为 Thorough
提醒:使用 Display-Link 驱动程序的戴尔坞站(例如 D6000 系列和 D3100)不允许 PXE 启动。这些坞站的驱动程序不会在 Windows 之前的环境中加载。戴尔不建议您通过坞站连接进行 PXE 启动,但您可以使用 USB Type-C 转以太网转换器(如戴尔 SKU# 470-ABND)完成 PXE 启动。
在 Latitude 7x20 和 7x30 的 BIOS 中启用 PXE 启动
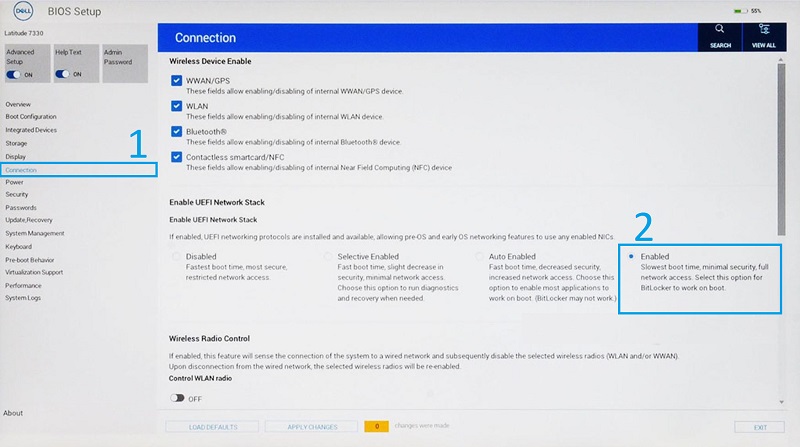
- 选择 Connection,然后确保 Enable UEFI Network Stack 设置为 Enabled。

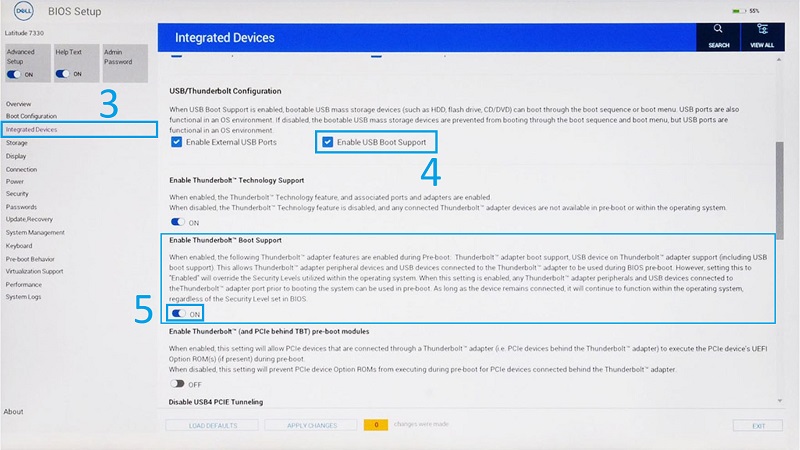
图 7:在 BIOS 中启用 UEFI 网络堆栈 - 选择 Integrated Devices。
- 向下滚动以查看 USB/Thunderbolt Configuration,然后选择 Enable USB Boot Support。

图 8:启用 USB 和 Thunderbolt 启动支持 - 确保 Enable Thunderbolt Boot Support 设置为 ON。
- 单击 Apply Changes 以保存更改。
Additional Information
推荐的文章
以下是您可能会感兴趣的与此主题相关的一些推荐文章。
Affected Products
7000 Series, Latitude 5300 2-in-1, Latitude 5300, Latitude 7300, Latitude 7400 2-in-1, Latitude 7400Article Properties
Article Number: 000131551
Article Type: Solution
Last Modified: 16 May 2023
Version: 5
Find answers to your questions from other Dell users
Support Services
Check if your device is covered by Support Services.