What is Wake-on-LAN: Troubleshooting Guide and Best Practices
Summary: Discover what Wake-on-LAN (WOL) is and how to troubleshoot it. Learn the steps to enable WOL in the BIOS and optimize network adapter settings for seamless remote access.
This article applies to
This article does not apply to
Instructions
Affected Operating Systems:
- Windows
Table of Contents
- What is Wake-on-LAN?
- Prerequisites
- BIOS Settings
- Driver Settings
- How to wake the computer up
- Wake-on-LAN troubleshooting
What is Wake-on-LAN
WOL is an Ethernet networking standard that allows a properly configured network computer to be turned on or awakened by a network message. WOL is an industry standard protocol for waking computers up from a low-power mode remotely. The definition of low-power mode means while the computer is off and has access to a power source. This is useful if you plan to access your computer remotely for any reason: It allows you to retain access to your files and programs, while keeping the computer in a low-power state.
Prerequisites
To use WOL, the computer has to meet some prerequisites:
- Available WOL features (you can check in your computer's manual if WOL is available on your computer).
- WOL enabled Network Card
- Energy-Efficient Ethernet must be deactivated.
- Deep Sleep must be deactivated in the BIOS if the option is present.
- The computer must be in S3, S4, or S5 state, this also depends on your computer model.
Note: For further Information on the System States, see this article in the Microsoft Knowledge Base
.
BIOS Settings
In order to use the WOL feature, you must set some settings within the systems BIOS. To do so, follow these steps:
- Restart the computer and press the F2 key multiple times.
- In the computer BIOS, go to Power Management and Wake on LAN/WLAN.
- Activate the Option that you want to use.
Note: WOL is not available on all computer models and in all computer states.
- Go to Deep Sleep Control and disable the Option.
- Click Apply and Exit the BIOS.
Driver Settings
Back in Windows, you have to set up WOL in your Network Card Driver. Follow these steps to do so:
- Open the Device Manager. In Windows 10, you can right-click the Windows Button and choose Device Manager.
- Go to Network adapters and open the category.
- Right-click your LAN Controller and choose Properties.
- Open the tab Power Management.
- Ensure that the following boxes are checked: Allow this device to wake the computer, Only allow a magic packet to wake the computer.
- Now open the advanced tab and choose Energy-Efficient Ethernet.
Note: This option is not available for all computer models.
- Set this option to disabled.
- Click OK and close the Device Manager.
- Go to the Control Panel then Hardware and Sound, Power Options, and System Settings.
- At the top click Change settings that are currently unavailable.
- At the bottom, clear Turn on fast startup.
- Click save changes.
Note: You need Administrator Rights to change these options.
How to wake the computer up
First, you should check if all Settings are done correctly. Shut down the computer and check if the Network LEDs are still on. If so, the settings are fine, and you can use WOL.
In this example, we use the wol.exe, but you are free to use any of the plenty WOL tools available.
Note: Dell does not endorse this Software and using it is at your own risk.
Choose the WOL tool that suits your needs and download it. You can find plenty of them in a Web search like Bing or Google.
To configure your WOL tools, follow these steps (steps may vary on other tools):
- Start the computer that you want to wake up. Once in Windows, right-click command prompt and choose Run as Administrator.
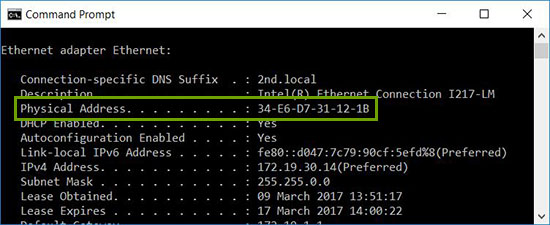
- Type in
ipconfig /alland press Enter. - Note the physical address of your LAN-Adapter.
- Shut down your computer again or send it into standby.
- On another System in your Network, download and open your WOL Tool.
- Configure the physical address of the computer that you want to wake up (here you need the address you noted before).
- And that is it, now run your WOL Tool and the System should wake up and boot to Windows.
Wake-on-LAN troubleshooting
The primary Ethernet port is usually on the side or the back of the computer, and it is listed as Ethernet 1 when you run IPCONFIG. This is the port that supports WOL.
Note: Most modern computers are equipped with an RJ45 network jack. Computers without an integrated network jack need a USB Dongle that is WOL-compliant. Ensure that any USB network adapter is WOL capable before any troubleshooting of the computer.
Once you have confirmed that the network cable is connected to the network adapter on the computer, if WOL still does not function properly, troubleshoot using the following steps:
- Confirm that the AC power is plugged in. WOL does not work when the computer is running on battery. This is by design.
- Confirm that the link light remains on when the computer is powered off. If there is no link light, then there is no way for the network adapter to receive the magic packet to wake the computer.
- Ensure that WOL is enabled in the BIOS under Power Management settings.
- Ensure that Deep Sleep is disabled in the BIOS (not applicable to all computers). This power-saving setting turns off the network adapter.
- It may be necessary to boot to the Windows desktop after changing the BIOS settings in order for them to be properly applied.
- Check the network adapter driver properties in Windows and ensure that WOL is enabled there. These settings can override the BIOS in Windows 10.
- Confirm that the computer sending the magic packet can ping the client computer.
- Confirm that the MAC address used in the magic packet matches the MAC for Ethernet 1 on the client computer.
- If an IP address is specified in the magic packet, then the network switch may not properly broadcast it to the whole network. It may be necessary to change the address to broadcast the packet to the whole network. For example, if the client address is 192.168.1.12, the broadcast address used in the packet would be 192.168.1.255.
- Ensure that the Power Management settings are configured correctly in the Ethernet driver properties, as shown in the examples below:
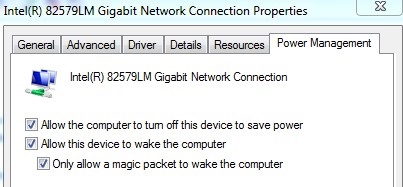
- Enable the following Power Management driver settings as shown for the Intel 82579LM Gigabit Network controller: Allow the computer to turn off this device to save power, Allow this device to wake the computer, and Only allow a magic packet to wake the computer:
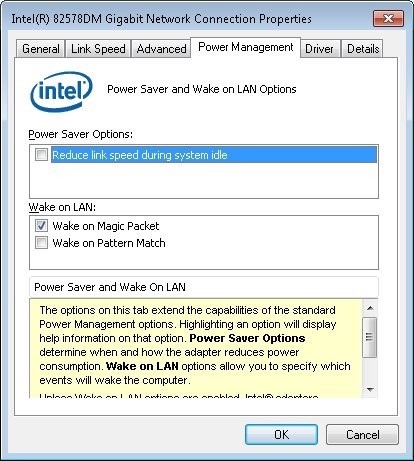
- The Power Management settings shown below for the Intel 82578DM should be configured with the settings Wake on Magic Packet and Wake on Pattern Match enabled, but the Power Save Option Reduce link speed during system idle disabled:
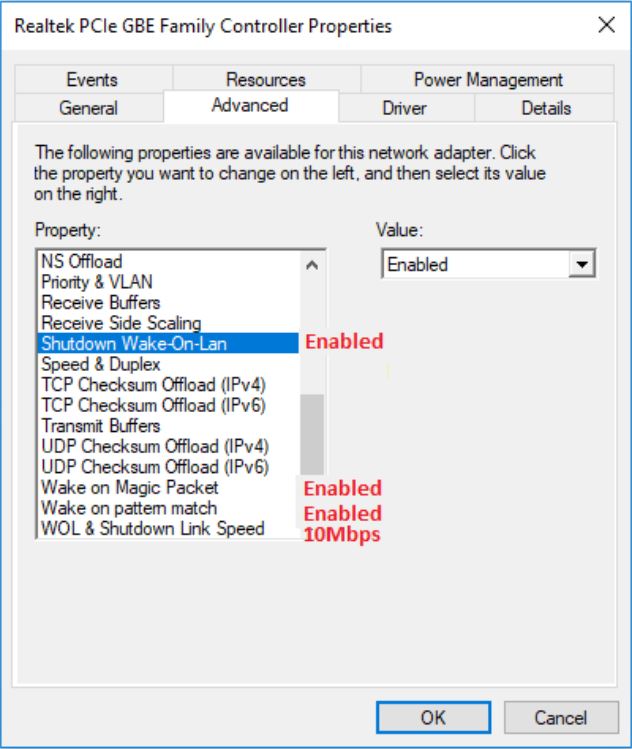
- If the Realtek PCIe GBE network adapter is installed on the computer, then configure the Advanced driver properties for the following settings:
- Shutdown Wake-on-LAN is Enabled
- Wake on Magic Packet is Enabled
- Wake on pattern match is Enabled
- WOL & Shutdown Link Speed is set to 10 Mbps:
- Enable the following Power Management driver settings as shown for the Intel 82579LM Gigabit Network controller: Allow the computer to turn off this device to save power, Allow this device to wake the computer, and Only allow a magic packet to wake the computer:
Additional Information
Recommended Articles
Here are some recommended articles related to this topic that might be of interest to you.