PowerEdge-How to configure the CMC on M1000e, VRTX, or FX2
Summary: Information on how to setup your Chassis Management Controller (CMC) for PowerEdge M1000e, VRTX, FX2 Chassis
This article applies to
This article does not apply to
This article is not tied to any specific product.
Not all product versions are identified in this article.
Instructions
Configuring the Chassis Management Controller (CMC) on the M1000e, VRTX, and FX2 Chassis
- Configuring the CMC Network
- Restore a Backup Configuration
- Configure CMC Date & time using the Web Interface
- Example Videos
Configuring the CMC Network
M1000E or VRTX:
The CMC is Pre-configured for the Dynamic Host Configuration Protocol (DHCP). To use a static IP address, you must switch the CMC setting from DHCP to a static address using either the LCD configuration wizard, or RACADM CLI commands.
You can perform the initial network configuration of CMC before or after CMC has an IP address. If you configure CMC’s initial network settings before you have an IP address, you can use either of the following interfaces:
- The LCD panel on the front of the chassis
- Dell CMC serial console
Once you have the IP Address, you can configure the CMC using either of the following interfaces:
- Remote RACADM
- CMC web interface
The CMC supports both IPv4 and IPv6 addressing modes. The configuration settings for IPv4 and IPv6 are independent of each other.
FX2:
The FX2 Chassis Management Controller (CMC) is pre-configured to use a static IP address. The default IP address of the CMC is 192.168.0.120. The default username is
root, and the password is calvin.
If you must obtain the CMC IP Address configured for DHCP, you can use either of the following interfaces:
- Dell CMC serial console
- Compute Sled Human Interface Infrastructure (HII)
Once you have the IP Address, you can configure the CMC using either of the following interfaces:
- Remote RACADM
- CMC web interface
The CMC supports both IPv4 and IPv6 addressing modes. The configuration settings for IPv4 and IPv6 are independent of each other.
Set the CMC IP address using a Serial Connection
In order to use this method, you must use a management system with a Serial Port or USB/Serial adapter along with a DB9 Serial Cable.
Settings and Log-in Information:
Terminal Settings:
- 8 bits
- No parity
- No flow control
- Baud rate 115200
The default login for the chassis is:
User: root
Password: calvin
To set the CMC IP to DHCP, run the command below:
racadm setniccfg -d
To set the CMC IP to Static, run the command below:
racadm setniccfg -s xxx.xxx.xxx.xxx yyy.yyy.yyy.yyy zzz.zzz.zzz.zzz
IP Address = xxx.xxx.xxx.xxx
Netmask = yyy.yyy.yyy.yyy
Gateway = zzz.zzz.zzz.zzz
Netmask = yyy.yyy.yyy.yyy
Gateway = zzz.zzz.zzz.zzz
Set the CMC IP address using the LCD Panel
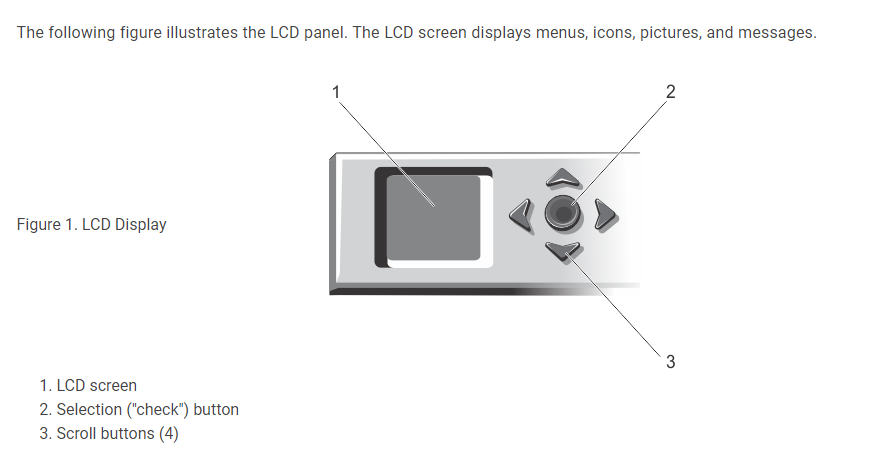
Figure 1: Image of Chassis Front LCD Panel
M1000E:
To set up a network using the LCD configuration wizard:
- If you have not already done so, press the chassis power button to turn it on. The LCD screen displays a series of initialization screens as it turns on. When it is ready, the Language Setup screen is displayed.
- Select a language from the options in the dialog box. The following message is displayed on the enclosure screen:
Configure Enclosure? - Press the center button to continue to the CMC Network Settings screen.
- Configure the CMC network settings for your network environment:
- Network speed
- Duplex mode
- Network mode (DHCP or static)
- Static IP address, subnet mask, and gateway values (if static mode was selected)
- DNS settings
- Review the settings on the Network Summary screen:
- If the settings are correct, press the center button to close the configuration wizard and return to the Main Menu.
- If the settings are not correct, use the left arrow key to return to the screen for that setting and correct it.
After you complete the configuration wizard, the CMC is available on your network.
VRTX:
To set up a network using the LCD configuration wizard:
-
To start the CMC configuration:
-
For a chassis that has not been configured earlier, the LCD Language panel is displayed. On the LCD Language panel, go to the required language using the arrow buttons. When the wanted language is highlighted, select the language by pressing the Center button. The Network Settings panel is displayed.
-
For a chassis that has been configured earlier, the Main Menu panel is displayed. From the Main Menu, select Settings and then Network Settings.
-
-
On the Network Settings panel, select the required mode of setup:
-
Quick Setup (DHCP) - Select this mode to set up CMC quickly using DHCP addresses.
-
Advanced Setup - Select this mode to set up CMC for advanced configurations.
-
Configuring CMC Using Quick Setup (DHCP):
- If you select Quick Setup (DHCP), the panel displays the following message.
About to get DHCP addresses. Ensure the CMC network cable is connected.
- Press the center button, and then wait for a few minutes. The panel displays the Please Wait message, and then CMC IP number is displayed on the IP Summary panel.
CMC IP4: <IP address>
- Press the center button, and then press the center button. The Main Menu panel is displayed.
Configuring CMC Using Advanced Setup:
- On the Network Settings panel, if you select Advanced Setup, the following message is displayed to ask you whether or not you want to configure a CMC.
Configure CMC?
- To configure your CMC by using advanced setup properties, click the center button.
- To select Auto (1 Gb), press the center button, and press the center button again.
- On the Mode screen the available modes are listed (DHCP, Static). Select Static and press the center button.
- Enter the IP address, gateway, and subnet mask by following the instructions on the LCD panel.
- The IP information that you entered is displayed. Press the center button, and then press the center button again to see the following message.
Register DNS?
- To register, select the check icon and press the center button.
- Set the DNS IP address, select the check icon, and then press the center button.
- If DNS registration is not required, then select the 'X' icon and press the center button.
- Indicate whether or not you want to configure iDRAC:
Note: You can also configure iDRAC from the CMC web interface. For more information about configuring the IDRAC, you can view the online manual from Dell Support.
- No: Select the 'X' icon then press the center button.
- Yes: Select the check icon then press the center button.a
- The following question should be displayed on the screen.
Apply All Enclosure Settings?
- To apply all enclosure settings, select the check icon and press the center button.
- On the IP Summary panel, after the 30s wait, review the configuration to ensure that the addresses are correct.
- To correct a setting, press the left arrow icon, and then press the center key to return to the screen for that setting. After correcting an IP address, press the center button.
- When you have confirmed that the settings you entered are accurate, press the center button, and then press the center button. The Main Menu panel is displayed.
The CMC is now available on the network. You can access the CMC on the assigned IP address using the Web interface or CLIs such as a serial console, and SSH.
Set the CMC IP address using the Web Interface
Configuring CMC Using Advanced Setup:
- Connect to the CMC using a Web Browser pointing to the CMC's IP Address.
- Login using
rootuser credentials - In the left pane, click Chassis Overview, and then click Network. The Network Configuration page displays the current network settings.
- Modify the General, IPv4, or IPv6 settings as required.
- Click Apply Changes for each section to apply the settings.
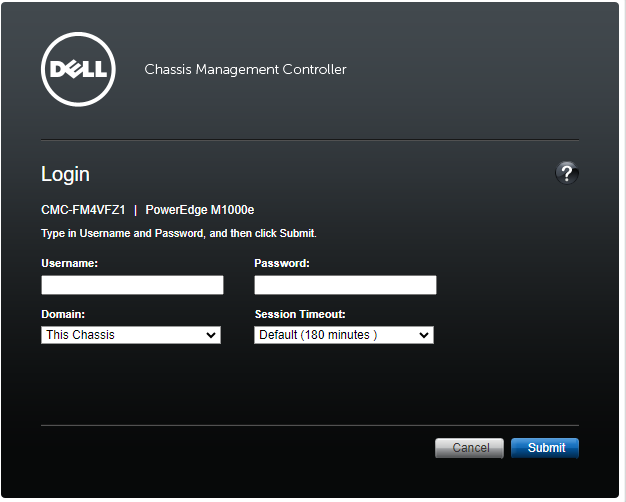
Figure 2: Image of CMC Login Page
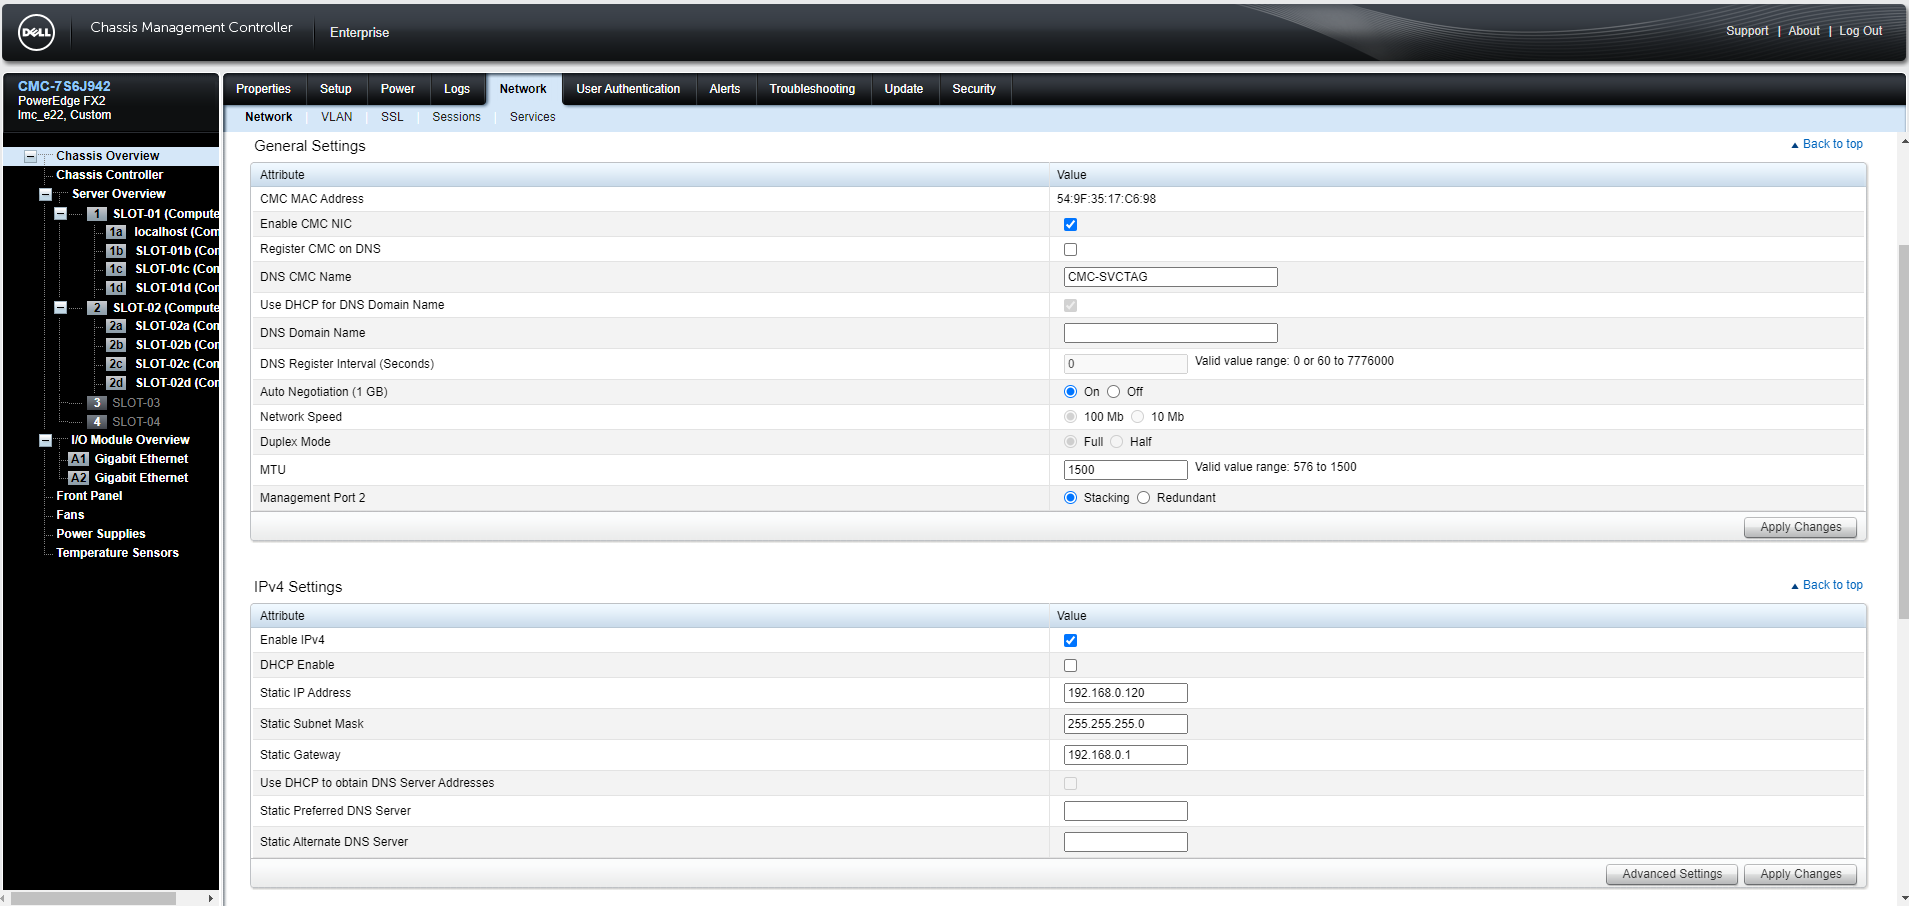
Figure 3: Image of the CMC Network Section
Identify the CMC IP address using the Sled HII (FX2)
- Connect external monitor and keyboard to the chassis KVM.
- Set Chassis KVM to the sled you want to use.
- Power the sled.
- Enter System Setup by pressing F2 - System Setup when the post screen indicates.
- Once in System Setup, select iDRAC Settings.
- Scroll down and select System Summary.
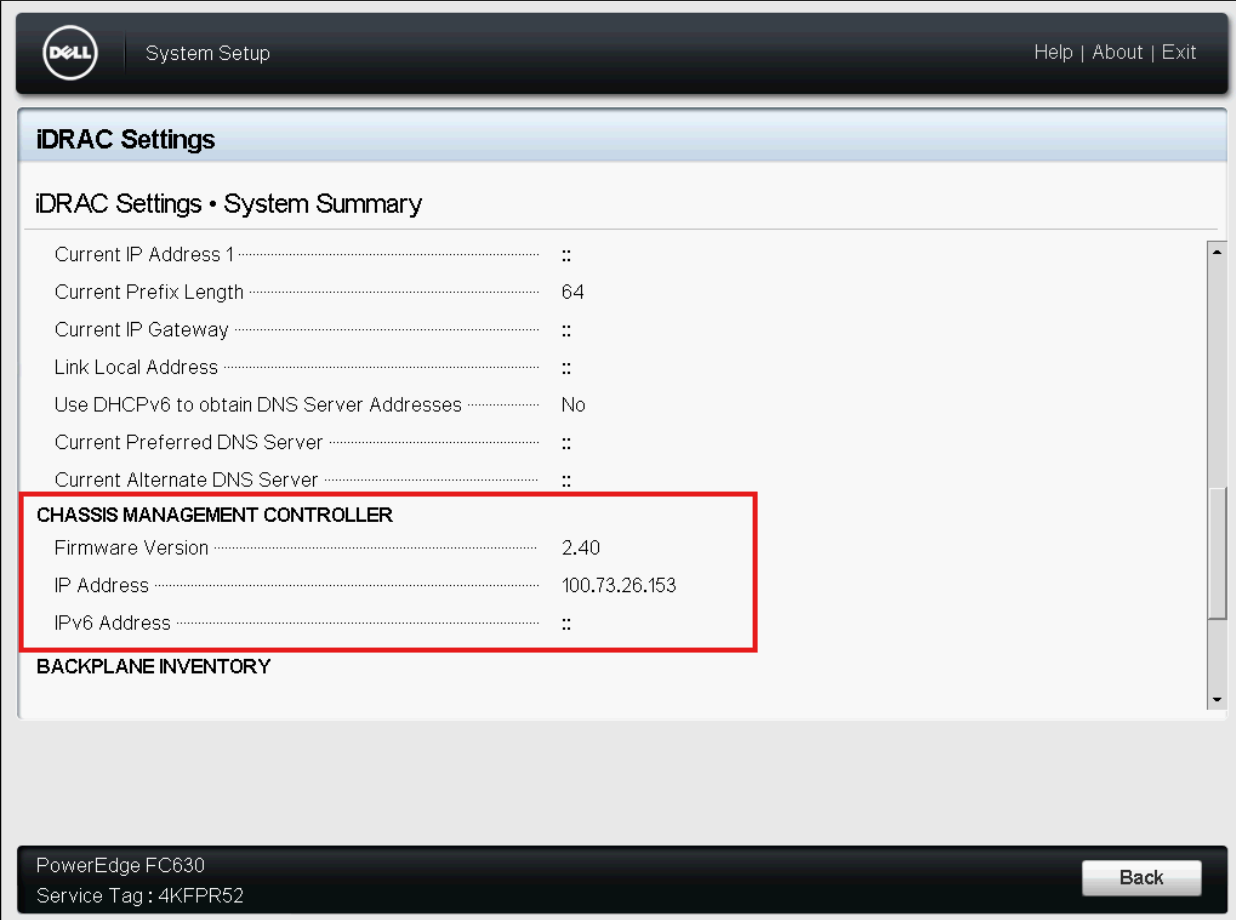
Figure 4: Image of the IDRAC Settings System Summary Page
Restore a Backup Configuration
You can restore the configuration of a chassis by importing the backup file (.xml or .bak) on the local management station or the network share to which the chassis configurations were saved. The configurations include all the properties available through the CMC web interface, RACADM commands, and settings.
To restore the chassis configuration, perform the following tasks:
- From Chassis Overview, select Setup and then the Profiles page.
- In the Restore Configuration > Restore Chassis Configuration section, click Browse, and select the backup file to import the saved chassis configuration.
- Click Restore Configuration to upload an encrypted backup file (.bak) or an .xml stored profile file to the CMC.
The CMC web interface returns to the login page after a successful restore operation.
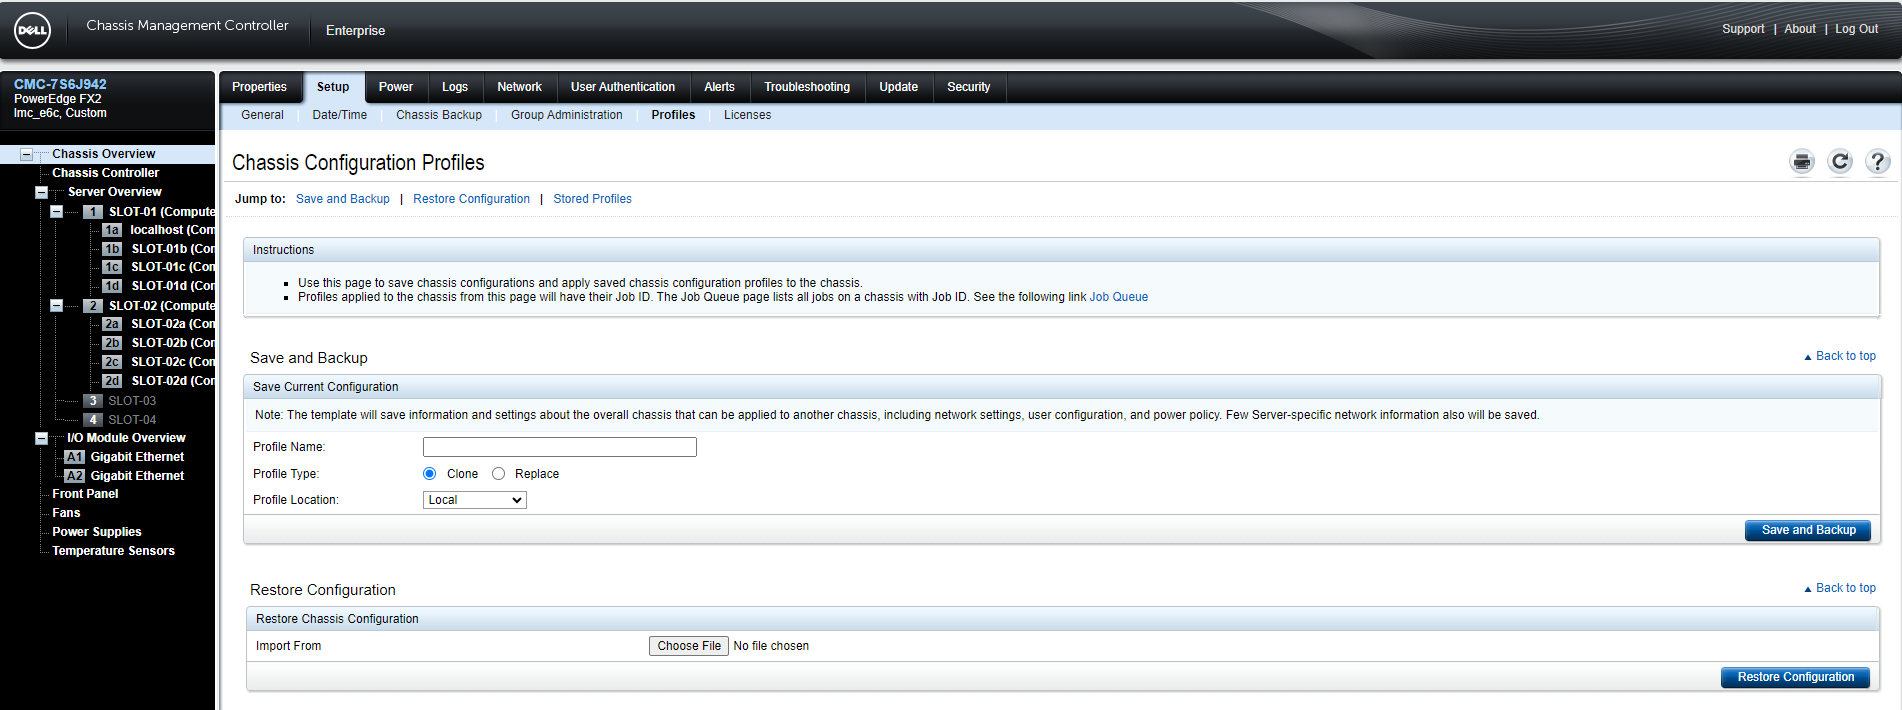
Figure 5: Chassis Configuration Profiles Page
Configure the CMC Date & time using the Web Interface
To set the date and time on CMC:
- In the left pane, click Chassis Overview > Setup > Date Time.
- To synchronize the date and time with a Network Time Protocol (NTP) server, on the Date Time page, select Enable NTP and specify up to three NTP servers. To manually set the date and time, clear the Enable NTP option, and then edit the Date & time fields.
- Select the Time Zone from the drop-down menu, and then click Apply
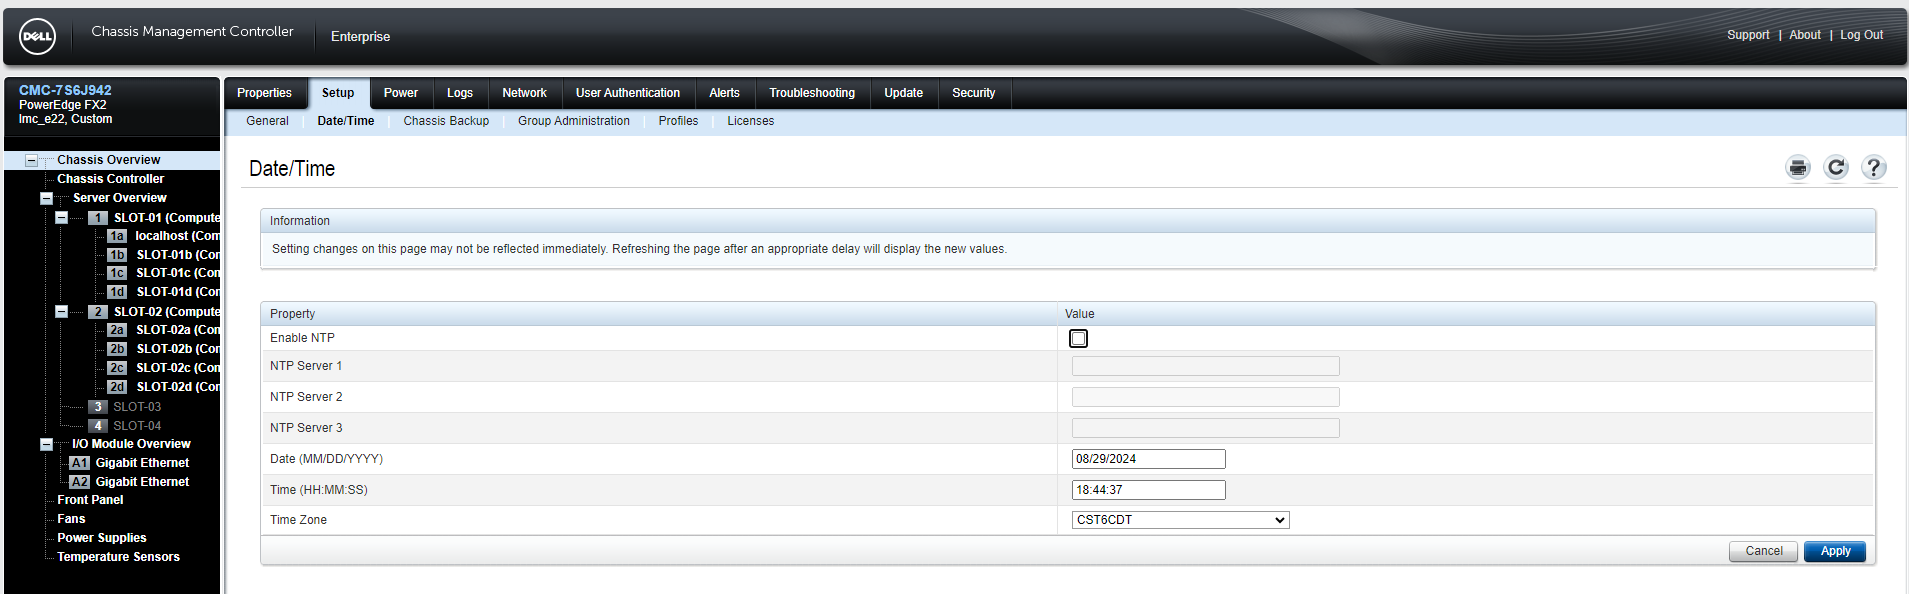
Figure 6: Image of the CMC Date & time Page
Example videos
How to configure the VRTX using the Front LCD Panel.
Duration: 00:8:20 (hh:mm:ss)
When available, closed caption (subtitles) language settings can be chosen using the CC icon on this video player.
Configure the CMC using a Serial Connection.
Additional Information
See related documentation on Dell Support:
Affected Products
Chassis Management Controllers, PowerEdge FX2/FX2s, PowerEdge M1000E, POWEREDGE VRTXArticle Properties
Article Number: 000128544
Article Type: How To
Last Modified: 07 May 2026
Version: 12
Find answers to your questions from other Dell users
Support Services
Check if your device is covered by Support Services.