VNX1/VNX2: How to Install VNX Launcher that has Embedded Java and Firefox (User Correctable)
Summary: If Java is not installed or Java 9 has been installed on a workstation or personal computer, then Unisphere Launcher is required to open Unisphere.
This article applies to
This article does not apply to
This article is not tied to any specific product.
Not all product versions are identified in this article.
Instructions
What is the VNX Launcher?
VNX Launcher is the Unisphere Client for Windows, it is a host-based version of the Unisphere management tool.
This version of the Unisphere client includes a browser with a self-contained Java Runtime Environment (JRE) and does not require Java to be installed.
Older versions of the Unisphere Client application and on-array Unisphere do not support Java 9. If the Windows management station is upgraded to Java 9, this Unisphere Client version is required for use with VNX1 and VNX2 arrays.
How to install the VNX Launcher that has embedded Java and Firefox:
- Download VNX Launcher using the link below and follow the installation wizard:
https://dl.dell.com/downloads/1PHV6_Unisphere-Client-1.3.21.1.0322-(self-contained-JRE)-for-Windows---English.exe - Once installation is complete, configure Java. This is a one-time setup.
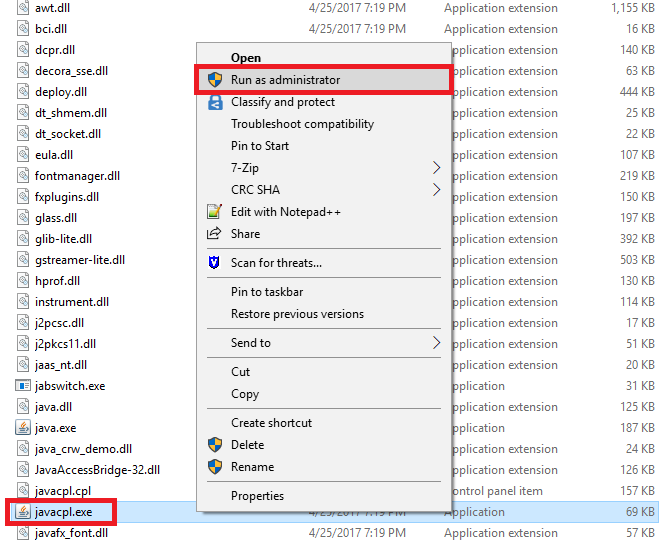
- Open the Java control panel by running javacpl.exe as administrator. This is located in the VNX Launcher install folder, "C:\Program Files (x86)\EMC\Unisphere VNX Management Launcher\CommonFiles\Java\bin"
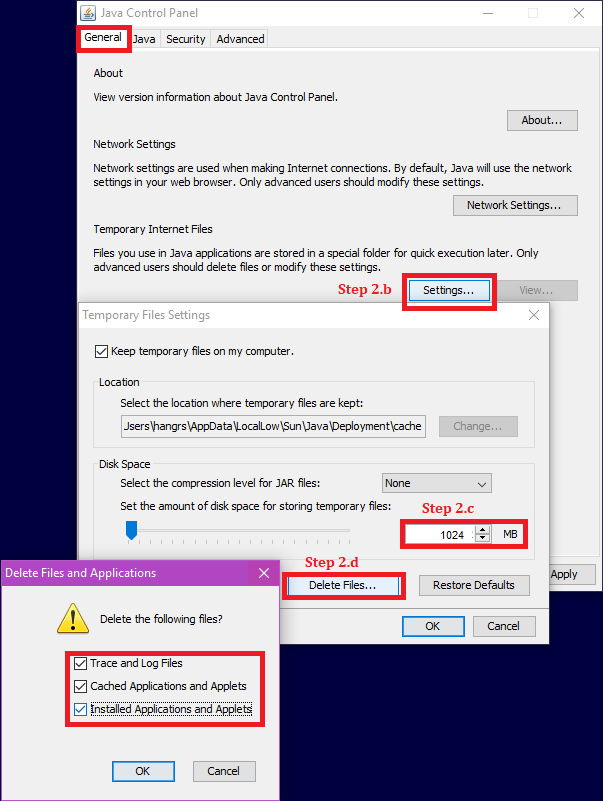
- Under the General tab, go to Settings.
- Adjust disk space to 1024.
- Click Delete Files..., check all boxes, then click OK.
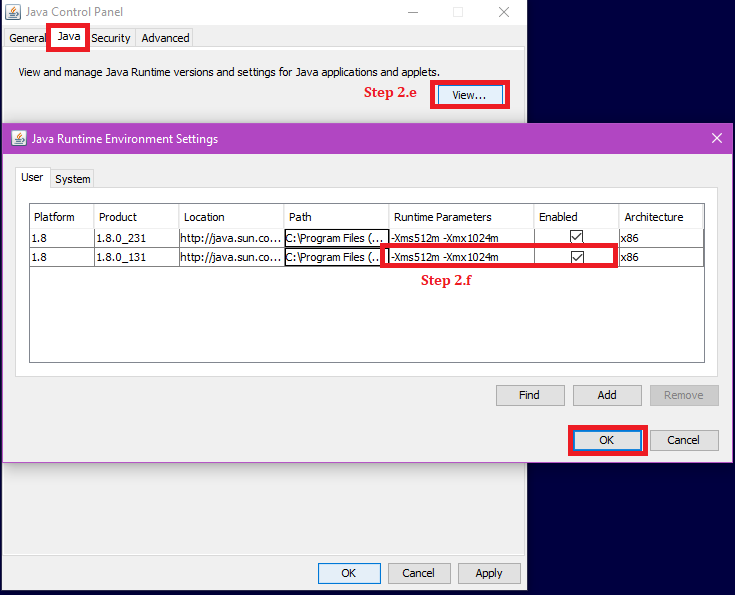
- Select the Java tab, then click View.
- On the Java Runtime Environment Settings window, add
-Xms512m -Xmx1024mto the Runtime Parameters, then click OK.- Note: If there is any 64-bit Java installed, disable that version.
- Java 1.8.0_131 is the embedded Launcher version.
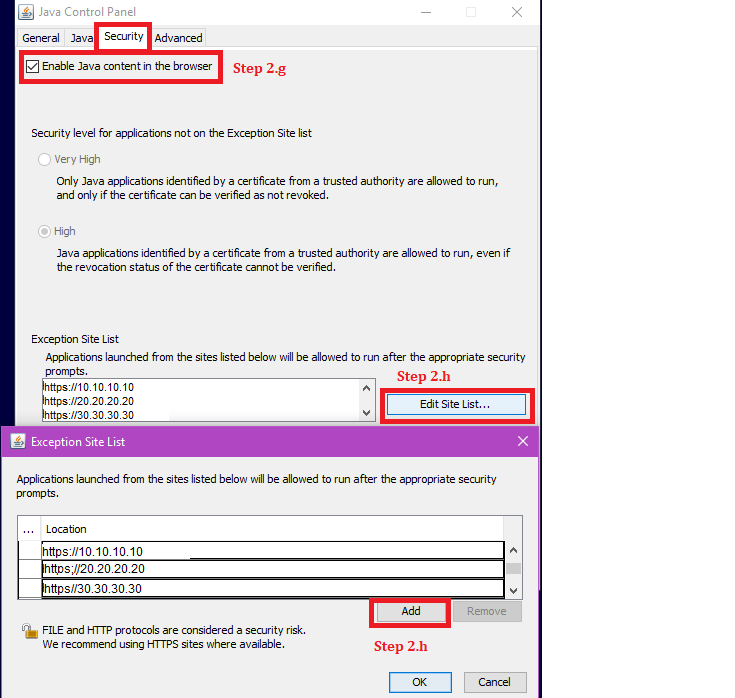
- Select the Security tab, and then confirm the checkbox for Enable Java content in the browser is checked.
- Under the Security tab, click Edit Site Lists… to add the array URL to the Exception Site List, then click OK. The array URL can be the IP of a Control Station, Storage Processor A, or Storage Processor B.
For example: https://10.10.10.10
- Click Apply

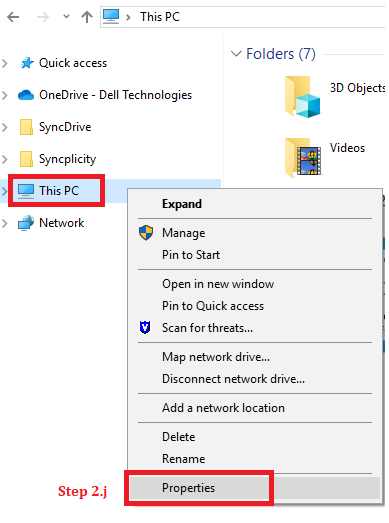
- Open File Explorer, right-click This PC, then go to Properties
- Go to Advanced System Setting
- Under the Advanced tab, click Environment Variables
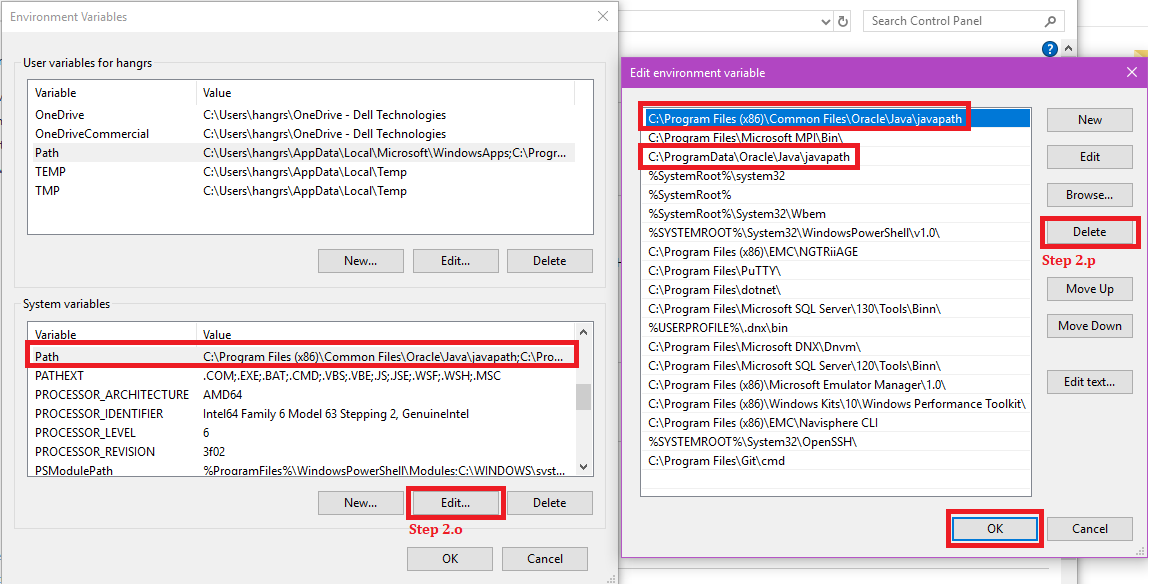
- Under System variables, click Edit on Path
- Add the VNX Launcher Java path: "C:\Program Files (x86)\EMC\Unisphere VNX Management Launcher\CommonFiles\Java\bin\" and move the path to the top of the list, then click OK.

- Note: If there is any Java path entry that no longer exists, it should be deleted.
- Under System variables, Select Path and click Edit
- Delete the invalid Java path entries, then click OK. For example:
- Open the Java control panel by running javacpl.exe as administrator. This is located in the VNX Launcher install folder, "C:\Program Files (x86)\EMC\Unisphere VNX Management Launcher\CommonFiles\Java\bin"
- Run VNX Launcher
- Open VNX Launcher
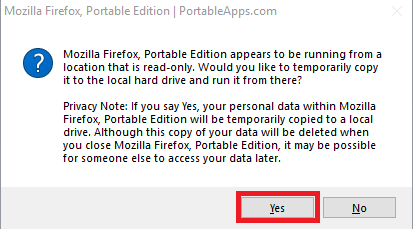
- If there is a warning about Firefox to be opened from a location that is read-only, select Yes to continue.
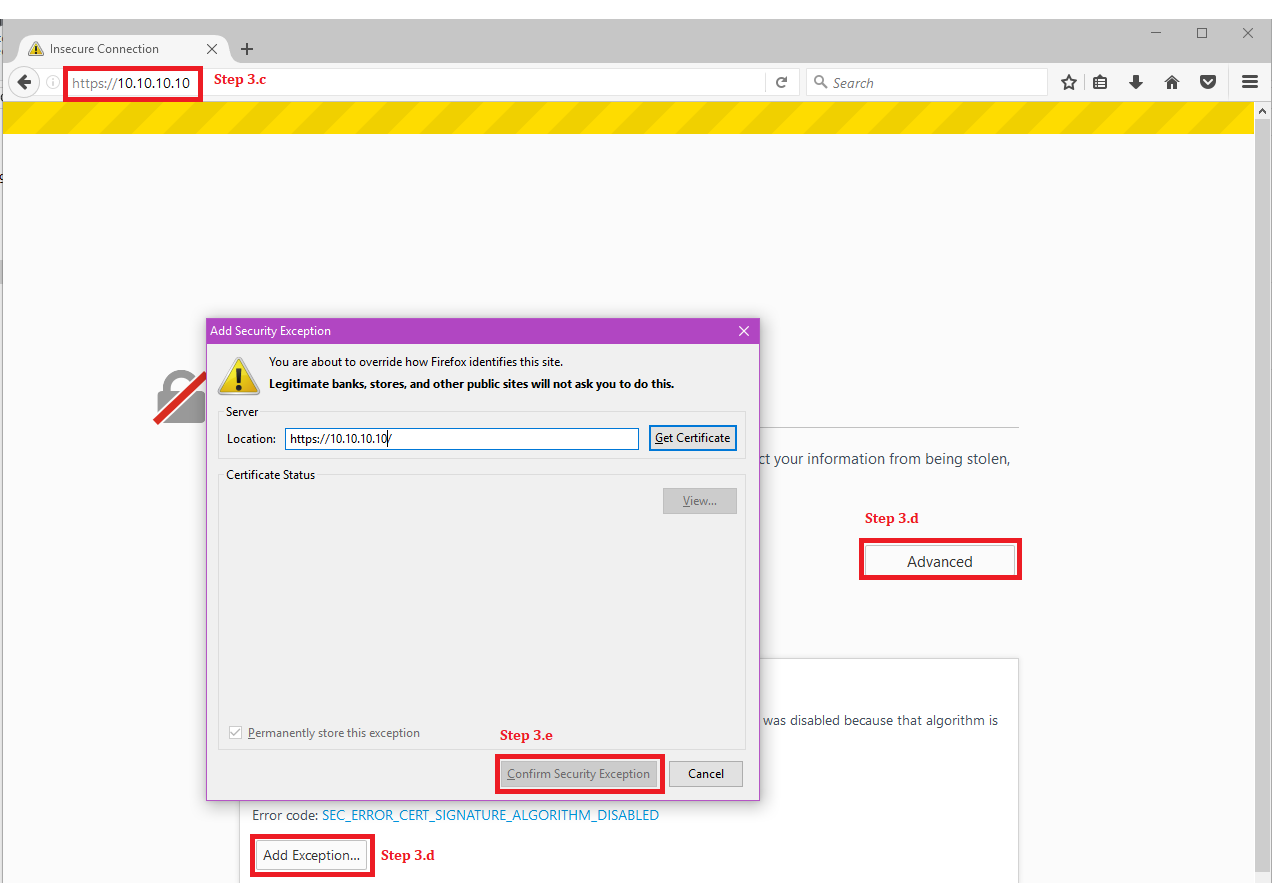
- Type in the array URL
- If the ensured connection warning page is received, click Advanced, then Add Exception
- Under the Add Security Exception window, click Confirm Security Exception
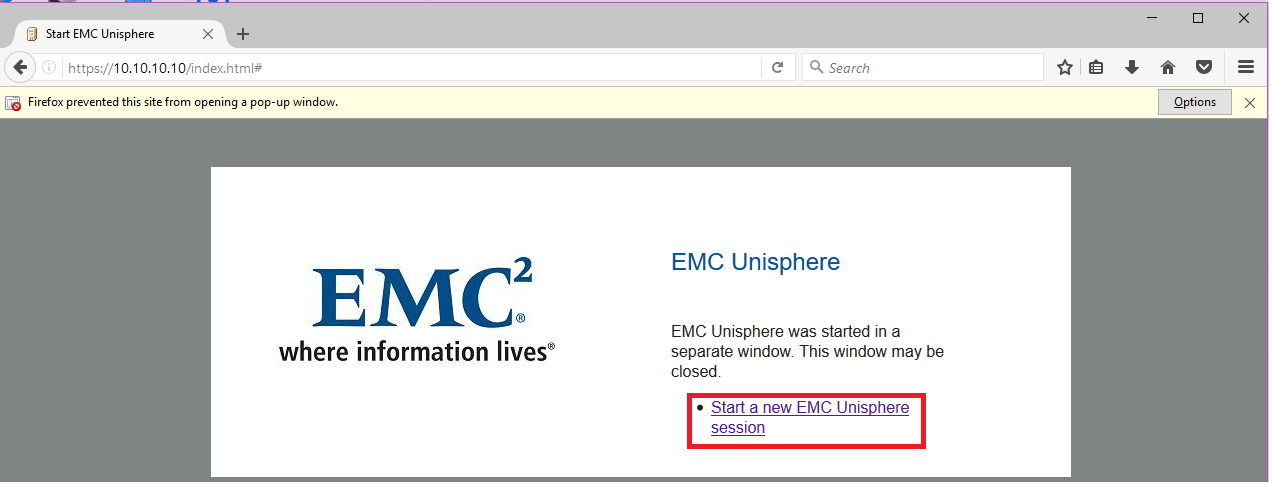
- Click Start a new EMC Unisphere session
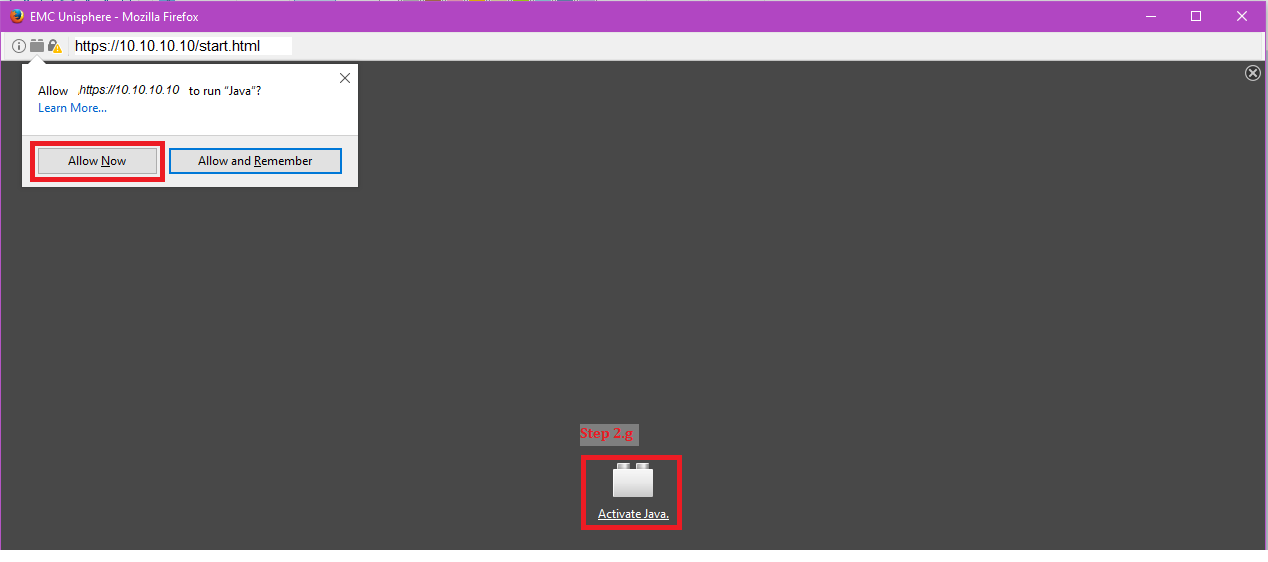
- Choose Activate Java, then Allow Now
- If there is a Java Update Needed warning message, choose Later to continue.
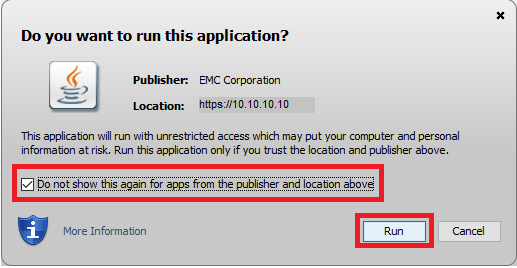
- If there is a Java security warning, select the I accept the risk and want to run this application and click Run
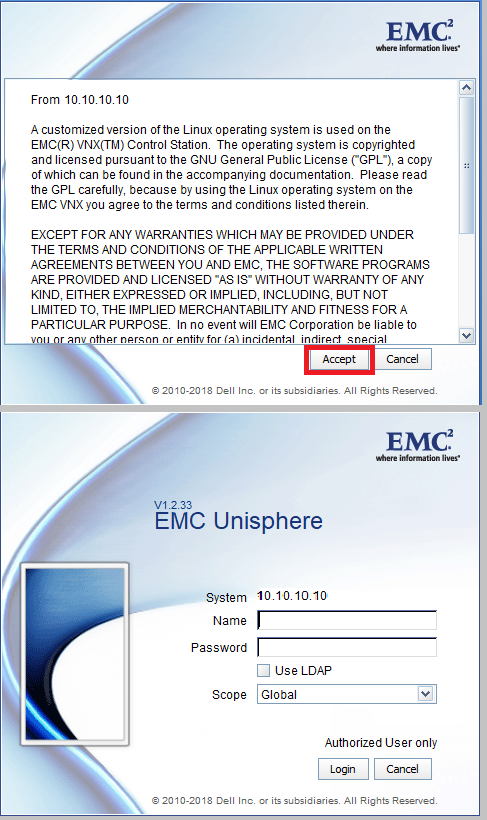
- Click Accept to continue to the Unisphere login page.
Additional Information
For convenience, create a shortcut of javacpl.exe, from step 2.a, and send it to the desktop to add additional arrays' IPs, step 2.h.
If VNX Launcher still reports a Java error after following steps above, perform the following:
If VNX Launcher still reports a Java error after following steps above, perform the following:
- Uninstall Java from the workstation by using JavaUninstallTool.exe from link below.
- Delete all invalid Java path entries from Environment variables, see step 2.p in the instruction paragraph.
- Re-install VNX Launcher
Affected Products
VNX2 SeriesProducts
VNX1 Series, VNX2 SeriesArticle Properties
Article Number: 000019852
Article Type: How To
Last Modified: 23 Sep 2024
Version: 6
Find answers to your questions from other Dell users
Support Services
Check if your device is covered by Support Services.