How to Install the Operating System on a Dell PowerEdge Server
Summary: The PowerEdge embedded LifeCycle Controller provides a simplified method for installation of supported Windows Server and Linux server operating systems with the OS Deployment feature. This article explains how to use the iDRAC LifeCycle Controller to install a supported operating system on most Dell PowerEdge servers. Step-by-step instructions and OS installation videos for Windows Server, Ubuntu Server LTS, SUSE Linux Enterprise Server, or Red Hat Enterprise Linux installation with LifeCycle Controller. ...
Symptoms
Table of Contents
Cause
Resolution
1. Prerequisites
1.1 PowerEdge supported Operating Systems.
Ensure that the operating system is supported by your PowerEdge server. Compatible and supported operating systems for PowerEdge servers are available in the PowerEdge supported Operating Systems matrix.
1.2 Update the Server.
It is best practice to update the OS Driver Pack for the latest operating system drivers, before installing a new operating system. Download the latest OS Driver Pack from the support site.
- Access the support site, enter the service tag of your system or click Browse all products and select your product.
- Click the DRIVERS and DOWNLOADS tab, type "Dell OS Driver Pack" in the keyword box, and download then upload to the Dell OS Driver Pack to the iDRAC update and rollback section. For more information, see Dell KB article Dell PowerEdge: Update the firmware of Single System Components Remotely Using the iDRAC.
1.3 Installation Source
For installing the operating system, the OS source media has to be available to the server. The installation files can be provided through:
- The optical DVD drive
- USB device
- PXE network boot
- Mounted ISO-file (through iDRAC Virtual Media)
1.4 Storage Location
For installing the operating system on a virtual disk, ensure that a Software RAID or PowerEdge RAID controller is installed and at least two (or more, depending on the required RAID level) hard drives are available. In specific scenarios, OS can be installed on SD cards.
2. Installing the Operating System
Two methods are available for installing an operating system:
- Using LifeCycle Controller for Supported OS
- Windows Server
- Linux-Based Distributions
- How to Mount and Unmount the driver packs using iDRAC9 on a Dell PowerEdge Server.
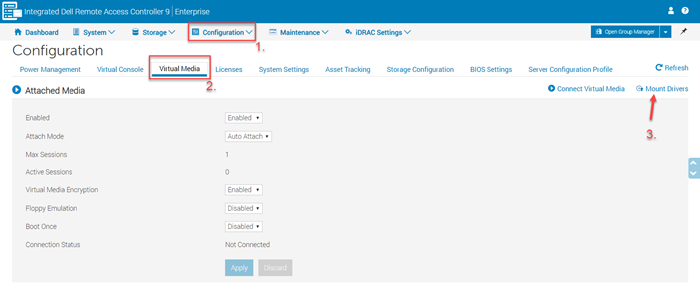
Log in to the server's iDRAC9, go to 1. Configuration > 2 Virtual Media > 3.Mount Drivers

Figure 1: iDRAC9 Virtual Media - Click the Mount Drivers button. For more information about Mounting and Unmounting the driver packs, see How to Mount and Unmount the driver packs using iDRAC9.
-
Boot directly from the OS Media:
- VMware ESXi distributions
- OS Installation on PowerEdge T20/T30/T40
- Nonsupported OS by LfeCycle Controller
2.1 Using the LifeCycle Controller
This is the preferred method to install the OS. The LifeCycle Controller simplifies the installation of the Operating System with the "OS Deployment" feature. The drivers are preloaded before the installation process when using this feature. The OS installs seamlessly due to its comprehensive compatibility with all hardware components.
- A wizard is displayed to assist with the initial configuration when accessing the LifeCycle Controller for the first time. If needed, configuration steps are detailed in the manual: Initial Configuration of the Dell Lifecycle Controller.
- If installing Windows Server 2022, additional BIOS configurations must be made. For more information, reference Trusted Platform Module (TPM) Support for Windows Server 2022 Operating System.
Steps to follow:
- Press F10 during boot to enter the Lifecycle Controller (LCC).

Figure 2: Lifecycle Controller - Select OS Deployment in the left side menu.

Figure 3: OS Deployment and Deploy OS - Click Deploy OS.
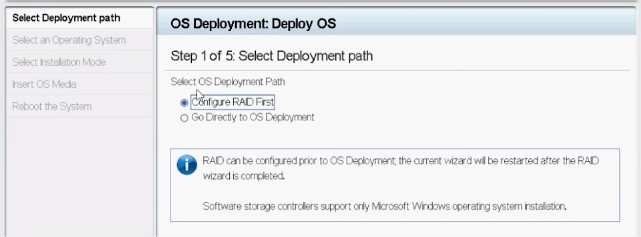
- Select Configure RAID First or Go Directly to OS Deployment depending on if you have a RAID set up already or not.

Figure 4: Configuring a deployment path - If applicable, follow the wizard to set up the RAID disk.
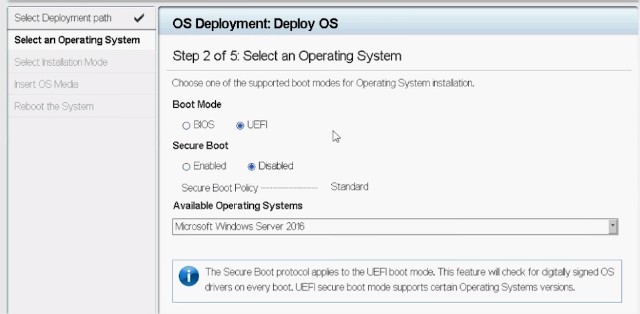
- Select the Operating System. The boot mode can be set in BIOS or UEFI. The matching boot mode must be configured properly in the "System Services" settings (F2).

Figure 5: Selecting an operating system - Either select Manual or select Unattended/Automatic install as needed.
- Insert the OS installation media (DVD Drive or Virtual Media of iDRAC).
- Follow the OS installation wizard (If Manual install has been selected).

Figure 6: PowerEdge 12G Lifecycle Controller UI
2.2 Booting directly from the Operating System Media
It is possible to boot directly from the OS installation media to install the operating system. Some components of the server may not be recognized as the OS media may not include all the needed drivers. Drivers can be downloaded from the Dell Support site and installed later once the OS is installed.
Steps to follow:
- Insert the OS installation media (DVD Drive, USB, Virtual Media of iDRAC) and boot on it.
- Press F11 during startup to select the boot device.
- Follow the OS installation wizard.
- Once the OS is installed, manually install the missing drivers.
3. Installation Videos
- YouTube: Installation of Windows Server on a Dell Server using LifeCycle Controller (W2022)
This video demonstrates the process of installing a Windows OS using the Lifecycle Controller. - YouTube: OS Deployment - Manual Installation
This video demonstrates the process of installing the operating system using Lifecycle Controller Manual Installation mode. - YouTube: Unattended OS Installation, BIOS Mode
Lifecycle Controller provides an infrastructure for OS loaders to consume the OS configuration files for OS deployment with minimal manual intervention in the BIOS mode. - YouTube: Unattended OS Installation, UEFI Mode
Lifecycle Controller provides an infrastructure for OS loaders to consume the OS configuration files for OS deployment with minimal manual intervention in the UEFI mode. - YouTube: OS Deployment - Installing and configuring Red Hat Enterprise Linux 7 by using PXE install method
This video demonstrates the installing and configuring Red Hat Enterprise Linux 7 by using the PXE install method on an onboard storage controller. - YouTube: OS Deployment (VMware ESXi) - Installing Using CD/DVD - This video demonstrates how to install and configure VMware ESXi from a CD or DVD to an SD card placed in the Internal dual SD module on a PowerEdge Server.
4. Troubleshooting FAQs
4.1 Which OS is supported on my PowerEdge server?
Dell collaborates with Operating System vendors to ensure consistent and reliable performances. The Operating System Library page provides the list of supported OS per PowerEdge model. An unsupported operating system may cause failures during the installation process or not work properly with hardware components.
4.2 Which licenses or subscriptions for the OS do I need?
To enable all functions of an operating system. A license (Windows and ESXi) or subscription (Linux) might be required. Here you find links to the most common vendors of supported operating systems:
Licensing resources:Subscription resources for:
4.3 How to find drivers on the Dell home page?
If drivers for hardware components are not in the operating system, download the missing software from the Dell home page:
-
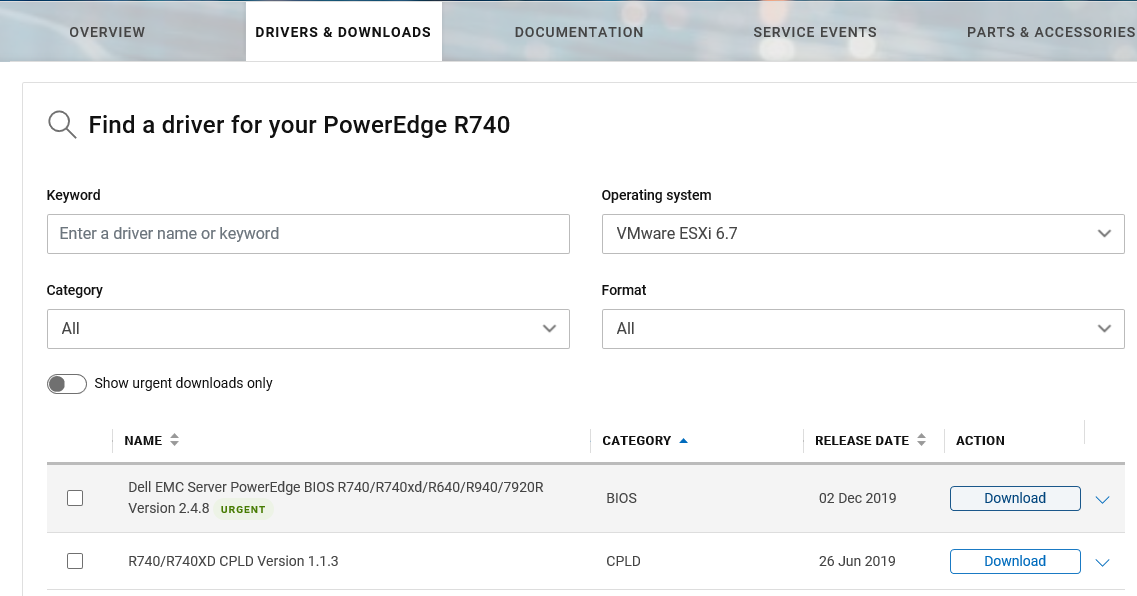
Go to https://www.dell.com/drivers and then choose the required system type by entering the Service Tag or selecting the product type manually.
-
Select the installed operating system, enter a matching Keyword in the intended field, and press Enter.
-
The corresponding drivers are shown below. Click the download sign to receive the required file.

Figure 8: Software search on Dell support site
4.4 What is the factory password for preinstalled VMware ESXi?
Since the 14th generation of Dell PowerEdge servers, a factory password is set for preinstalled VMware ESXi. The root password is the Service Tag of the machine followed by the character "!". This can be changed during deployment. Example: "AAAXXX1!".
Find more details in the dedicated Dell KB article Dell VSAN Ready Node: What is the Default VMware ESXi root password for 14G Servers?
The LifeCycle Controller requires a standard Windows retail media to go to the installation. The LifeCycle Controller does not support the Volume License media. Three solutions are possible:
- See Dell KB article How to Mount and Unmount the driver packs using iDRAC9.
- Boot directly on the Volume License media and use the Windows Operating system installer. It is required to manually inject the RAID Controller driver to detect the array and the virtual disks. The best way to find the appropriate driver is by using the service tag on the Dell.com/Support site and select the PERC driver.
- How to load PERC drivers: When deploying an operating system without using the OS Deployment feature, the RAID Controller drivers may not be in the installation wizard. As a result, no available partition is displayed during the installation. You may need to use different media (USB, CD/DVD, etc) with the latest PERC drivers from the Dell Support site to proceed with the installation.
- How to load USB 3 drivers: Windows Server versions older than 2012 (including WS 2008 R2 w/SP1) do not support USB 3.0 natively. How to inject USB 3.0 drivers into Windows Server 2008 R2SP1 for use on Dell R230, R330, T30, T130, T330 is explained in How to inject USB 3.0 drivers into Windows Server 2008 R2SP1 for use on Dell R230, R330, T30, T130, T330.
- Run the installation with a standard retail media with the LifeCycle Controller and use the volume license key to activate the Operating System.
Additional Information
Related Resources
Here are some recommended articles related to this topic that might be of interest to you.