如何為 Dell Data Security 伺服器配置 SMTP 設定
Summary: 您可以依照以下指示,為 Dell Data Security / Dell Data Protection 伺服器設定 Simple Mail Transfer Protocol (SMTP)。
This article applies to
This article does not apply to
This article is not tied to any specific product.
Not all product versions are identified in this article.
Symptoms
本文提供在 Dell Security Management Server (先前稱為 Dell Data Protection | Enterprise Edition) 和 Dell Security Management Server Virtual (先前稱為 Dell Data Protection | Virtual Edition) 配置 SMTP 伺服器的相關資訊。
受影響的產品:
Dell Security Management Server
Dell Data Protection | Enterprise Edition
Dell Security Management Server Virtual
Dell Data Protection | Virtual Edition
受影響的版本:
v8.0.0 及更新版本
受影響的作業系統:
Windows
Linux
Cause
不適用。
Resolution
需要為 Dell Security Management Server 或 Dell Security Management Server Virtual 手動配置 SMTP。如需詳細資訊,請按一下適當的伺服器類型。
若要輸入 SMTP 伺服器資訊:
- 登入 Dell Security Management Server。
- 停止所有 [PRODUCT] 服務。
注意:
- [PRODUCT]=
- v8.15 及更早版本 = Dell
- v8.14.1 及更早版本 = Dell Data Protection
- 如需更多資訊,請參閱如何在 Dell Security Management Server/Dell Data Protection Enterprise Edition Server 中停止與開始服務。
- 在 Windows Explorer 中,前往
C:\Program Files\Dell\Enterprise Edition\Server Configuration Tool\並按兩下Credant.Configuration.exe以開啟伺服器組態工具。

注意:如果 Dell Security Management Server 安裝至自訂位置,則目錄會有所不同。
- 在伺服器組態工具中,按一下 SMTP 標籤。

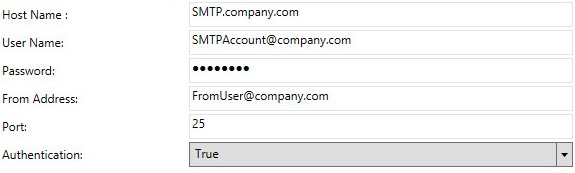
- 從 SMTP 功能表:
- 填入 SMTP 主機名稱。
- 為 SMTP 伺服器填入使用者名稱。
- 填入使用者的密碼。
- 在電子郵件訊息中填入寄件人地址。
- 填入 SMTP 連接埠。
- 將認證選取為「True」或「False」。
注意:
- 您環境中的主機名稱、帳戶、連接埠和設定可能會有所不同。
- 如果環境需要驗證才能轉送,請將認證設為「True」。如果轉送不需要認證,請將認證設為「False」。
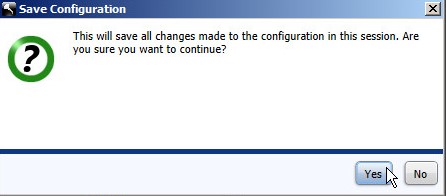
- 按一下組態,然後選取儲存。
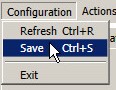
- 按一下是。
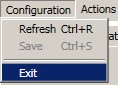
- 按一下組態,然後按一下結束。
- 啟動所有 [PRODUCT] 服務。
在 Dell Security Management Server Virtual 中輸入 SMTP 伺服器資訊的步驟會因版本而異。如需詳細資訊,請按一下適當的版本。如需版本資訊,請參閱如何識別 Dell Data Security/Dell Data Protection 伺服器版本。
若要輸入 SMTP 伺服器資訊:
- 使用預設系統管理員 (
delluser) 登入資料登入 Dell Enterprise Server Virtual 管理主控台。

注意:
- Dell Security Management Server Virtual 的預設登入資料為:
- 使用者名稱:
delluser - 密碼:
delluser
- 使用者名稱:
- 系統管理員可以變更在產品的虛擬裝置選單中的預設密碼。
- 在主功能表中,選取進階組態,然後按下 Enter 鍵。
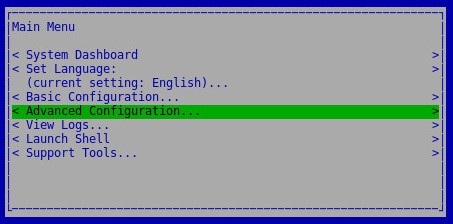
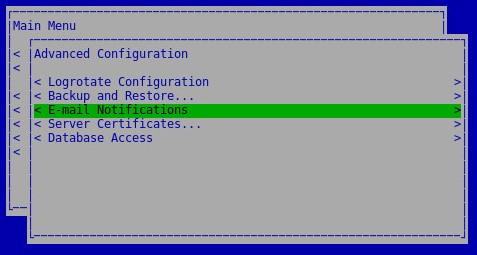
- 選取電子郵件通知,然後按下 Enter 鍵。
- 在「設定電子郵件通知」功能表中:
- 勾選啟用電子郵件警示。
- 填入 SMTP 伺服器主機名稱。
- 填入 SMTP 連接埠。
- 填入 SMTP 使用者。
- 填入 SMTP 使用者的密碼。
- 在通知傳送位址填入帳戶。
- 在將伺服器狀態傳送至填入電子郵件。
- 在將密碼變更傳送至填入電子郵件。
- 在將軟體更新傳送至填入電子郵件。
- 您也可以勾選服務警示提醒,然後填入提醒間隔 (以分鐘為單位)。
- 選取摘要報告的頻率。
- 選取確定。
- 按 Enter 鍵。
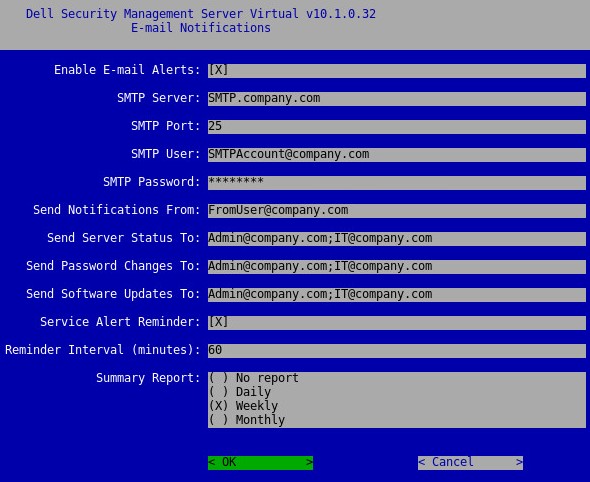
注意:
- 您環境中的主機名稱、帳戶、連接埠和設定可能會有所不同。
- 多個電子郵件地址可使用分號分隔。
若要輸入 SMTP 伺服器資訊:
- 使用預設系統管理員 (
ddpuser) 登入資料登入 Dell Enterprise Server Virtual 管理主控台。

注意:
- Dell Security Management Server Virtual 的預設登入資料為:
- 使用者名稱:
ddpuser - 密碼:
ddpuser
- 使用者名稱:
- 系統管理員可以變更在產品的虛擬裝置選單中的預設密碼。
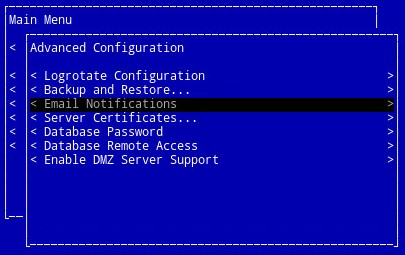
- 在主功能表中,選取進階組態,然後按下 Enter 鍵。

- 選取電子郵件通知,然後按下 Enter 鍵。
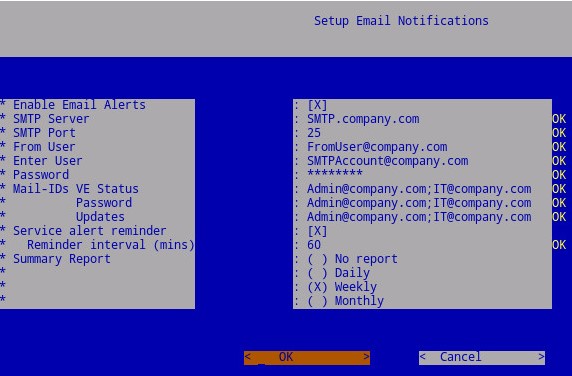
- 在「設定電子郵件通知」功能表中:
- 勾選啟用電子郵件警示。
- 填入 SMTP 伺服器主機名稱。
- 填入 SMTP 連接埠。
- 在寄件使用者填入 SMTP。
- 在使用者填入 SMTP (Enter)。
- 填入 SMTP 使用者的密碼。
- 填入要傳送 VE 狀態通知的電子郵件。
- 填入要傳送密碼變更通知的電子郵件。
- 填入要傳送軟體更新通知的電子郵件。
- 您也可以勾選服務警示提醒,然後填入提醒間隔 (以分鐘為單位)。
- 選取摘要報告的頻率。
- 選取確定。
- 按 Enter 鍵。
注意:
- 您環境中的主機名稱、帳戶、連接埠和設定可能會有所不同。
- 多個電子郵件地址可使用逗號或分號分隔。
若要輸入 SMTP 伺服器資訊:
- 使用預設系統管理員 (
ddpuser) 登入資料登入 Dell Enterprise Server Virtual 管理主控台。

注意:
- Dell Security Management Server Virtual 的預設登入資料為:
- 使用者名稱:
ddpuser - 密碼:
ddpuser
- 使用者名稱:
- 系統管理員可以變更在產品的虛擬裝置選單中的預設密碼。
- 在主功能表中,選取進階組態,然後按下 Enter 鍵。

- 選取電子郵件通知,然後按下 Enter 鍵。

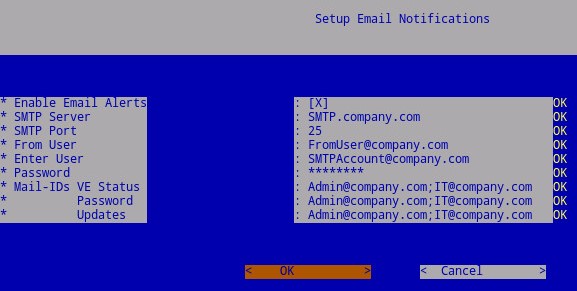
- 在「設定電子郵件通知」功能表中:
- 勾選啟用電子郵件警示。
- 填入 SMTP 伺服器主機名稱。
- 填入 SMTP 連接埠。
- 在寄件使用者填入 SMTP。
- 在使用者填入 SMTP (Enter)。
- 填入 SMTP 使用者的密碼。
- 填入要傳送 VE 狀態通知的電子郵件。
- 填入要傳送密碼變更通知的電子郵件。
- 填入要傳送軟體更新通知的電子郵件。
- 選取確定。
- 按 Enter 鍵。
注意:
- 您環境中的主機名稱、帳戶、連接埠和設定可能會有所不同。
- 多個電子郵件地址可使用逗號或分號分隔。
如要聯絡支援部門,請參閱 Dell Data Security 國際支援電話號碼。
請前往 TechDirect,以線上產生技術支援要求。
如需更多深入見解與資源,請加入 Dell 安全性社群論壇。
Additional Information
Videos
Affected Products
Dell EncryptionArticle Properties
Article Number: 000125171
Article Type: Solution
Last Modified: 20 dec 2022
Version: 12
Find answers to your questions from other Dell users
Support Services
Check if your device is covered by Support Services.